Disclosure: Some of the links below are affiliate links, meaning that at no additional cost to you, I will receive a commission if you click through and make a purchase. For more information, read our full affiliate disclosure here.
Canva is a go-to designing tool for everyone now. It’s easy to use, has tons of amazing features and the best part is it’s FREE. And I know you too, use Canva every now and then but wait, do you sometimes get messed up, frustrated, take more time than usual, or worse, accidentally loses your designs. I understand, with this many features provided by Canva, it can get a little too overwhelming and cause resistance in your work. But don’t worry. I have one single answer to all your problems and that is, GET ORGANIZED. I know you’ve heard this before or perhaps even tried to get it, but didn’t exactly reached your goal. And that is why this tutorial is designed to guide you on how exactly you can stay organized in Canva in the easiest way possible.
How to Stay Organized in Canva
1. Use The Folder Feature (Method 1)
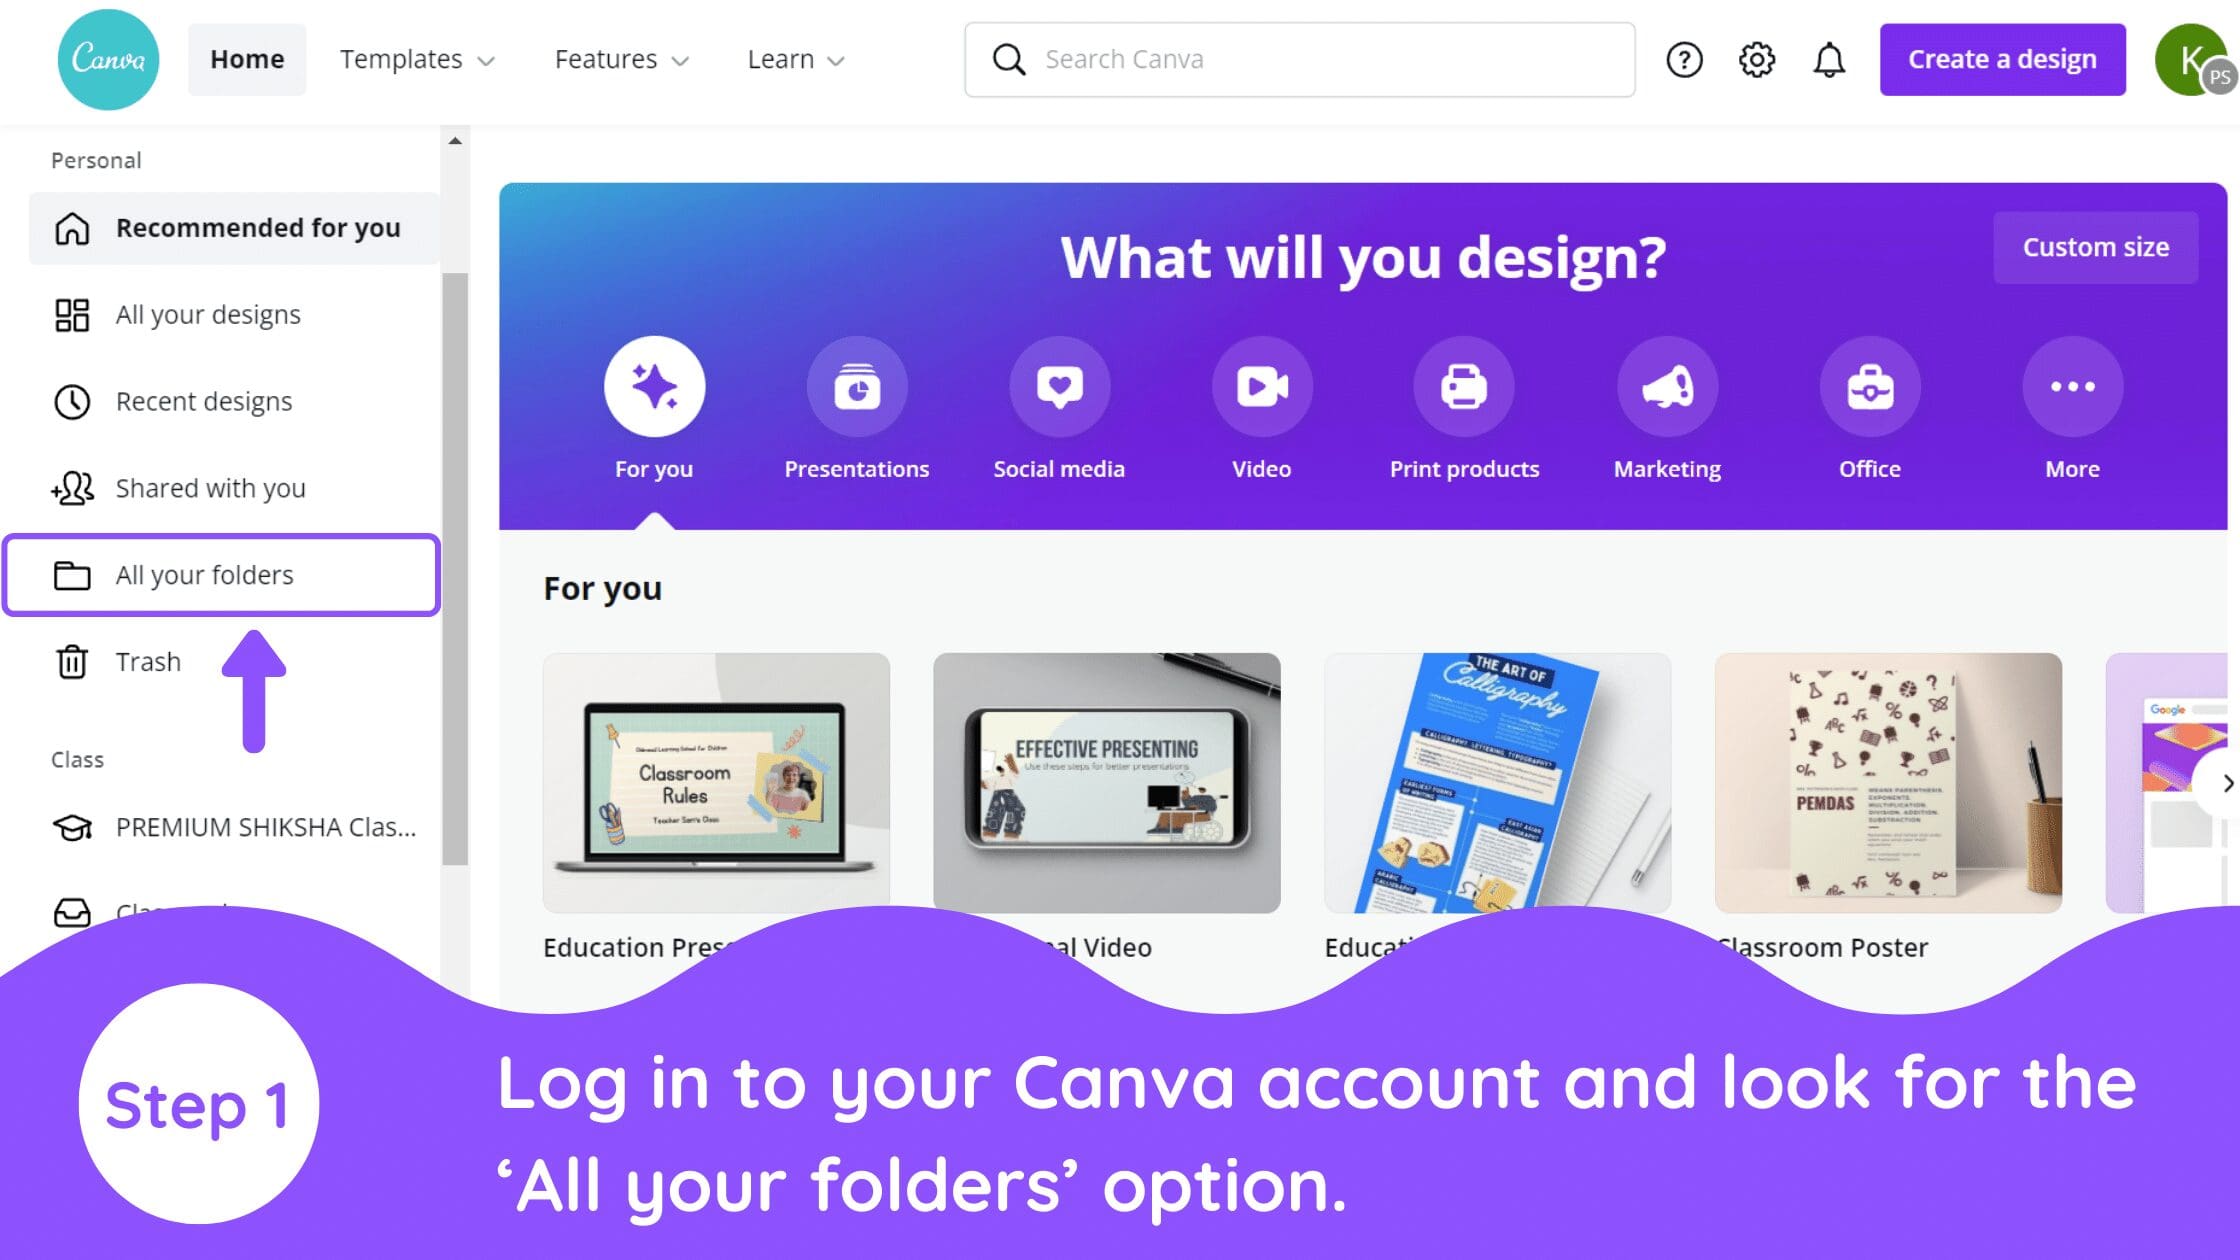
Log in to your Canva account and look for the ‘All your folders’ option present in the left corner of your screen and click on it.
2. Create a New Folder
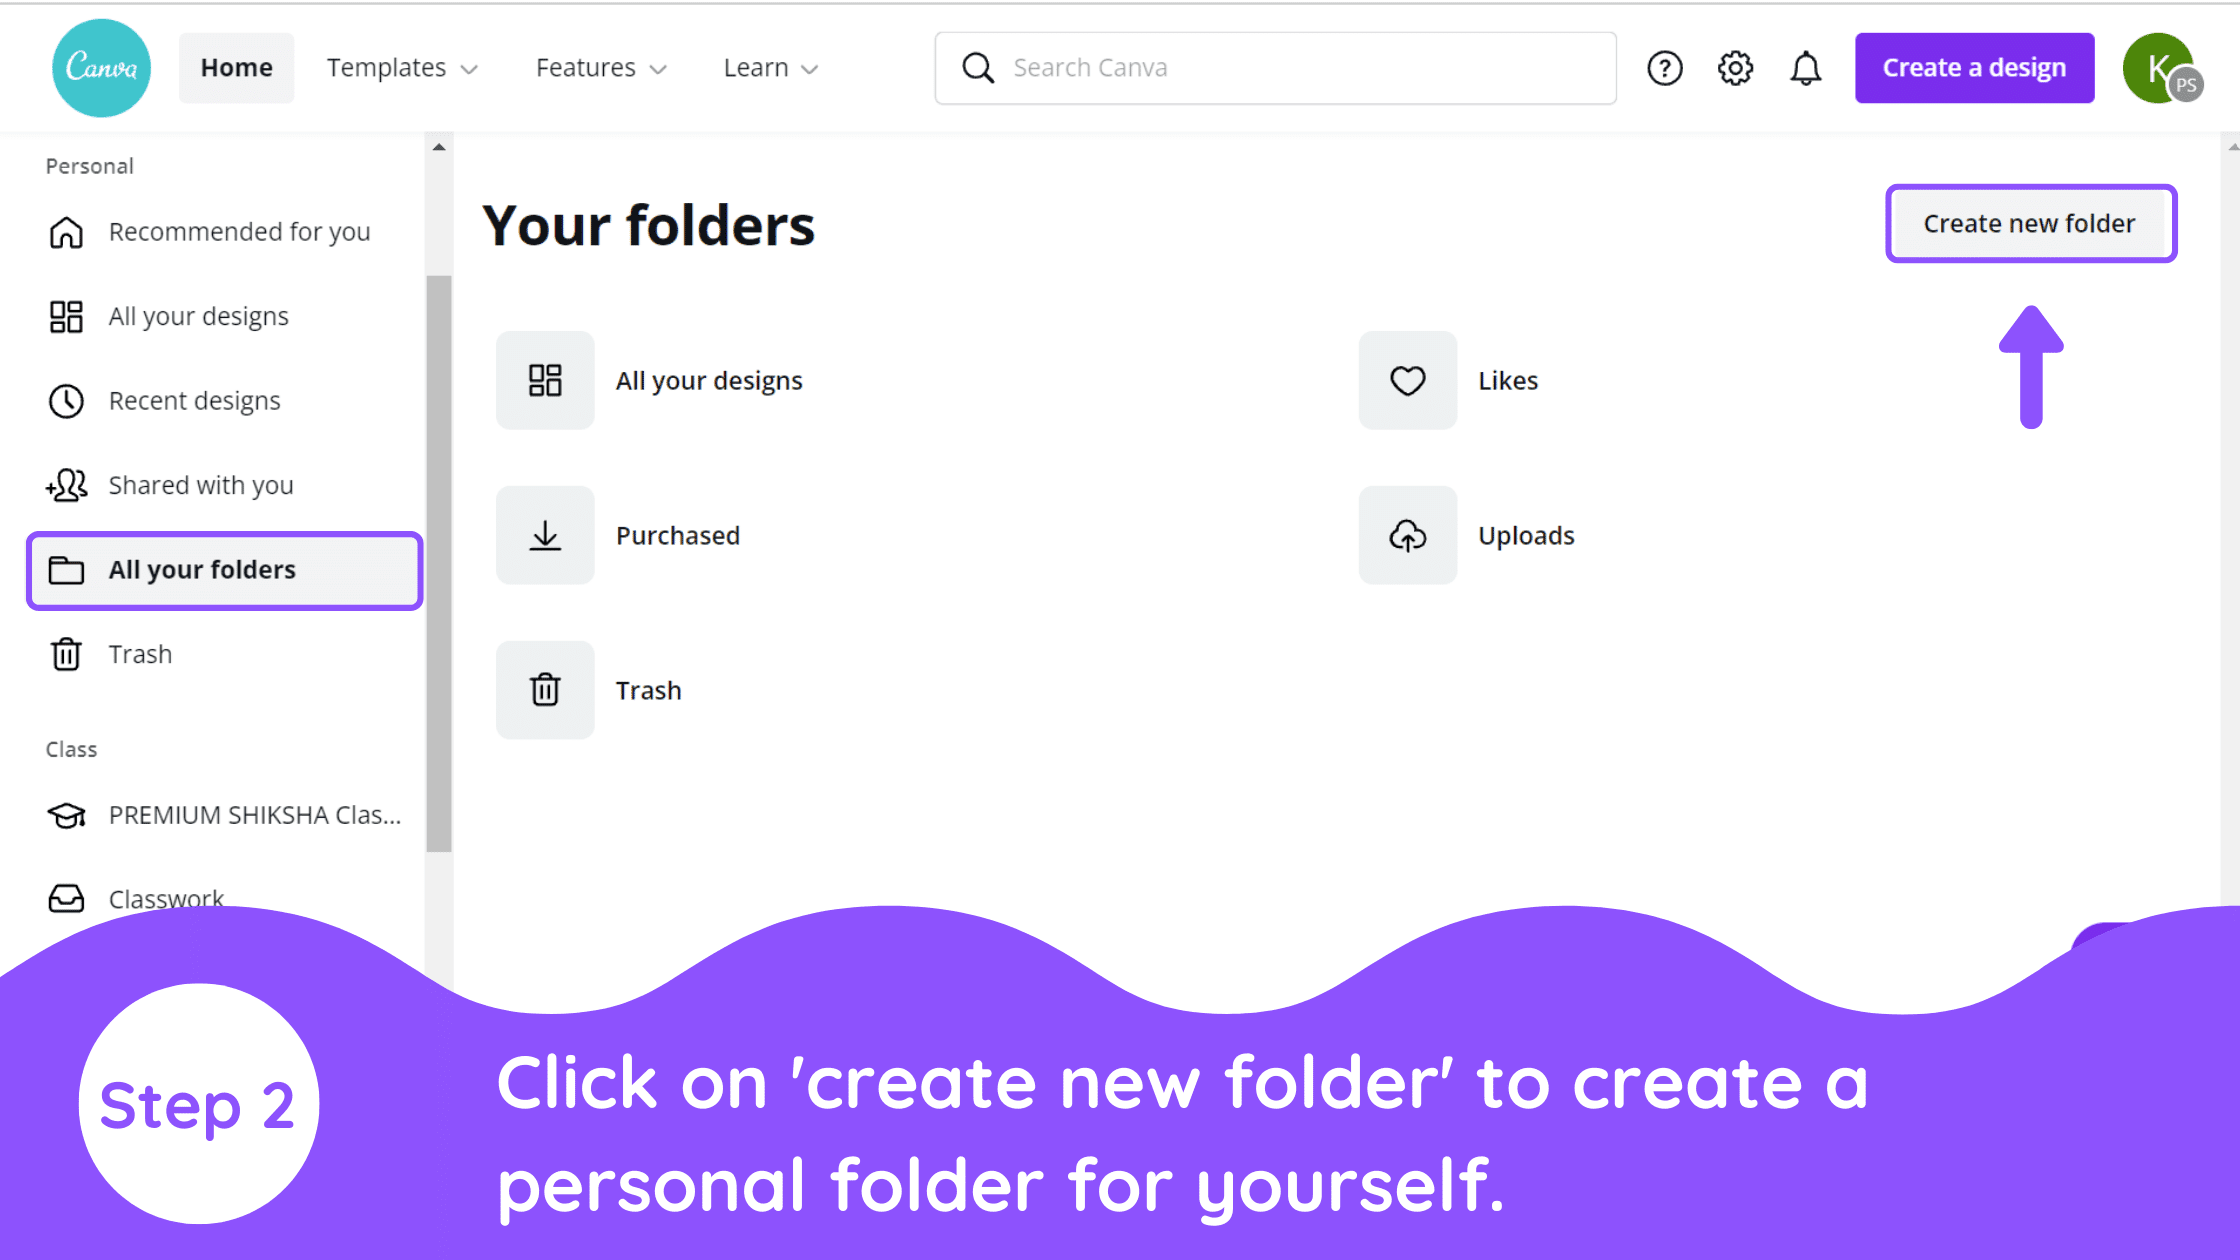
Once you enter the ‘All your folders’ page you will see a ‘Create new folder’ option present on the top right corner of your screen. Click on it to create a personal folder for yourself.
3. Name Your Folder
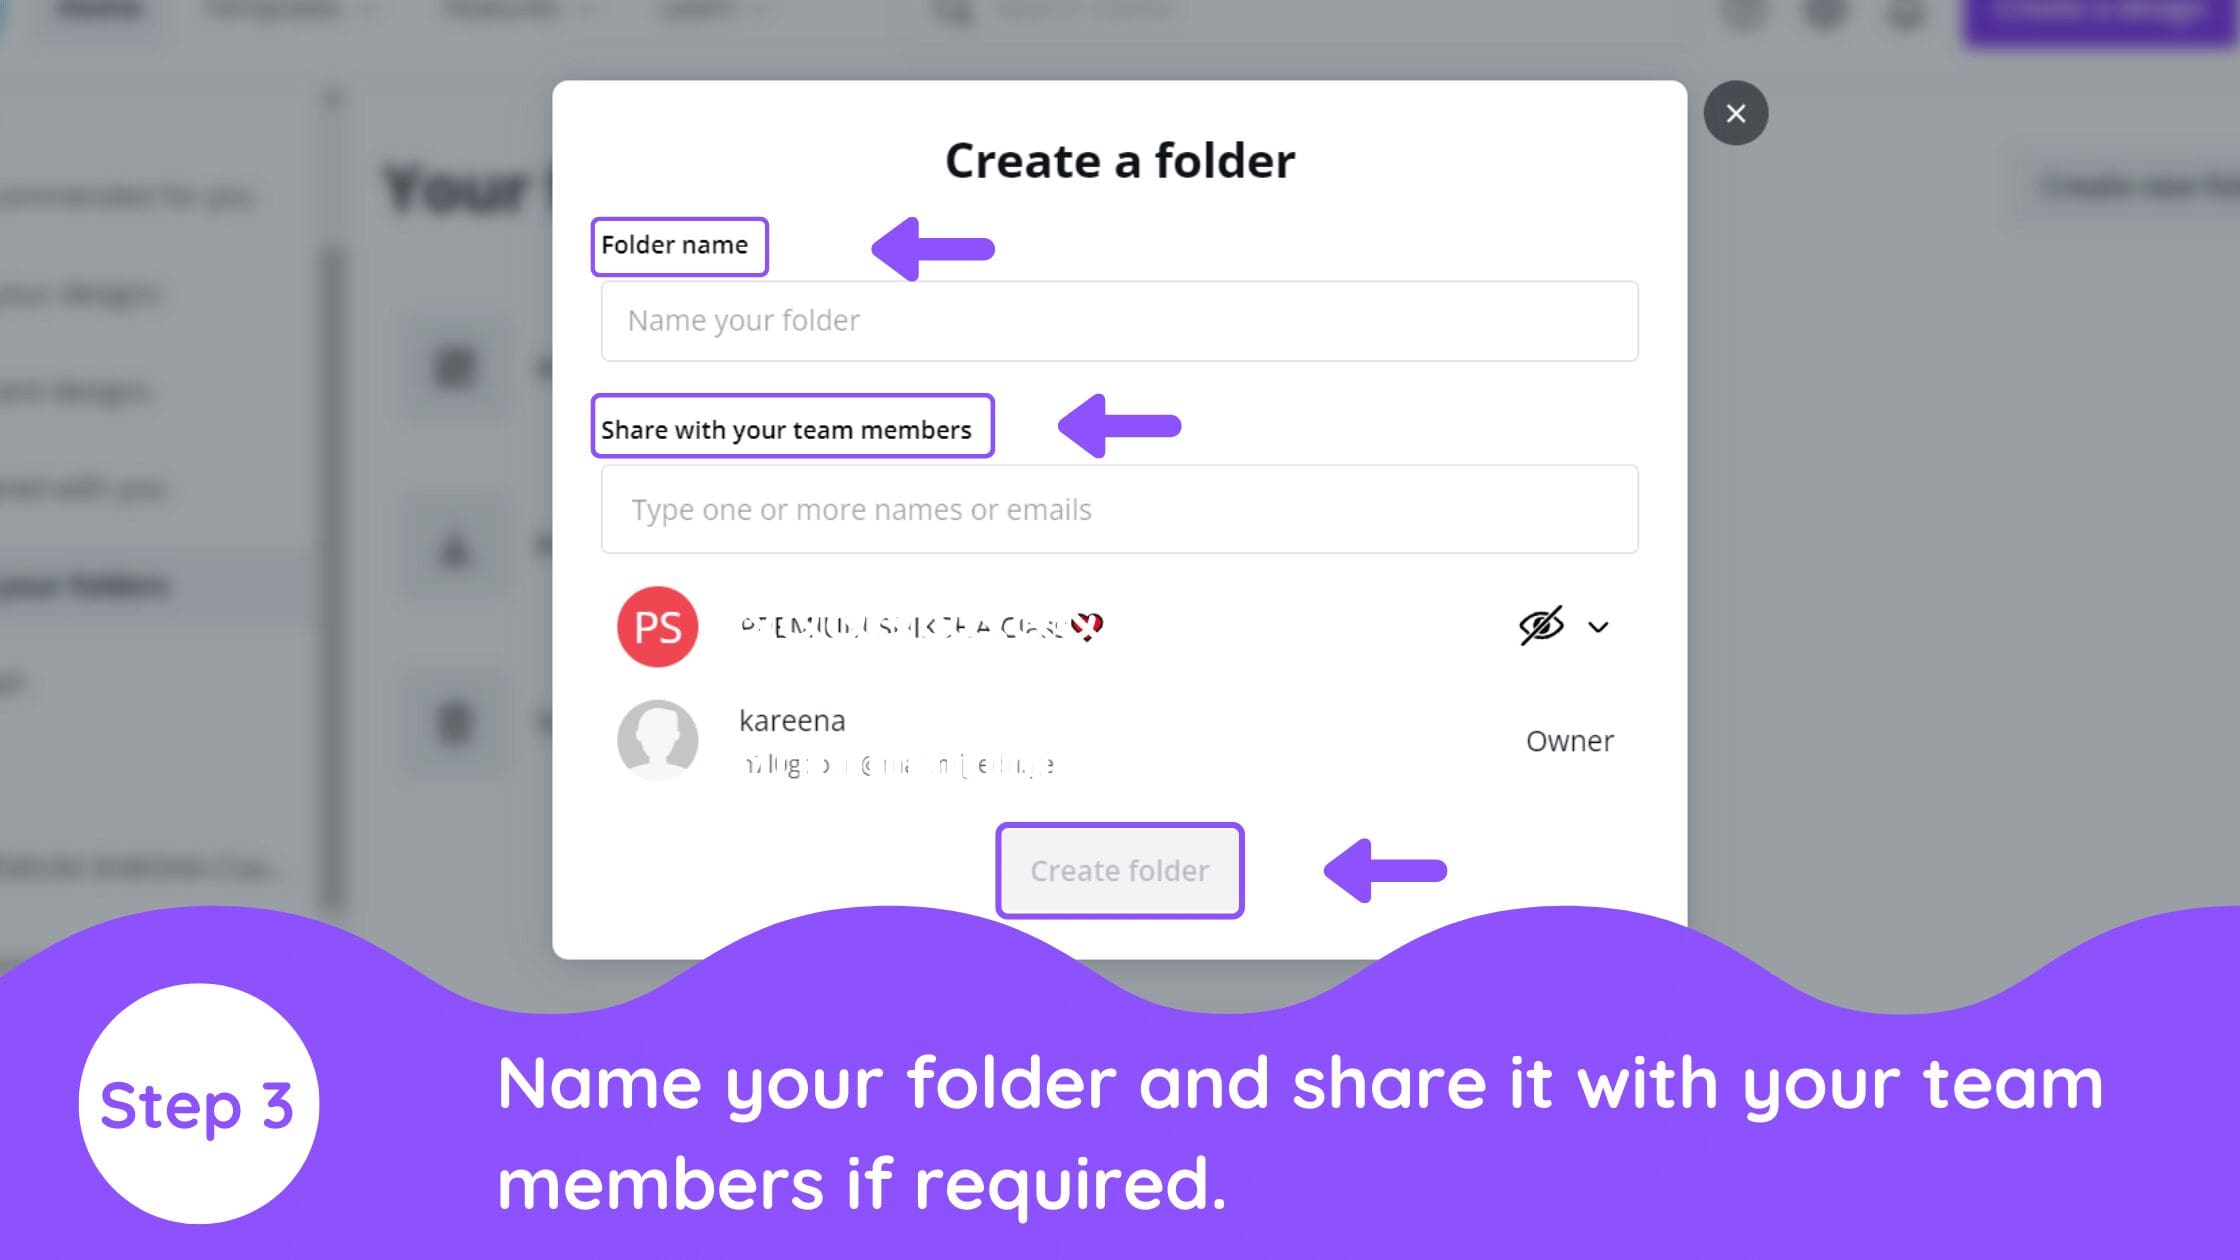
After clicking on ‘create a new folder’ you will get such a prompt. Here, you can name your folder and even share with your team members by clicking their respective name.
4. Upload Pictures in Your Folder
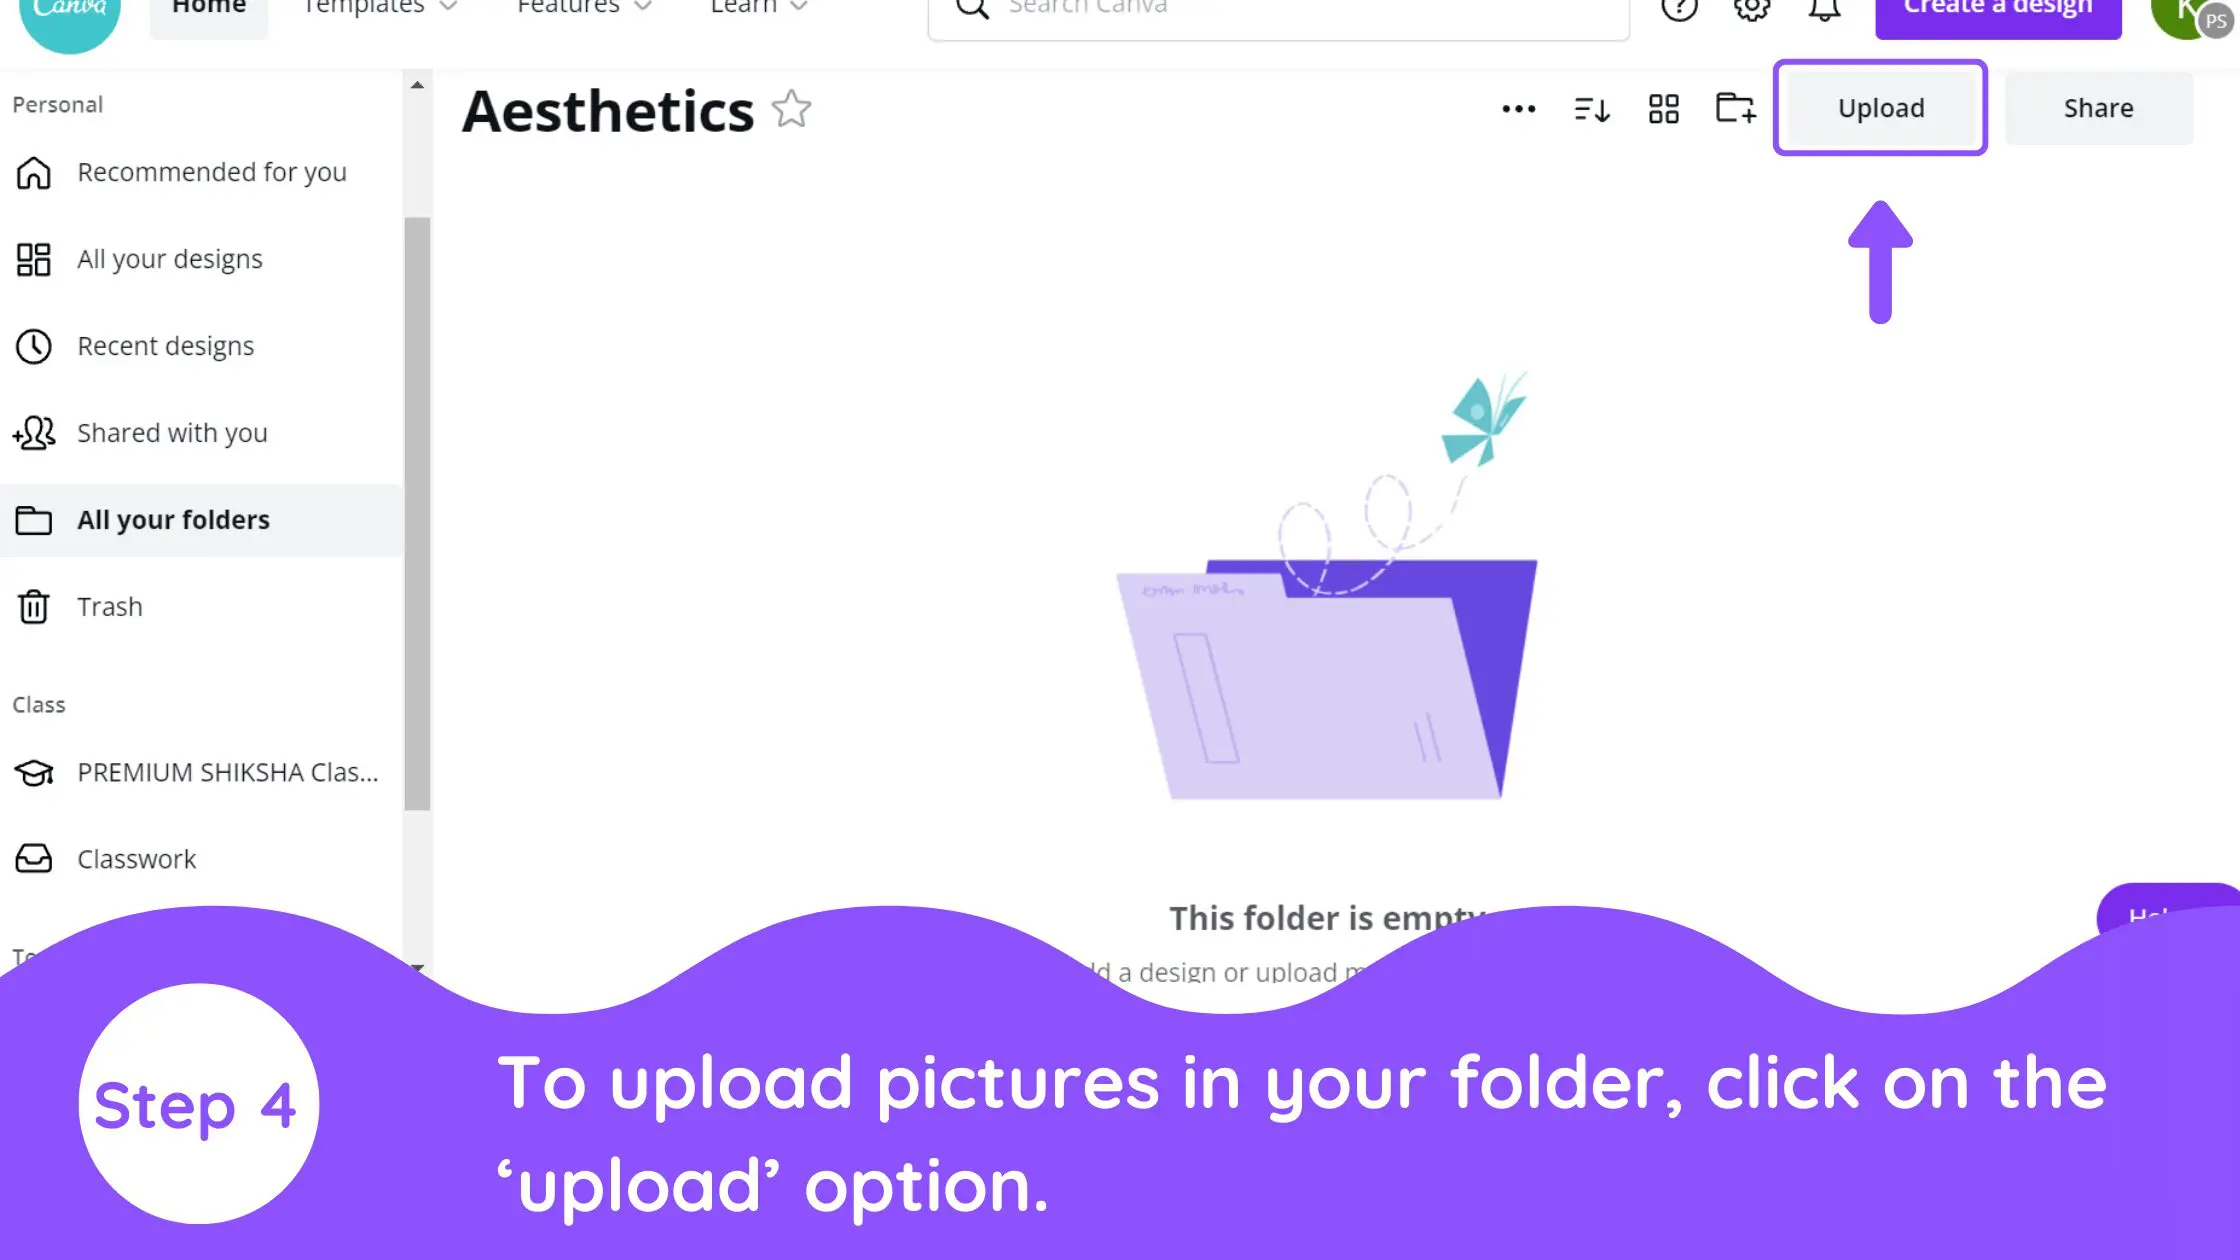
After creating your folder, you get your free space where you can put all the items you may need in the future. To upload pictures in your folder, click on the ‘upload’ option present in the top right corner of your screen.
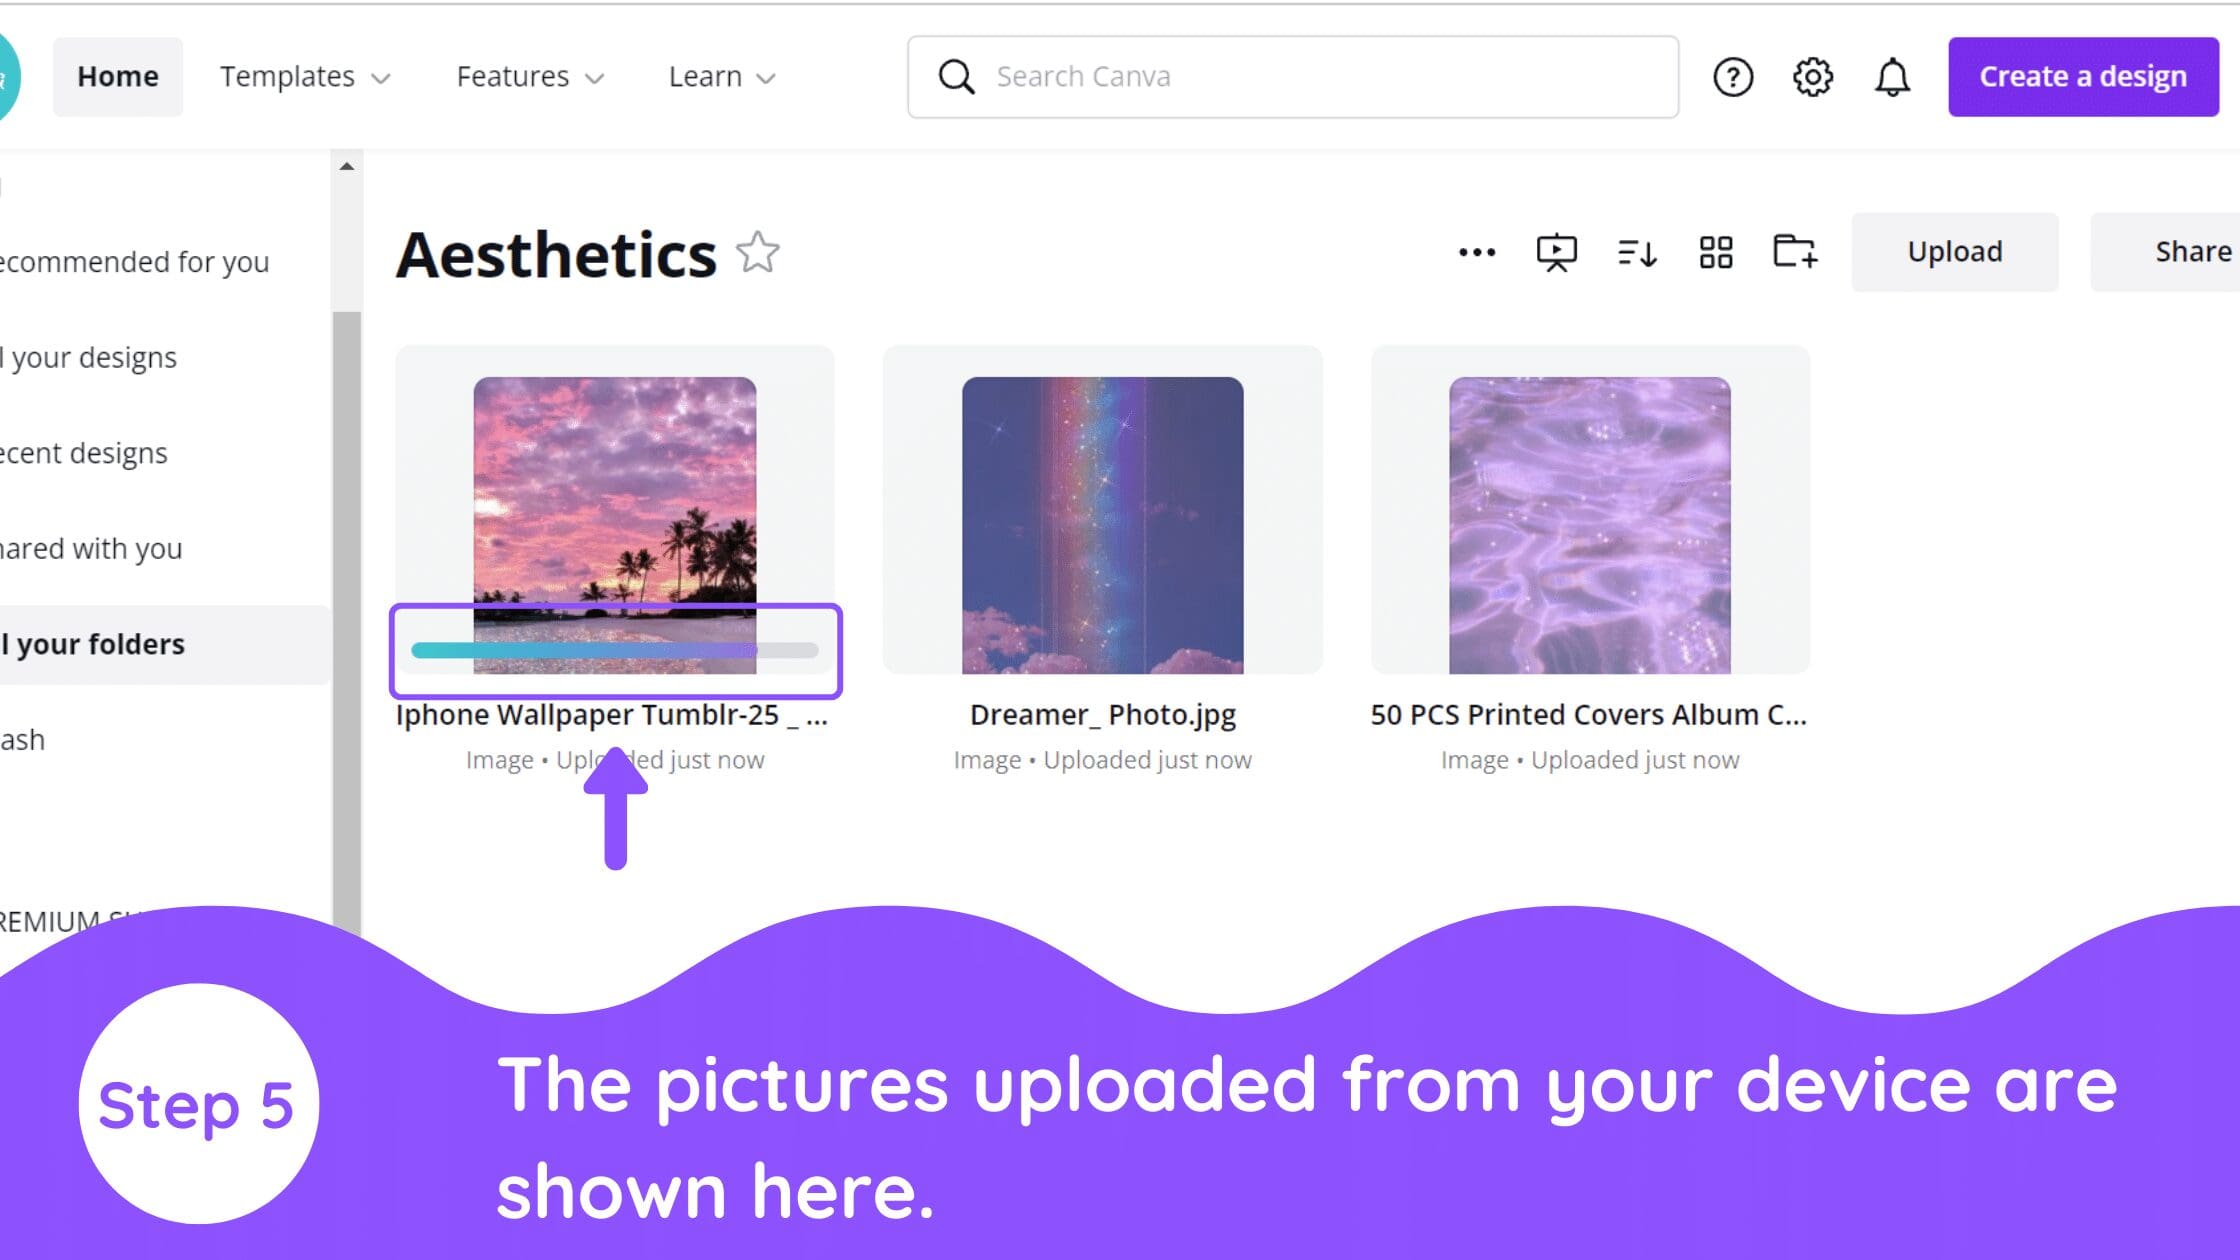
5. Uploading
After clicking the upload option you will be able to upload your pictures directly from your device. The pictures being upload is shown here.
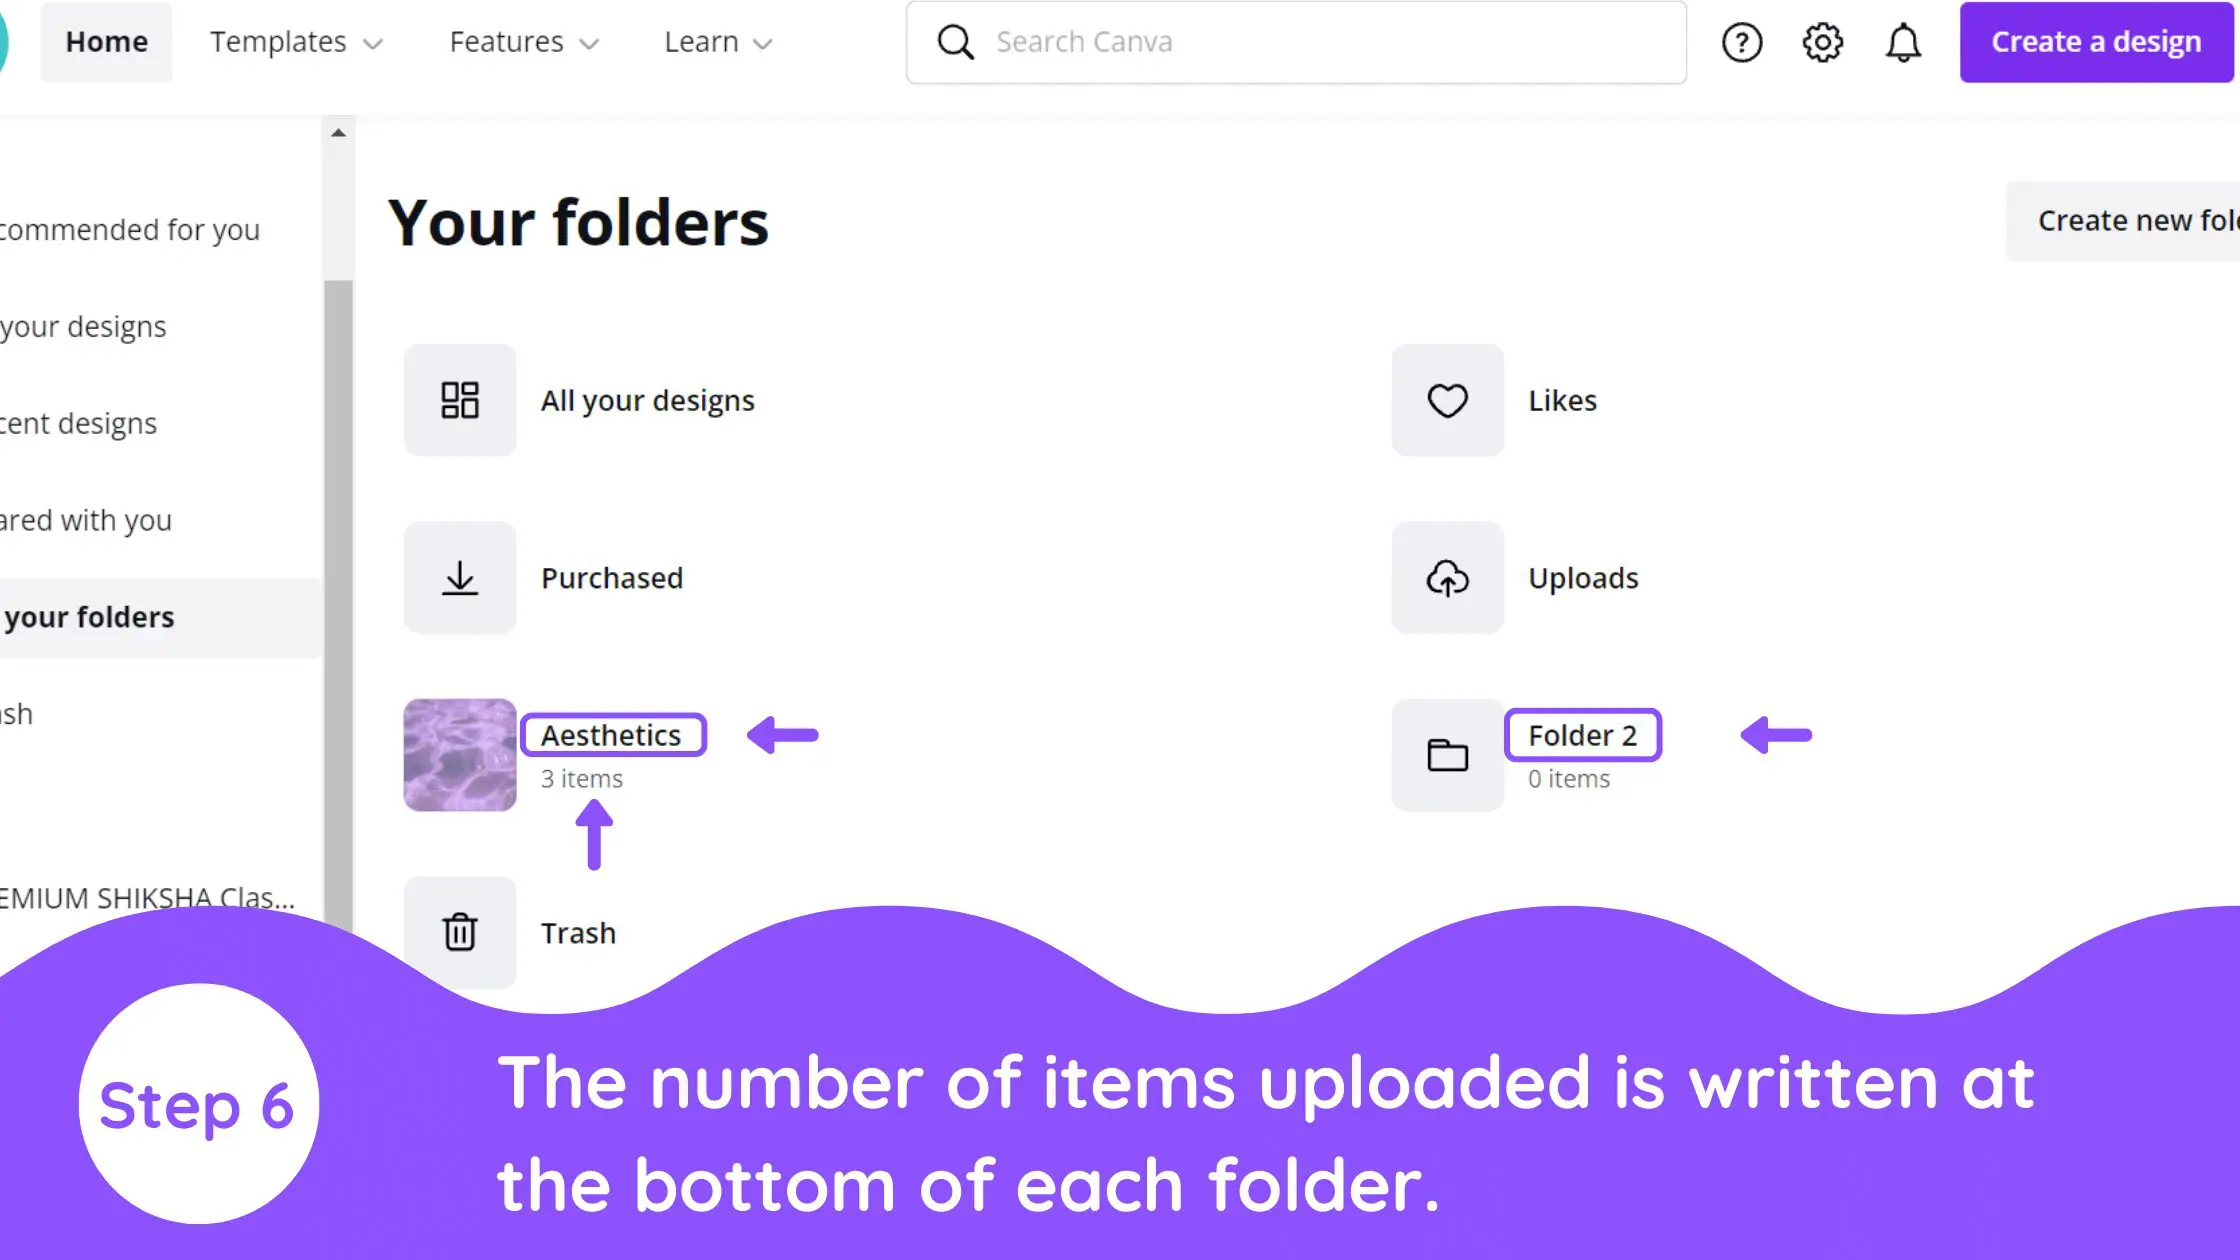
6. Review Your Folders
The number of items uploaded is written at the bottom of each folder. Here we have 2 folders, one with 3 items named aesthetics and the other with 0 items called folder 2.
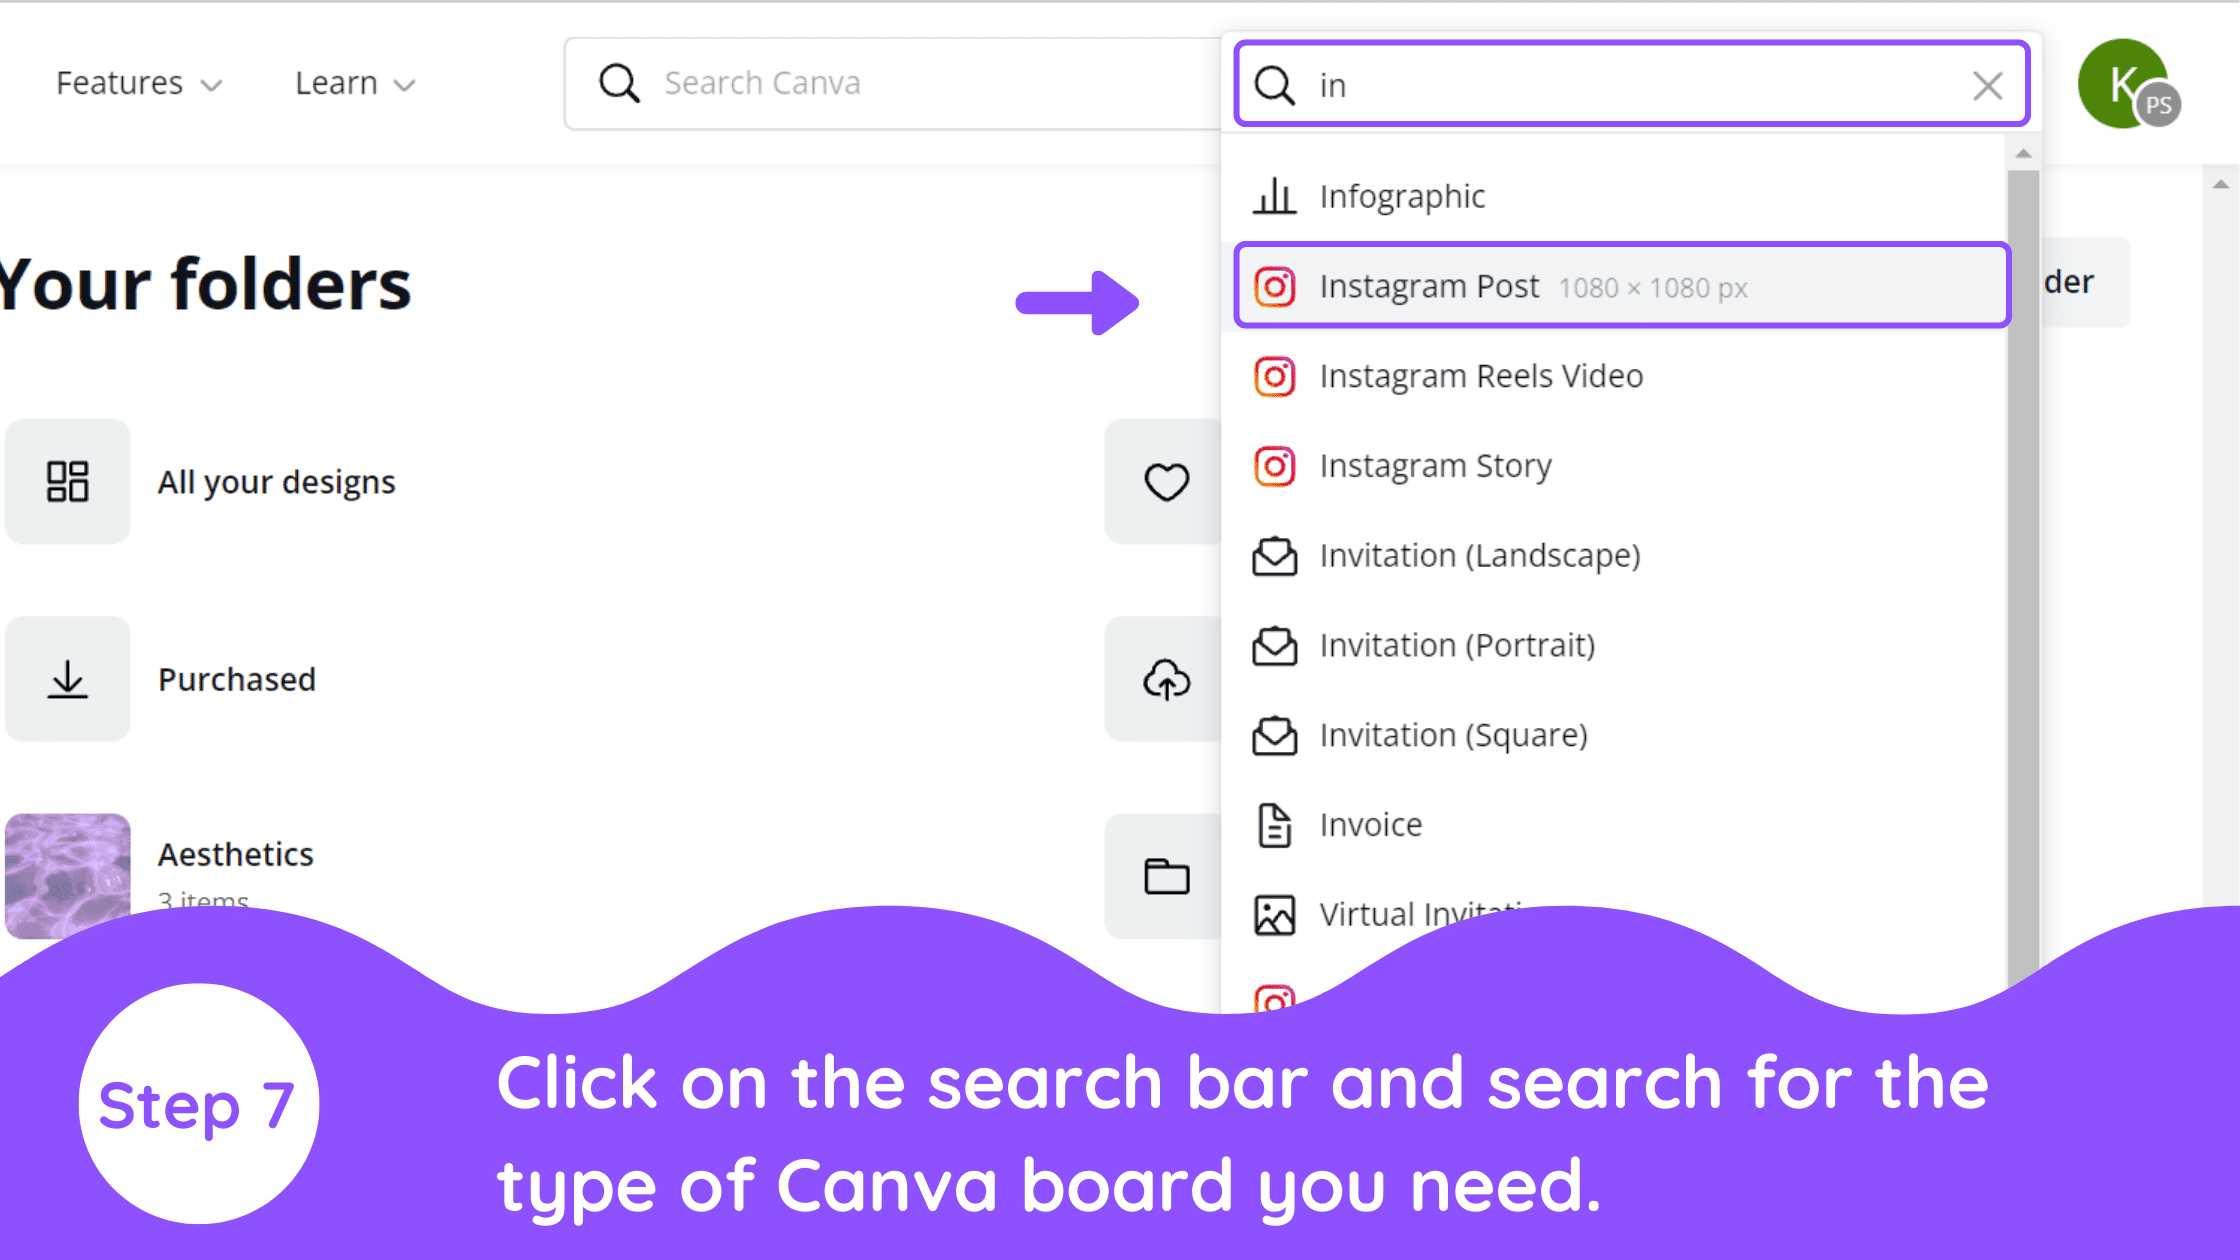
7. Organize Designs to Use Later
Click on the search bar and search for the type of Canva board you need.
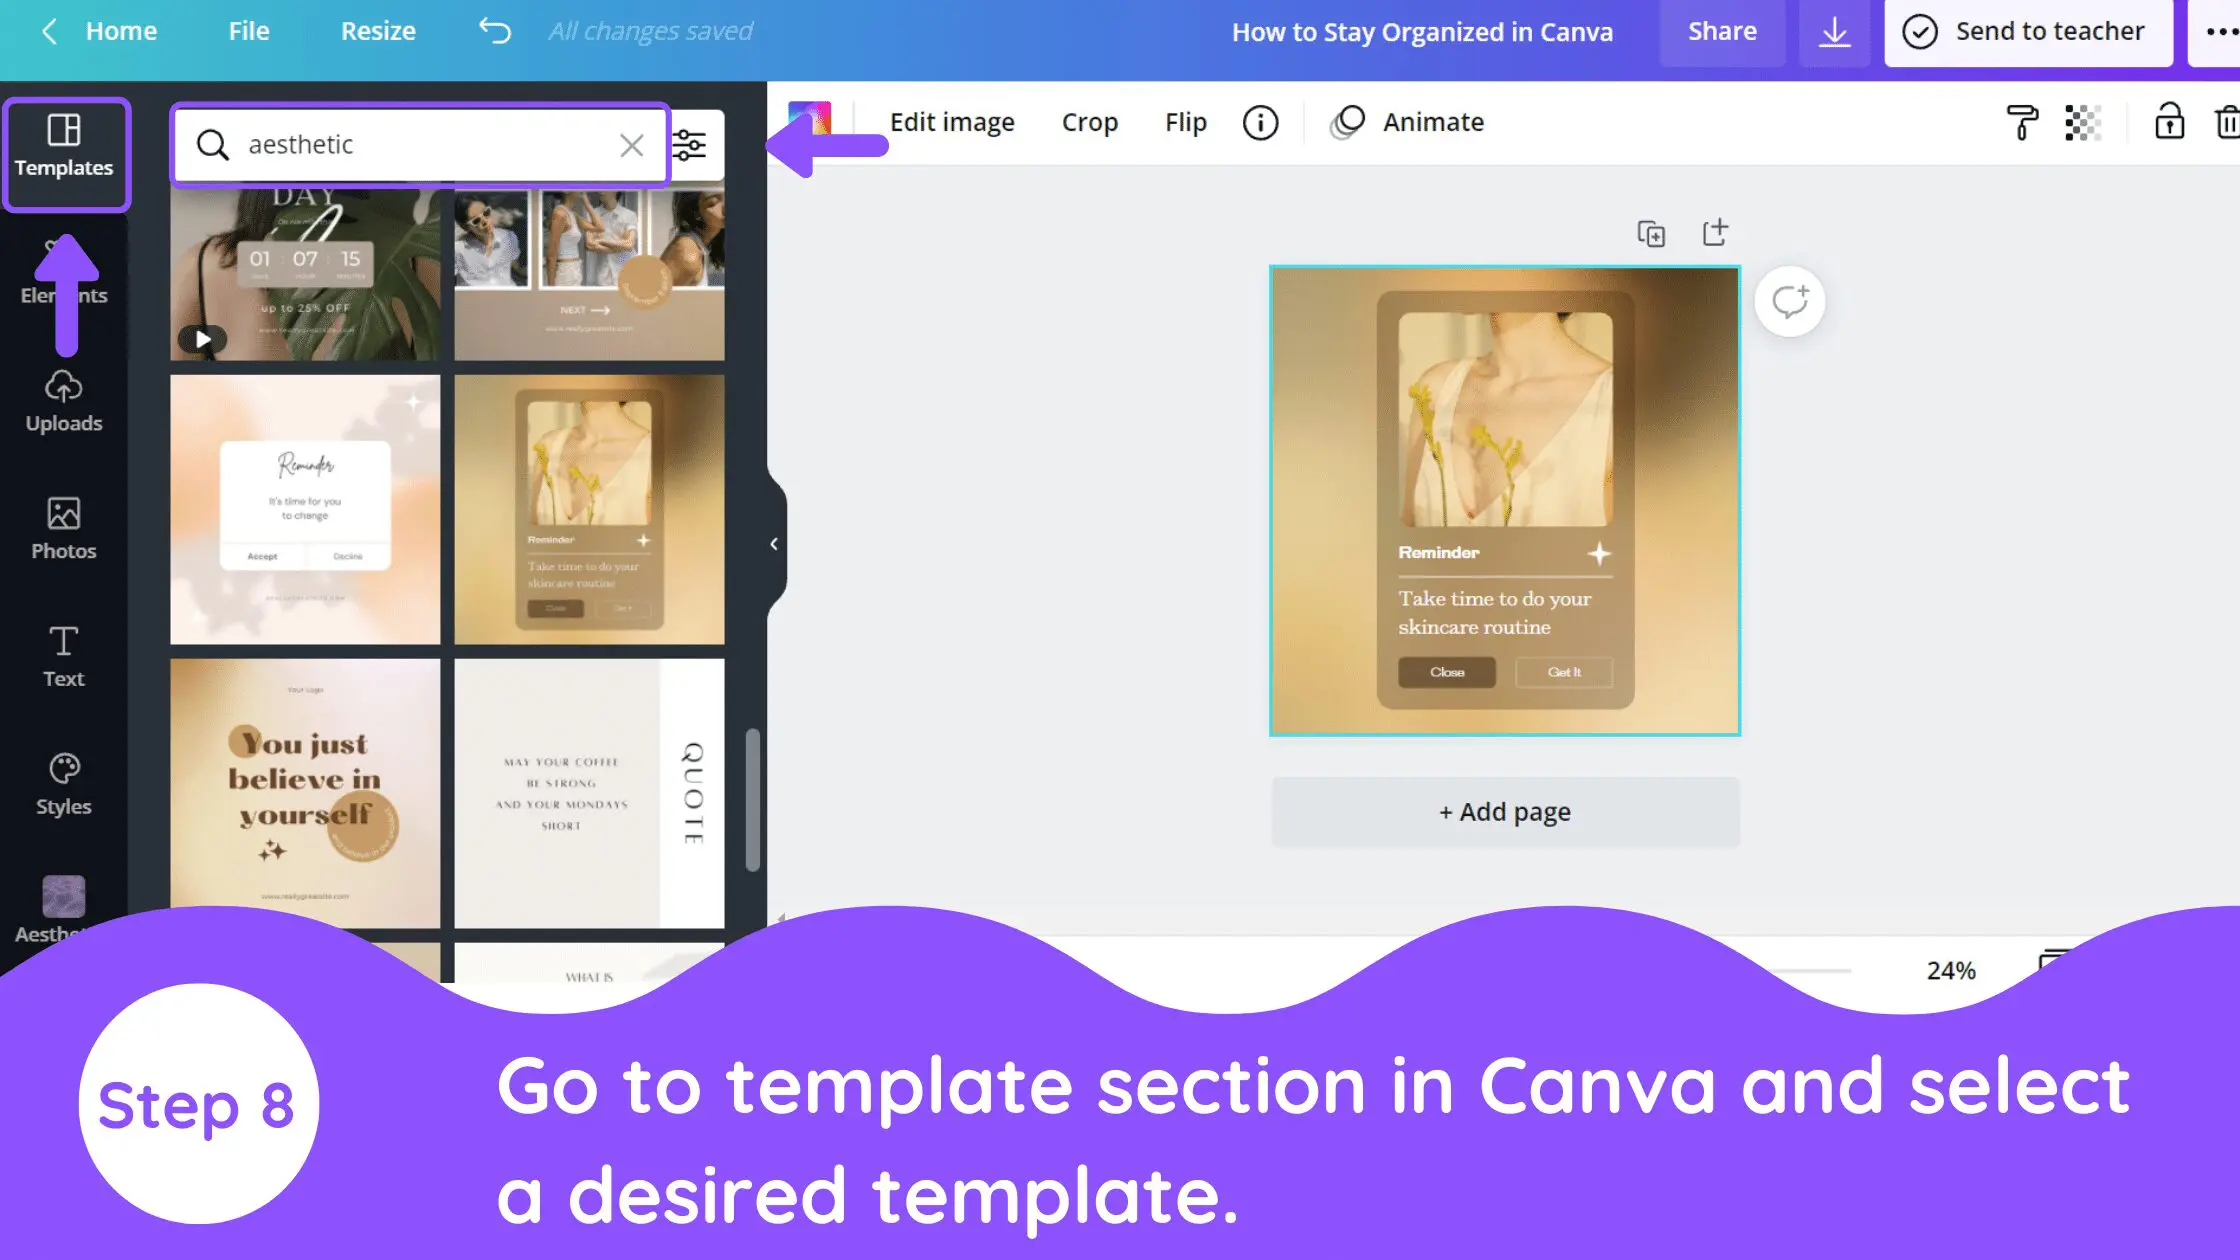
8. Select Template
Go to the template section in Canva and select the desired template.
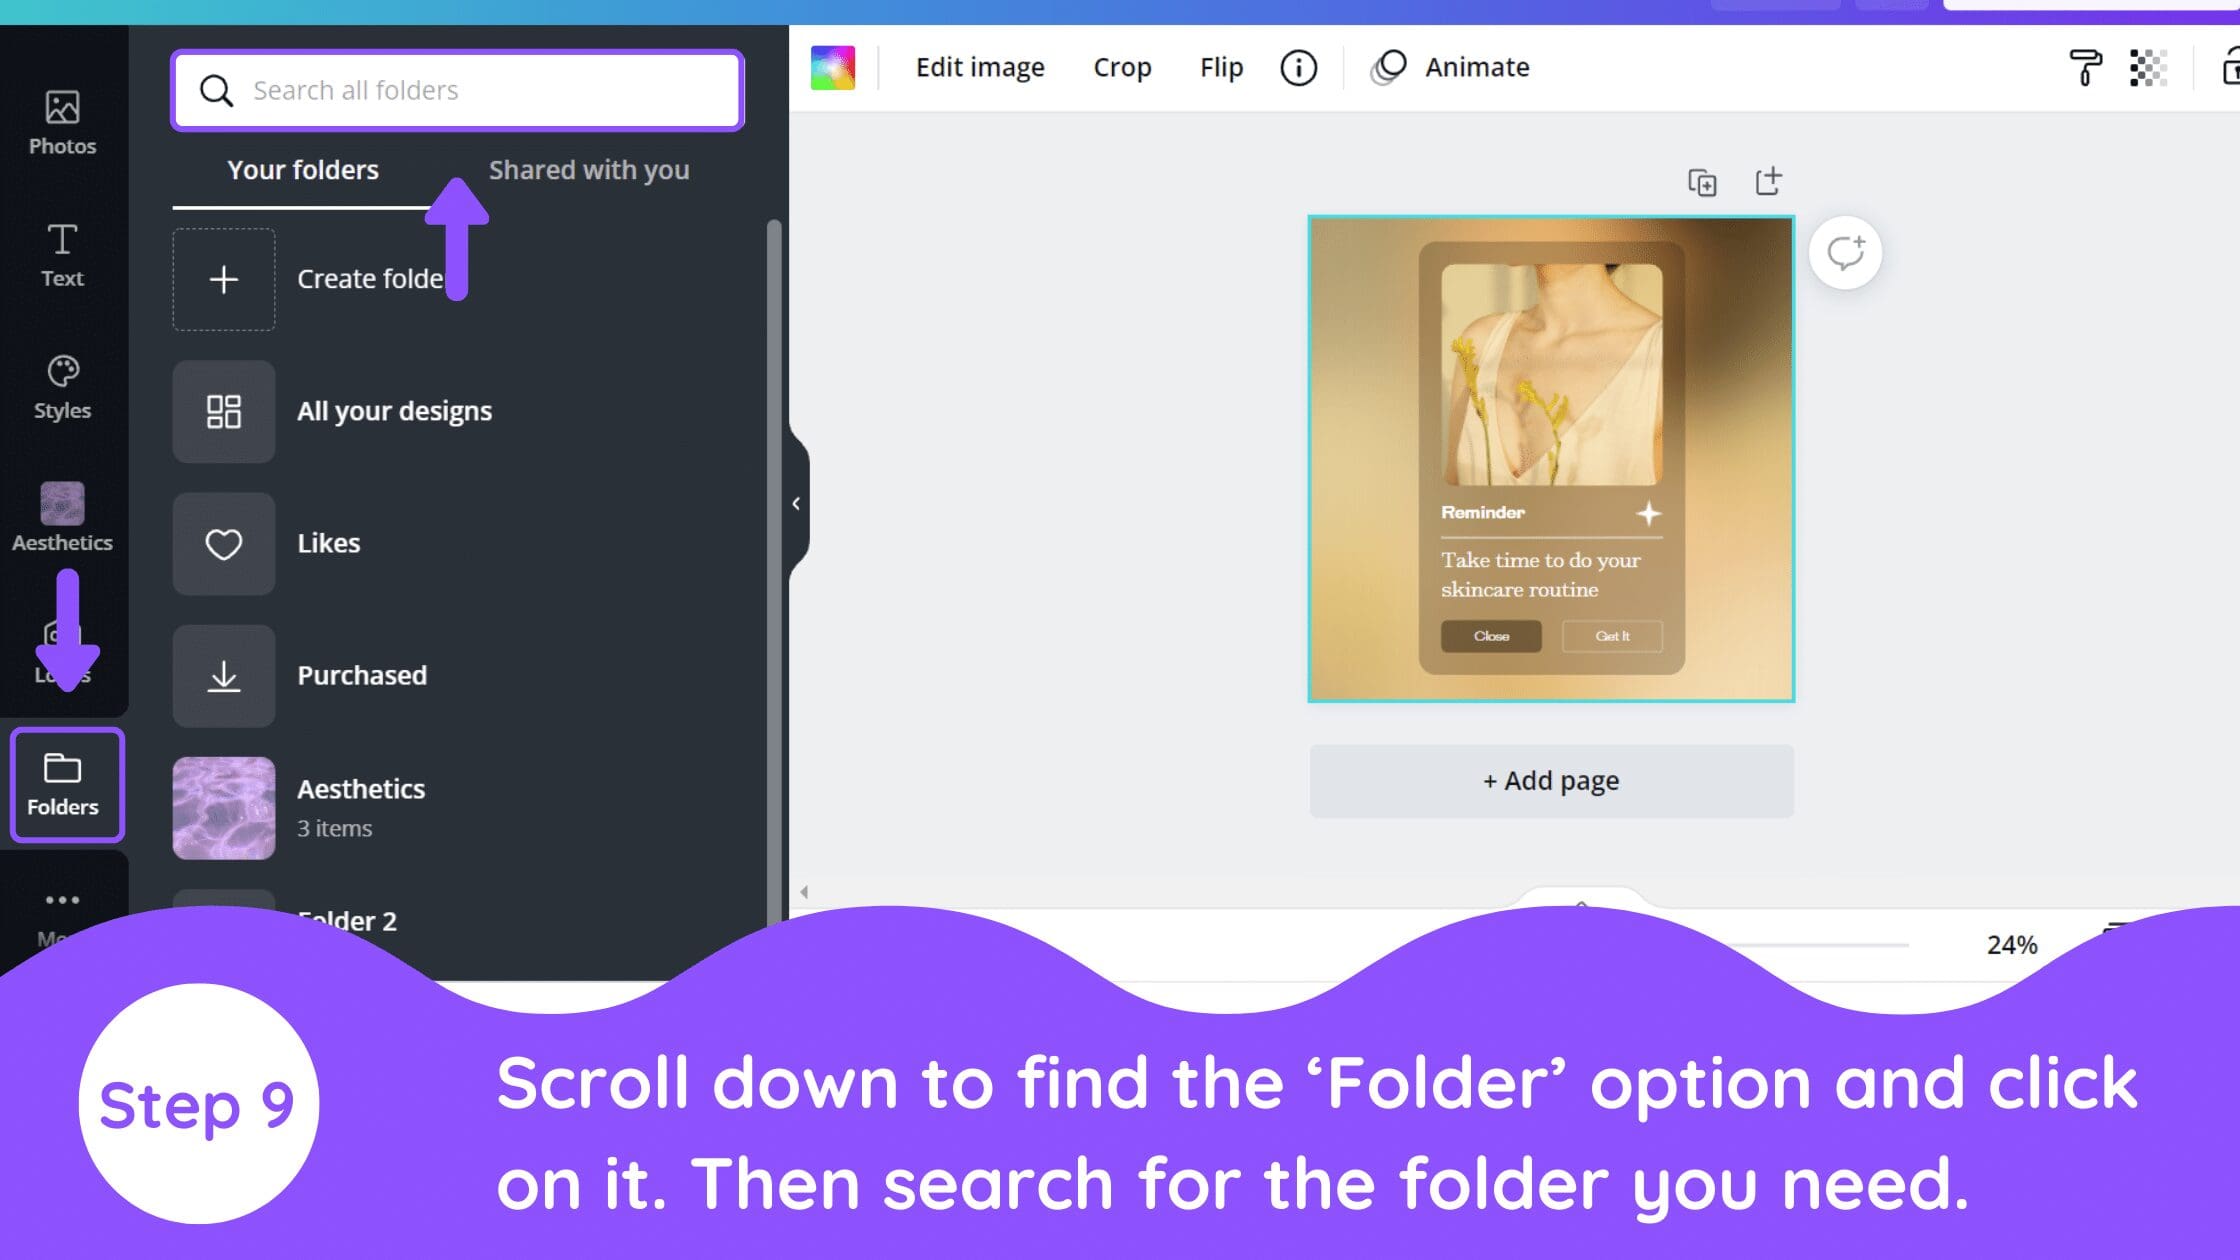
9. Search Uploaded Pictures in Your Folder
Scroll down and you will find a ‘Folder’ option below other options like ‘Text’, ‘Template’, ‘Element’ etc. Click on the ‘folder’ option.
Tip – In case you couldn’t find it, select the last option which says ‘More’ and there you may get your folder option in Canva.
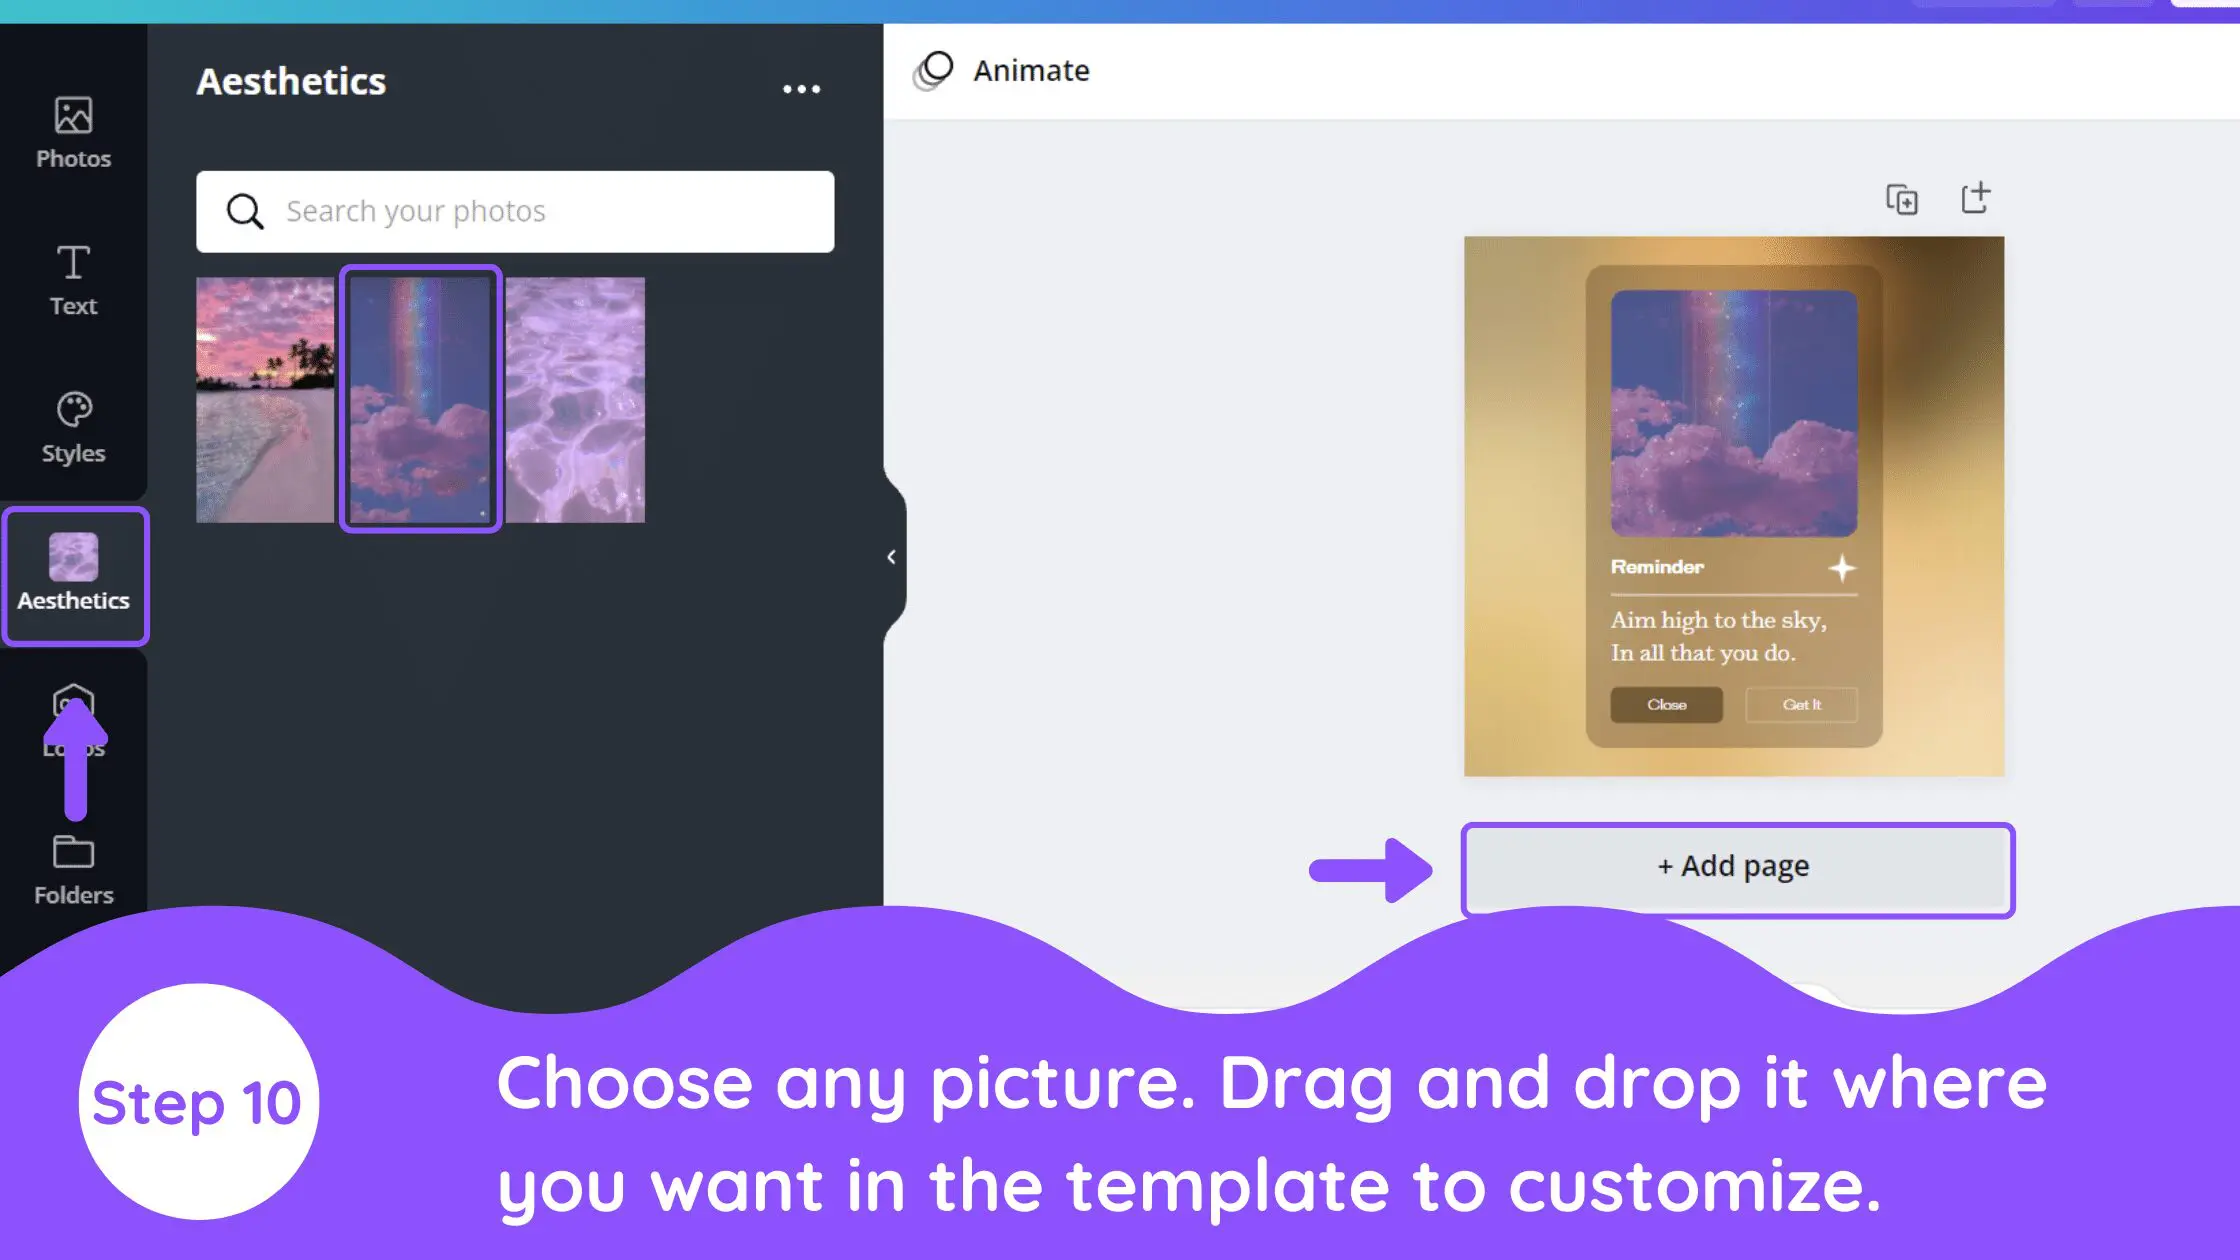
10. Customize Templates
Once you get into the ‘folder’ option, find the recently created folder of yours and click on it. You will find the pictures you uploaded there. Now choose any picture from it. Drag and drop it where you want in the template to customize it.
Click on ‘Add a page’ below your existing page to create more such customizable designs/template
Tip – To customize the template, even more, change the text, font, color, etc.
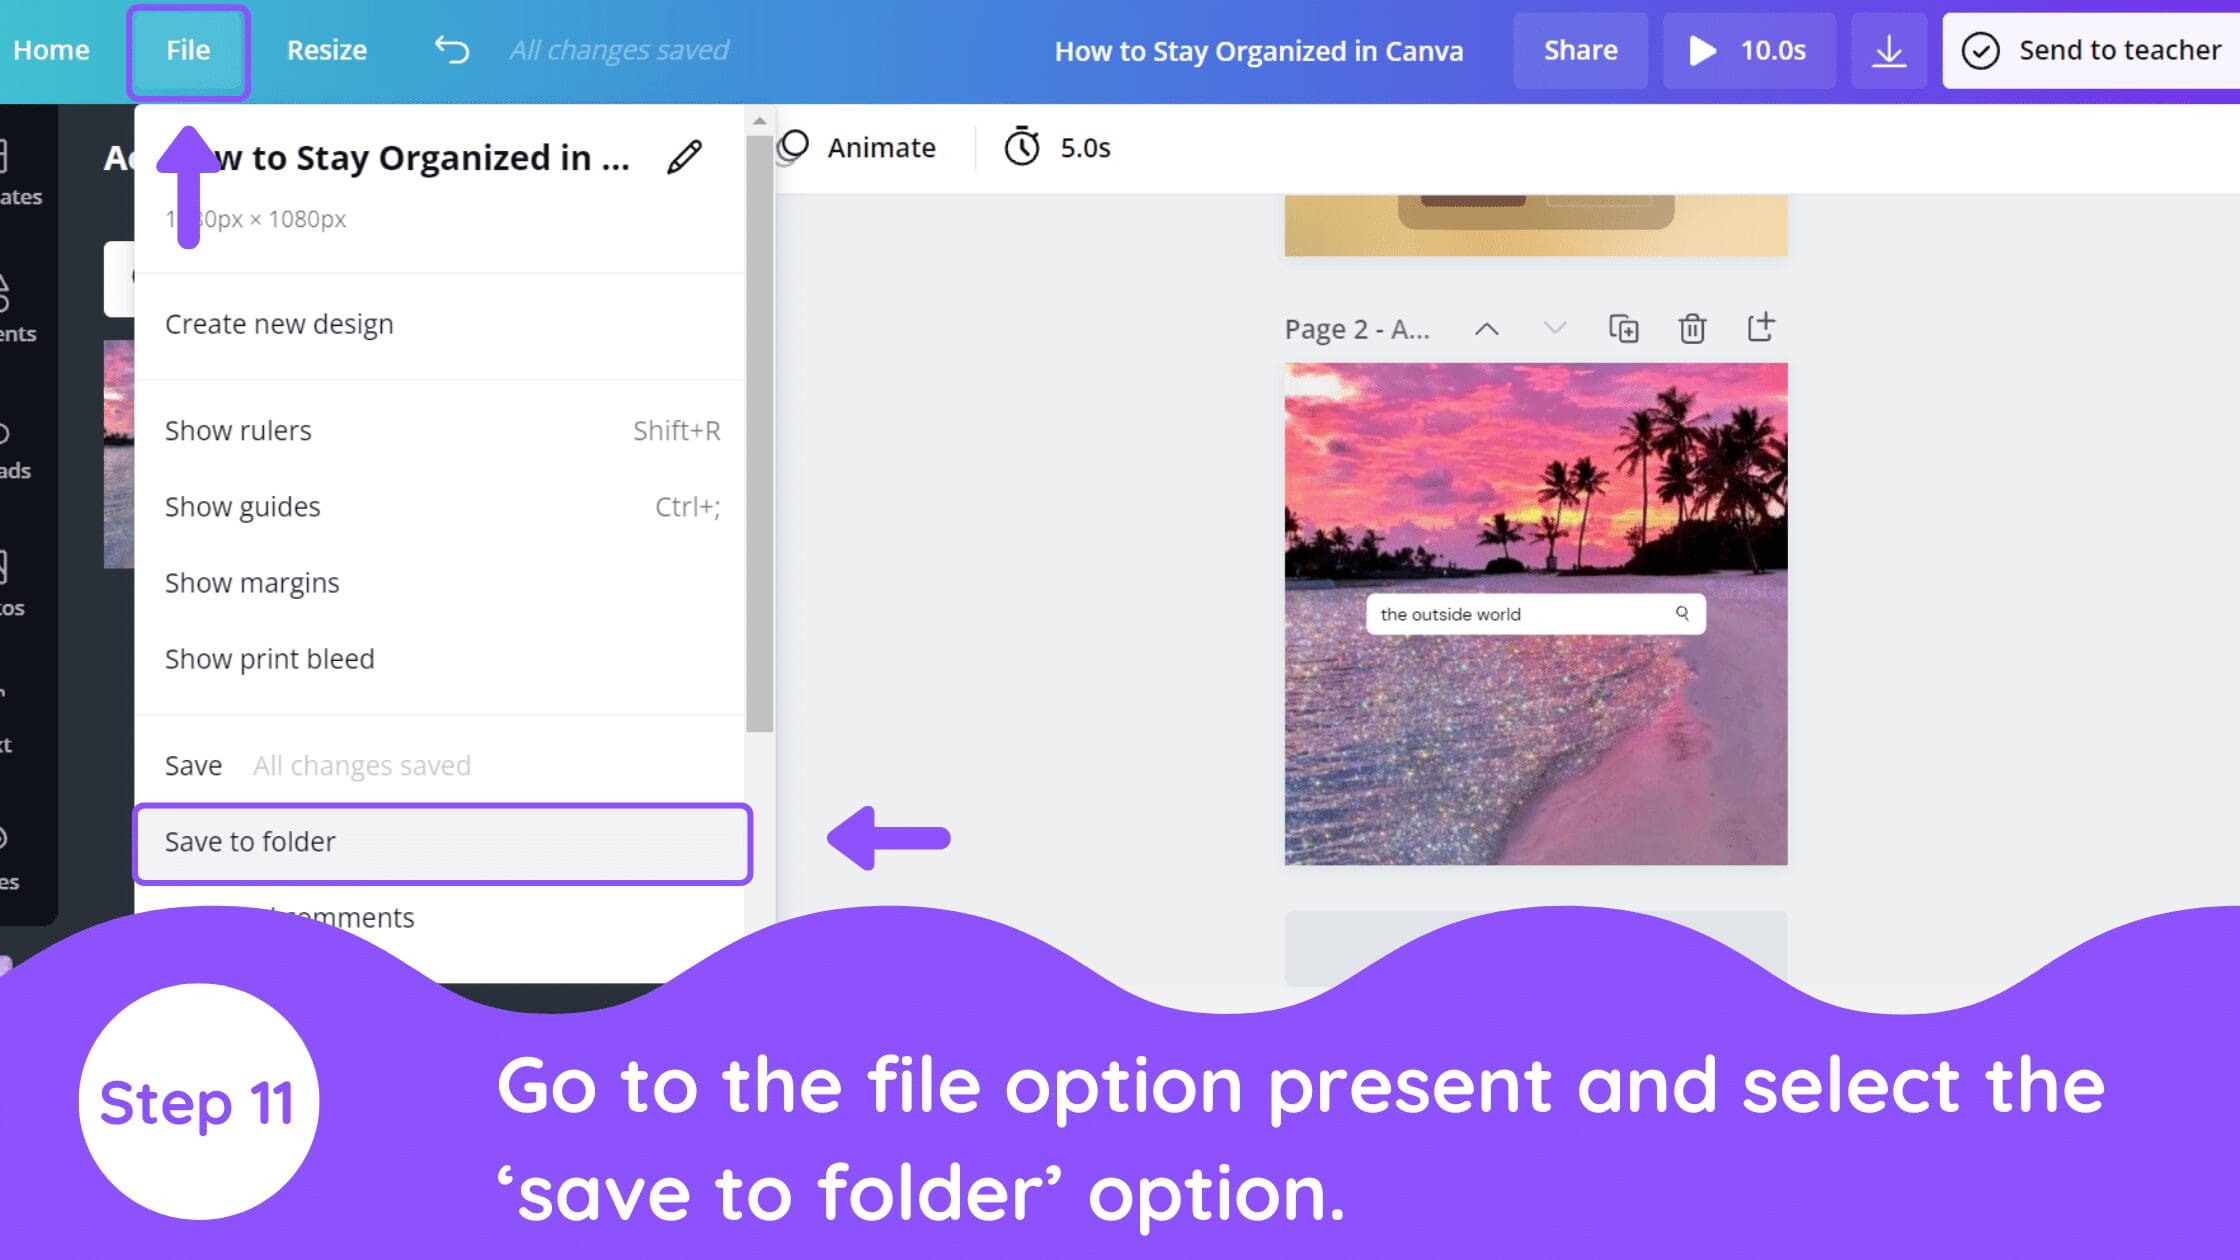
11. Save Design
Once done customizing your templates, it’s time to save and use them later. Go to the file option present above and select the ‘save to folder’ option.
12. Decide Location
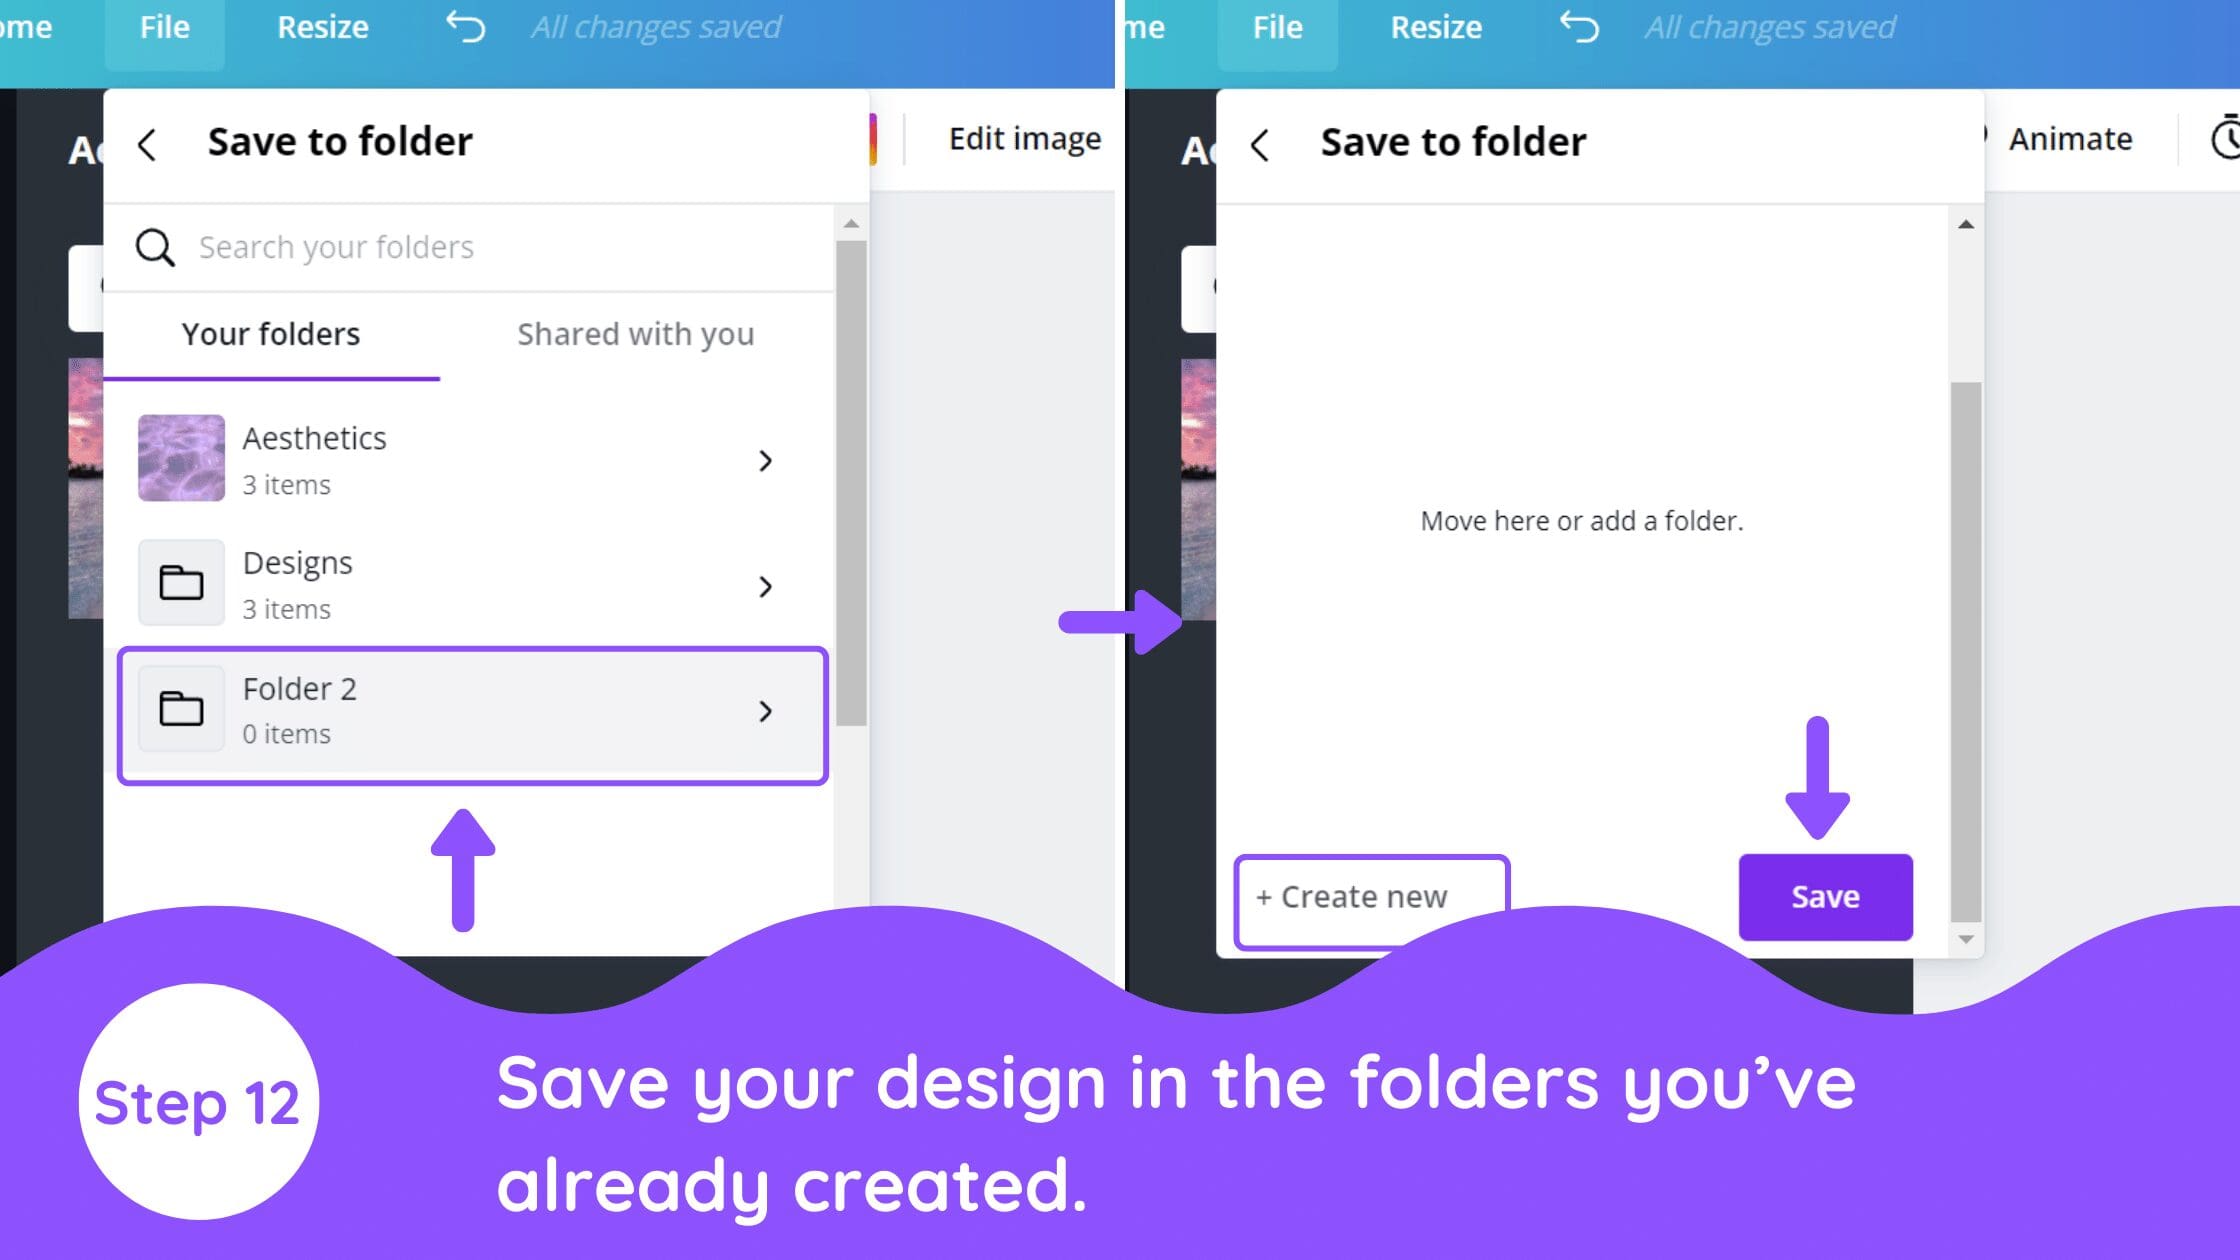
You can save your design in the folders you’ve already created. Just click on the desired folder and scroll down. You will find two options either you can create a separate folder for it inside the parent folder your you can directly save it inside the parent folder. The choice is yours.
13. Check the Saved Design
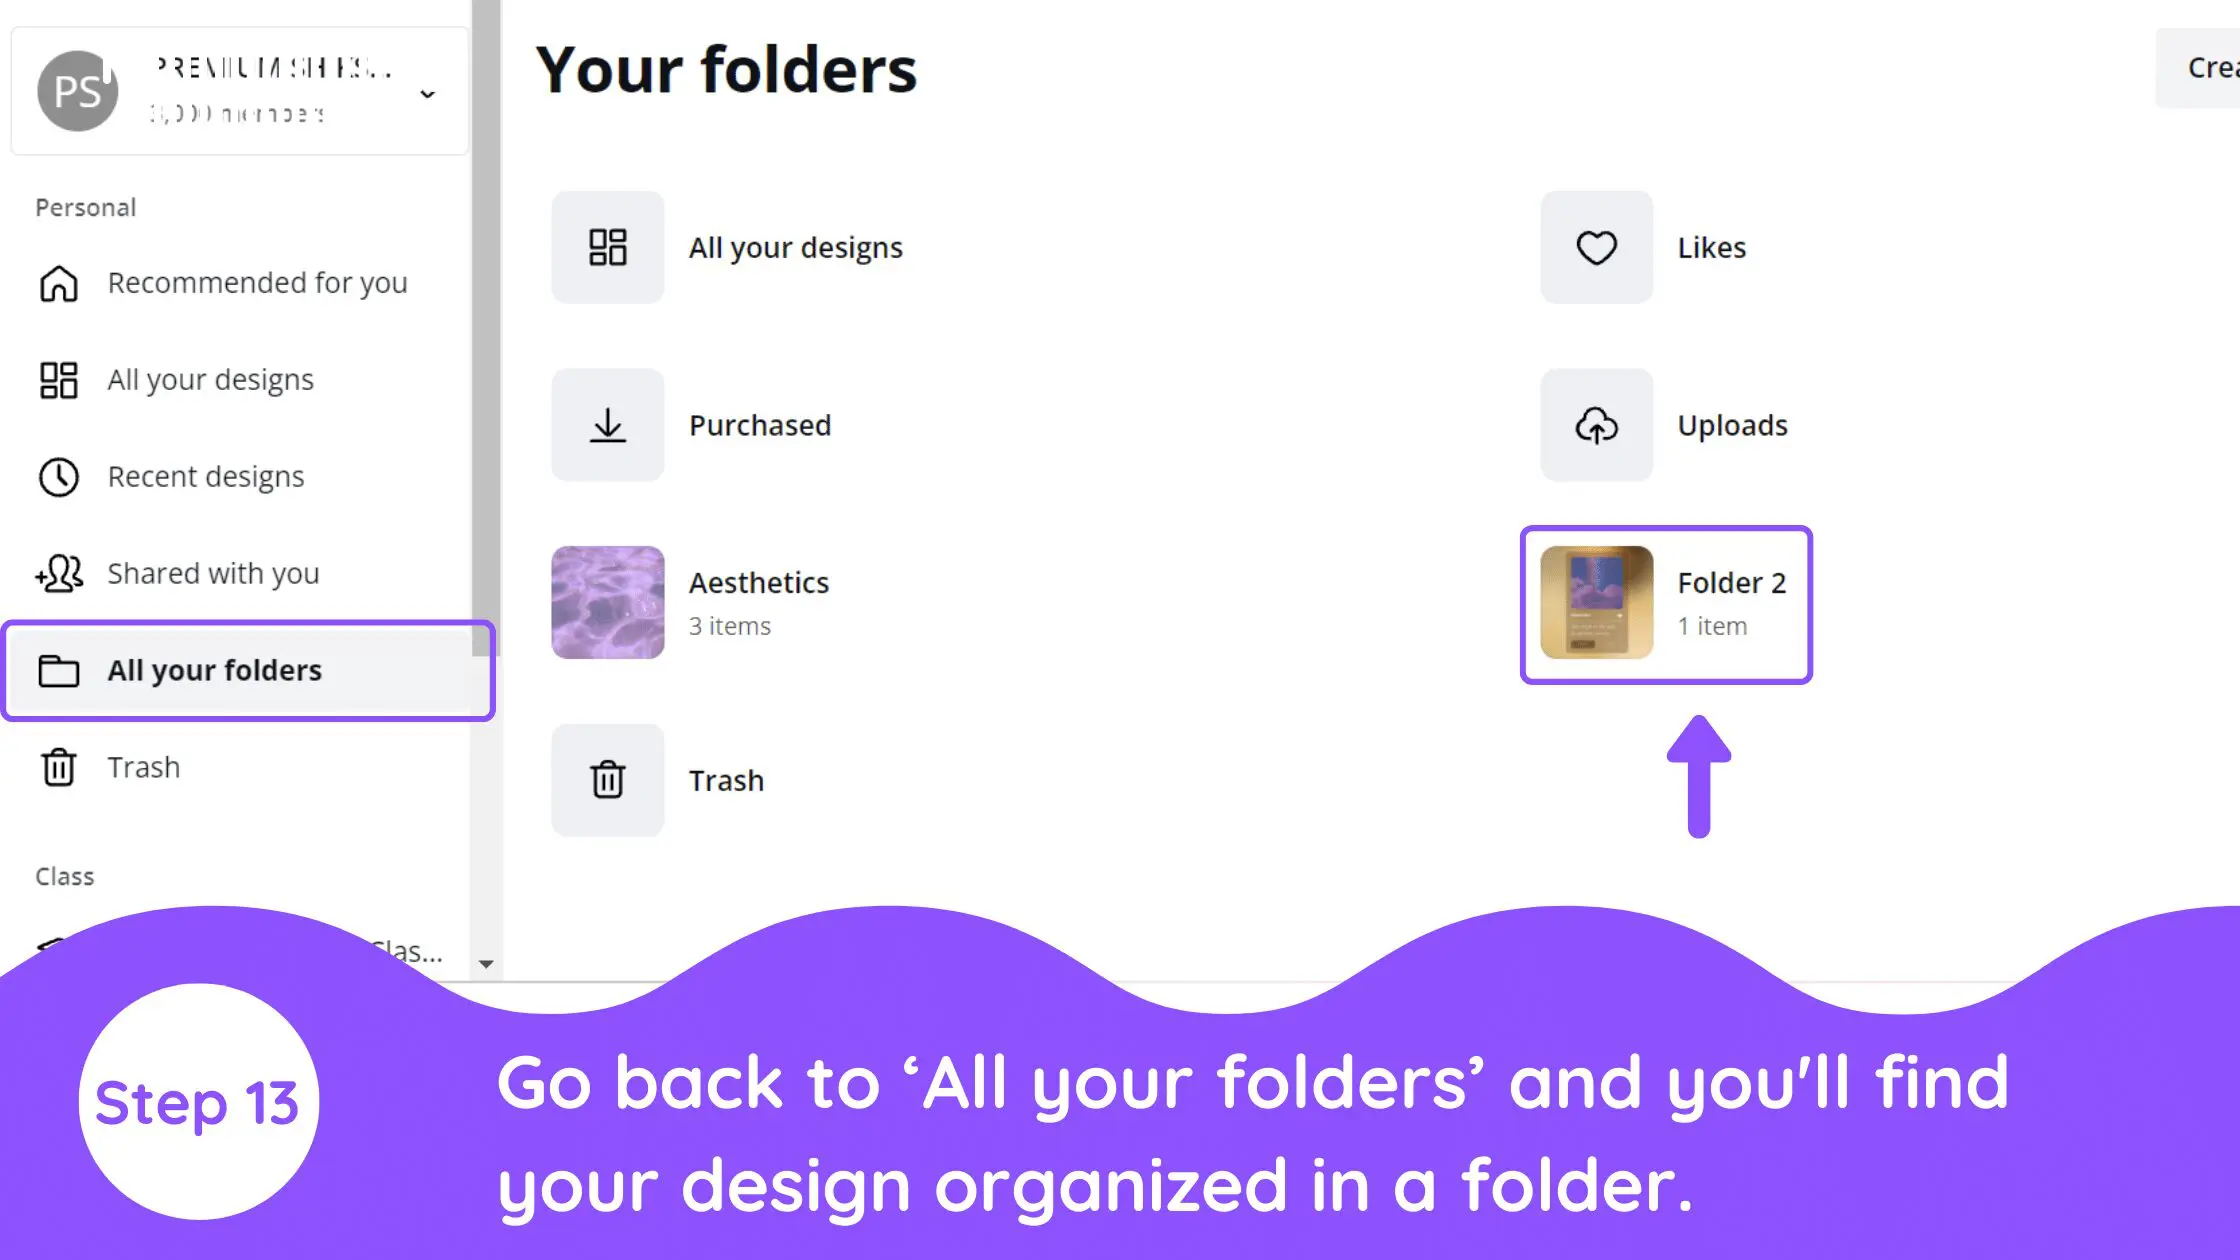
Go back to ‘All your folders’ and voila! You just created your template and can use it whenever you want by just accessing your folder. Super Organized!
14. Use The Search Bar to Get Organized (Method 2)
If you find searching your designs in your folders tiring don’t worry Canva made it simple too!
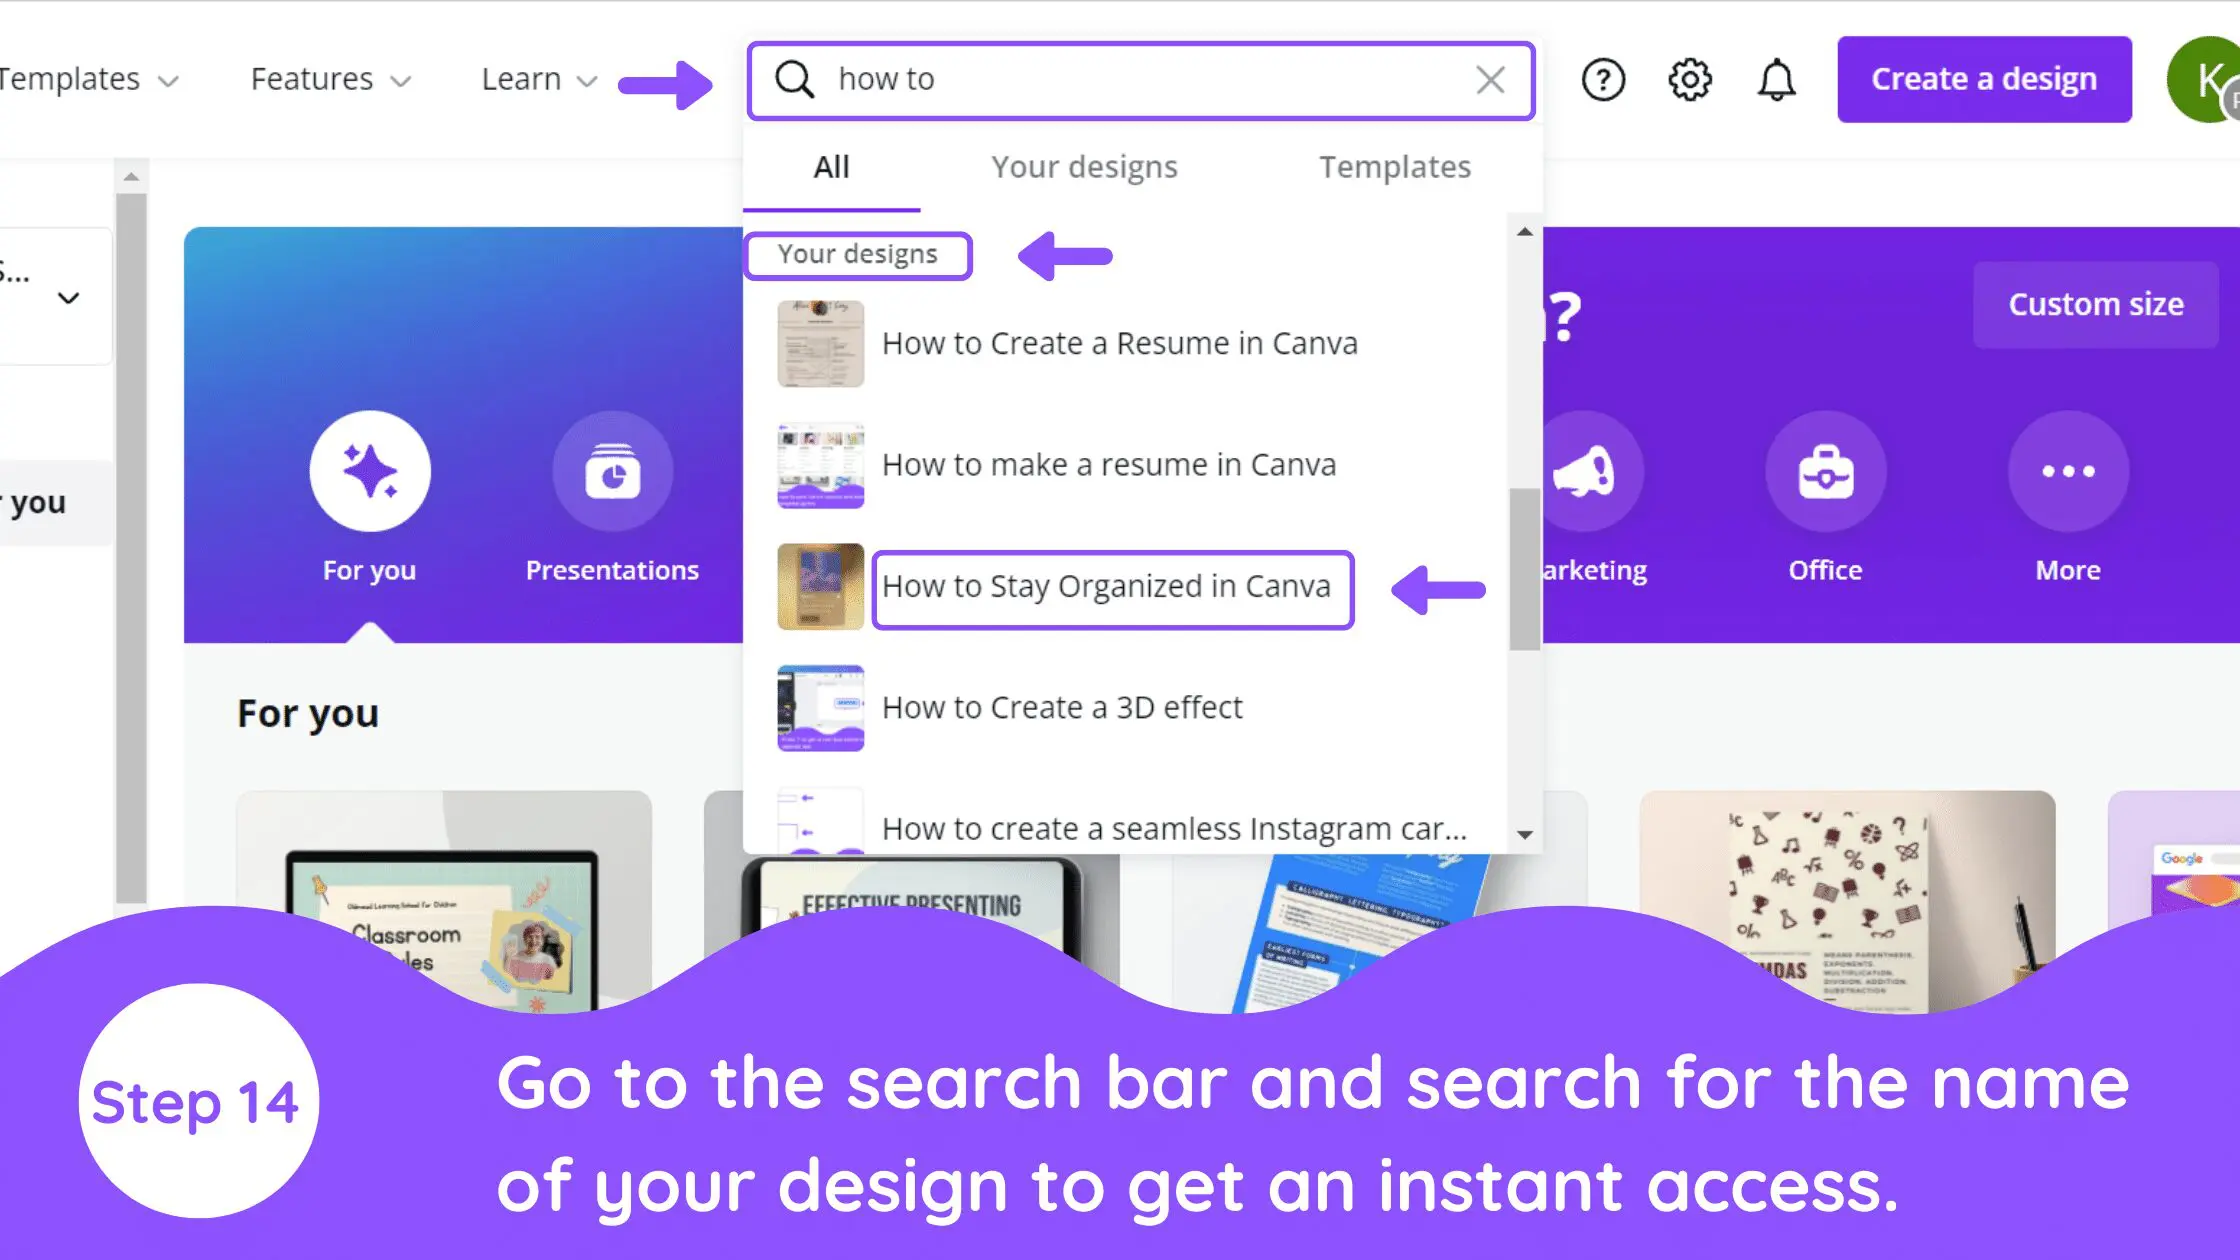
Just go to the search bar and search for the name of your design. Scroll a little till you find the ‘your designs’ section. There, just look for the name of your design and click on it. You will be sent directly to your design!
15. Naming Folder Hack (Method 3)
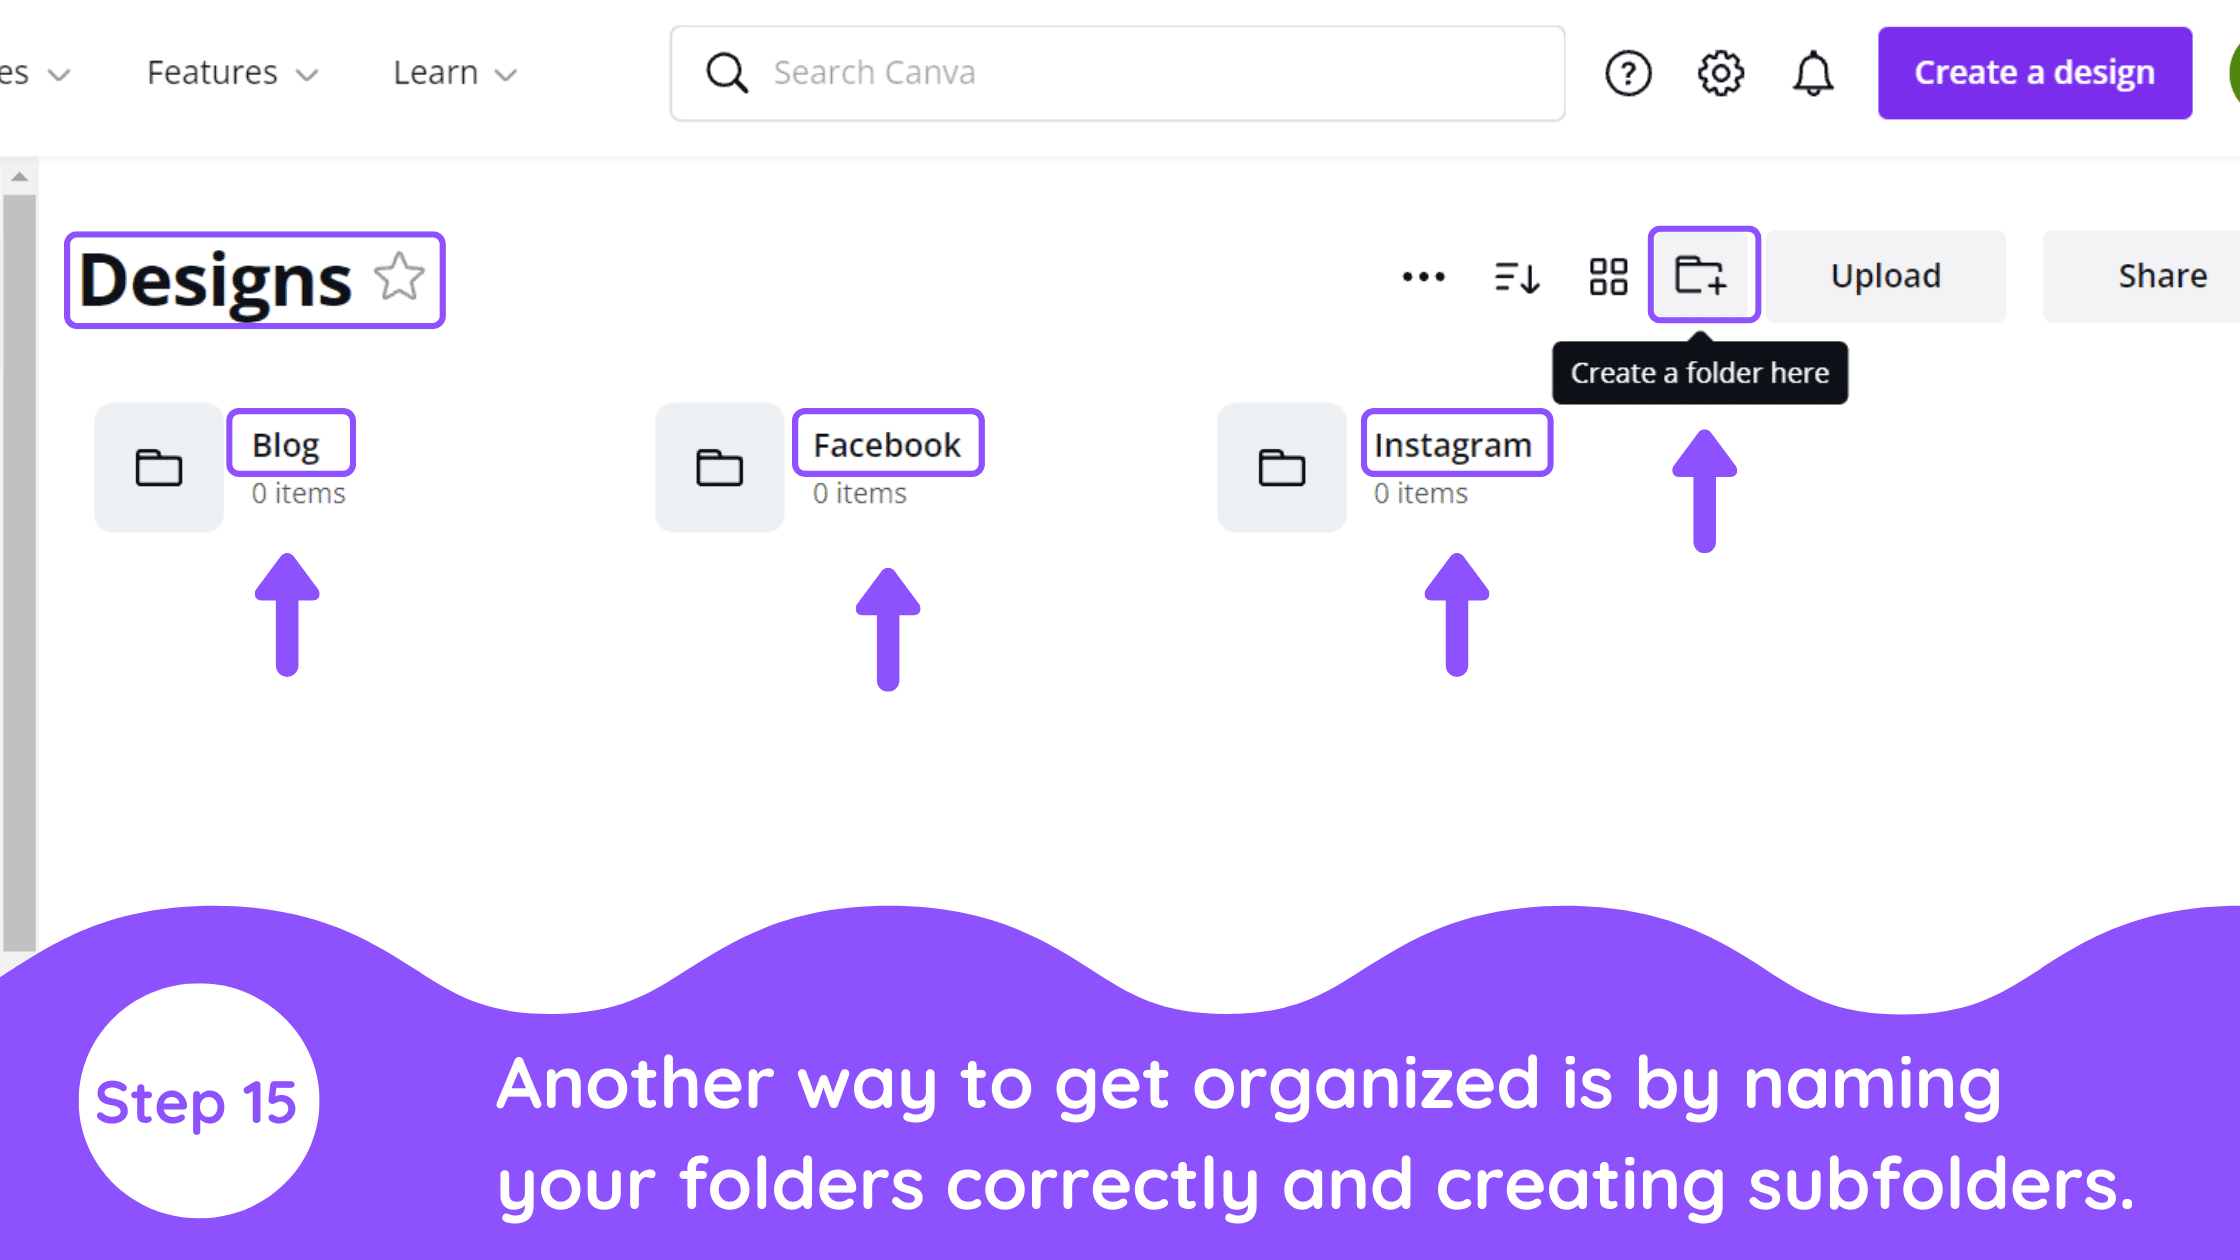
Another hack to be organized in Canva is simply by naming your folders correctly and creating subfolders. You can create a folder inside a folder by just clicking on the ‘create a folder here’ option present on the top right corner of your parent folder.
For example, you design in Canva for various social media platforms where you don’t post immediately, rather you schedule your post. So, what you can do is name your folder by the name of social media platforms. The next time you post for a particular platform all you have to do is search for Designs -> name of social media platform. And there you go with all the designs you need for your social media platform!
16. Organize All Your Favorite Elements in One Place (Method 4)
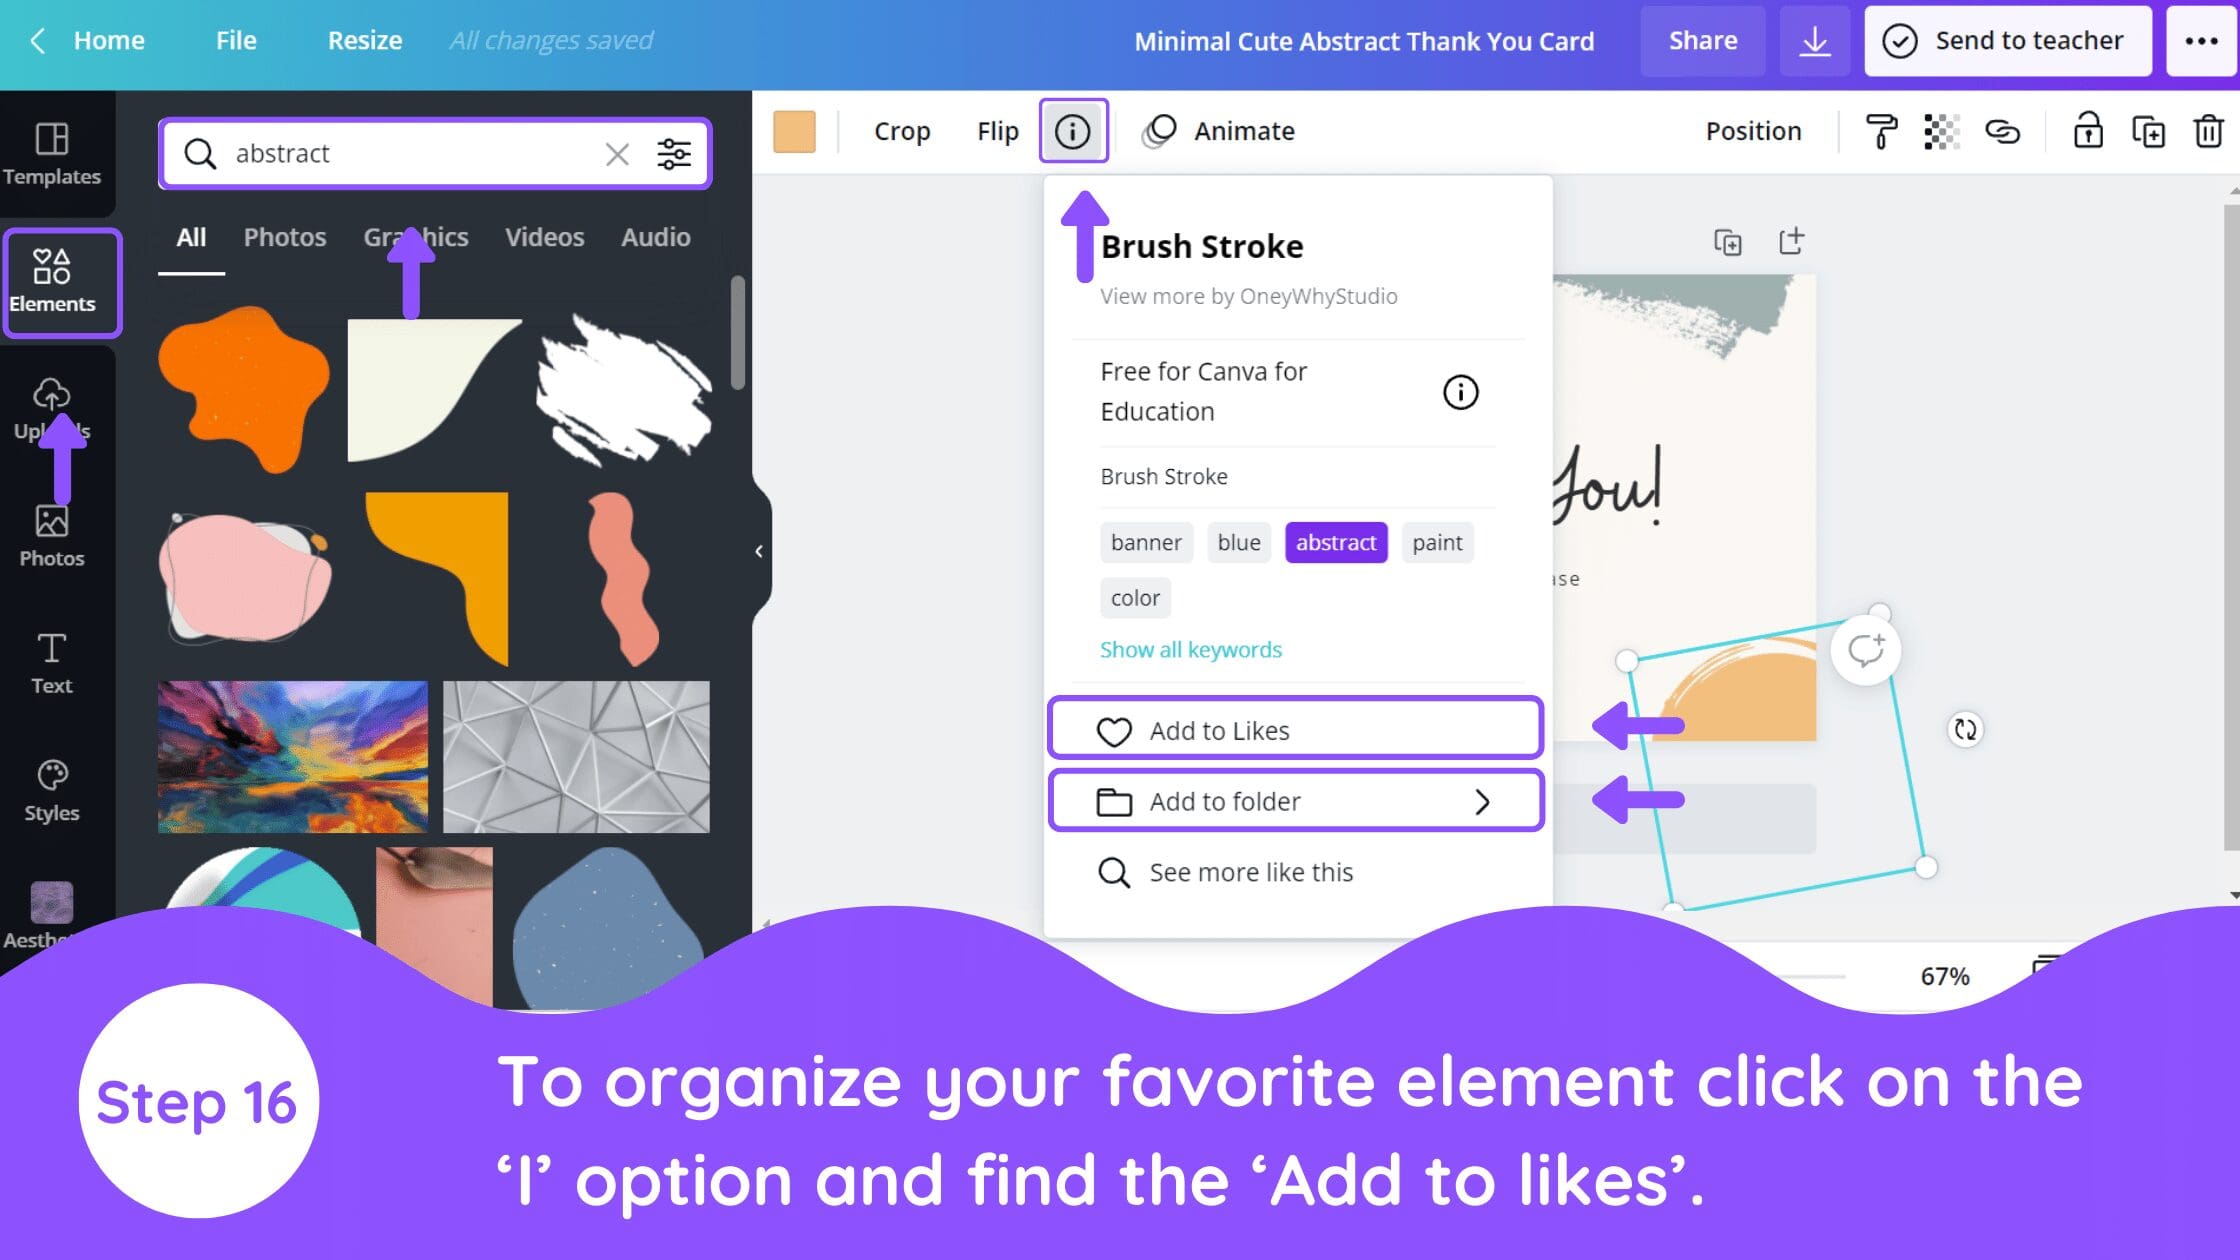
While working on a certain template you sometimes bump up to certain elements you like and wonder ‘This is so cool, I want to use this element in my next designs too!’ so to fulfill this demand all you’ve to do is click on that particular element and go to the ‘I’ option present above. You will find the keyword for that element which you can search in the element section of Canva.
Now to organize your favorite element be there in the ‘I’ option and find the ‘Add to likes’ option.
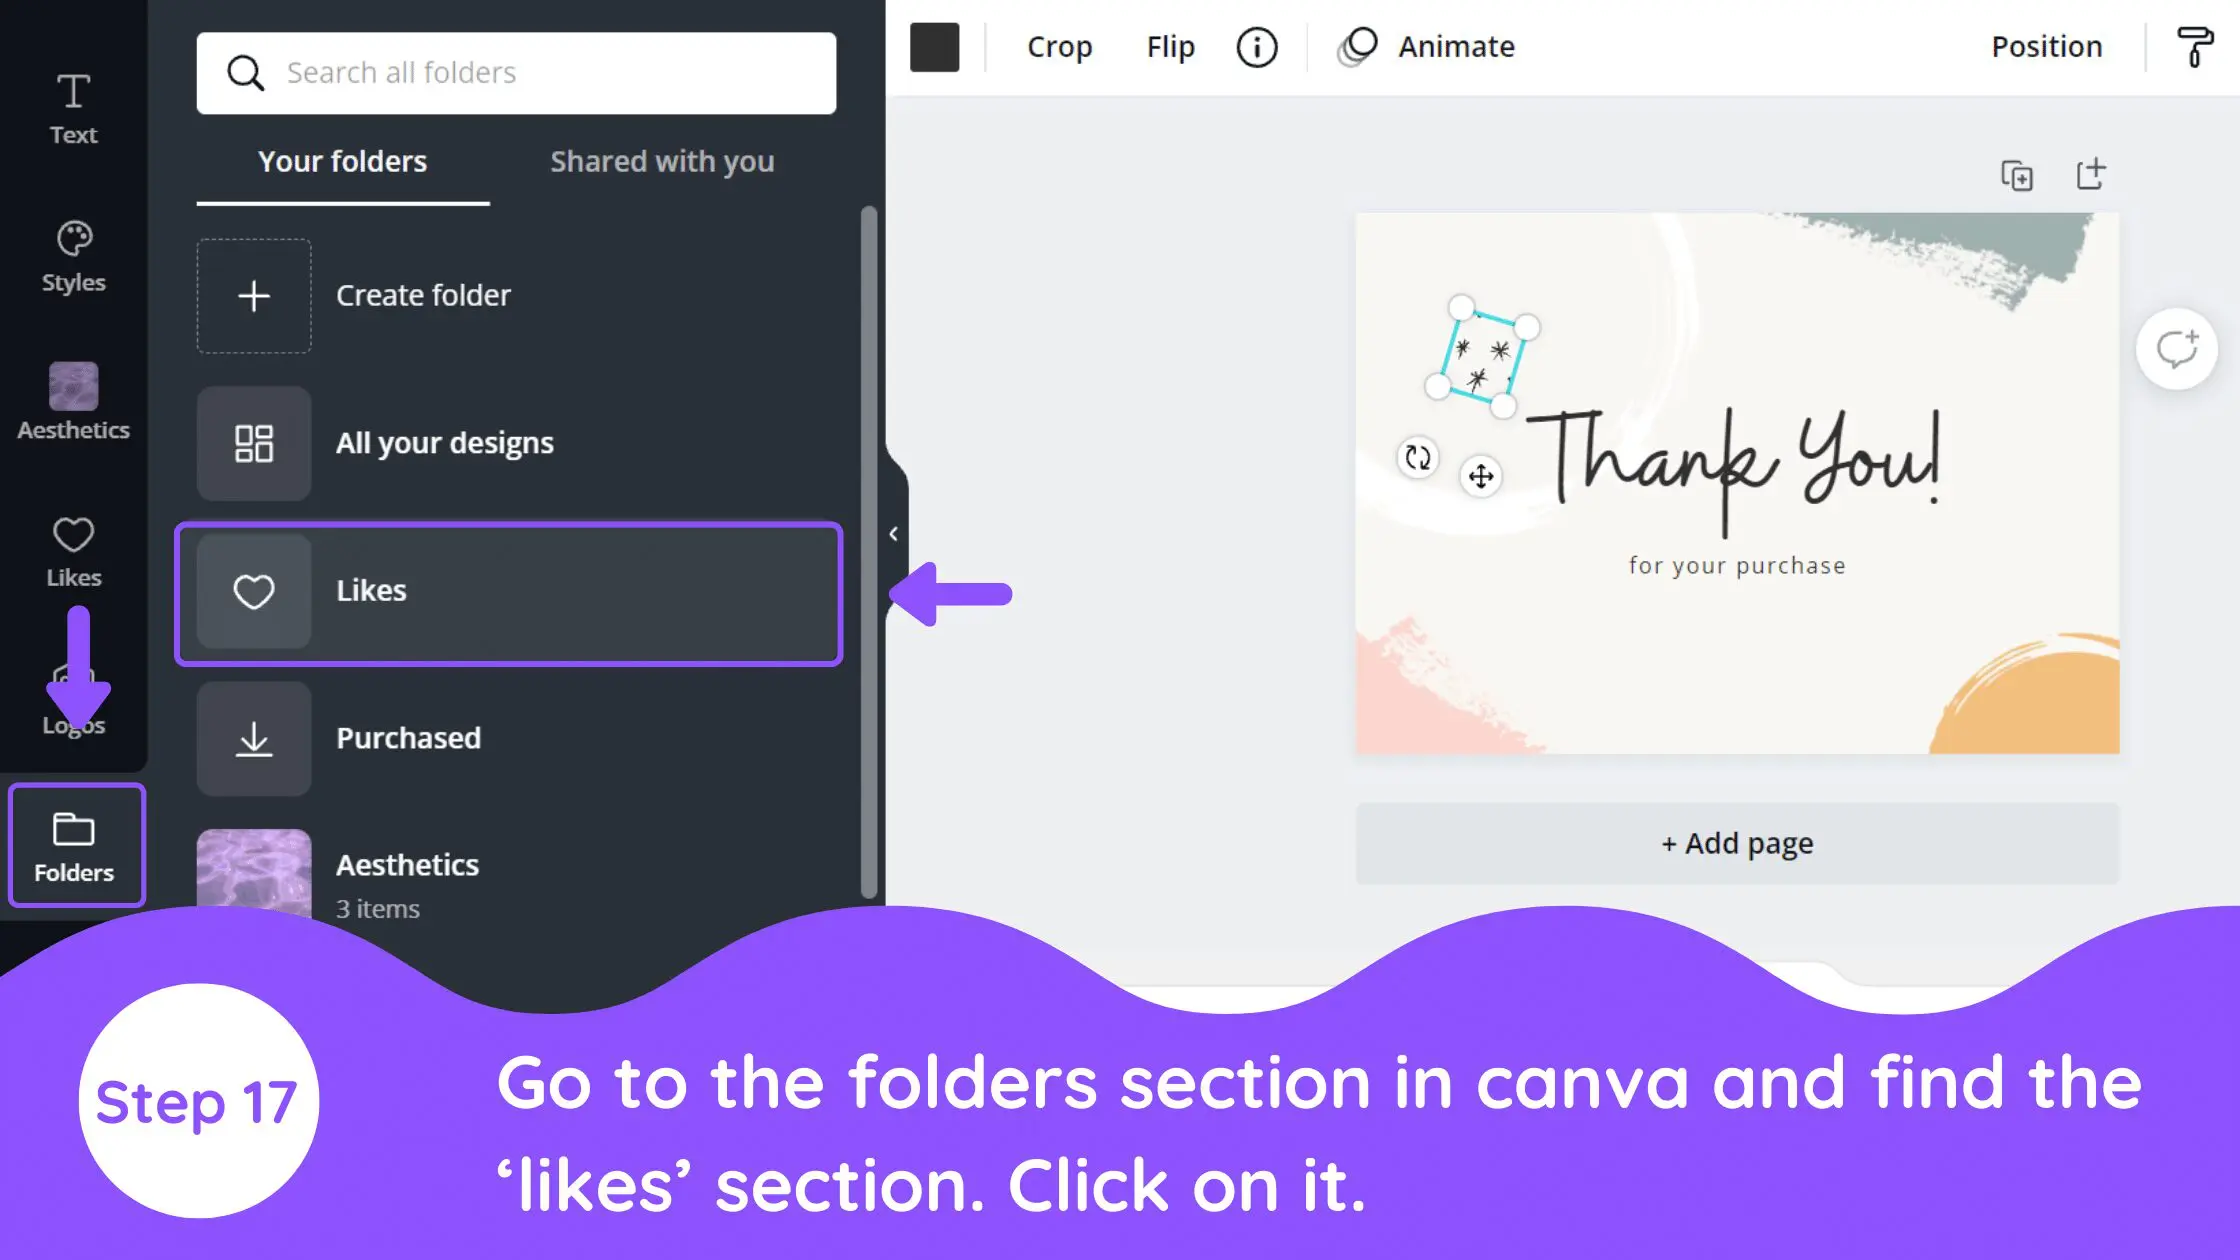
17. Access the Likes Folder
Now go to the folders section in Canva where under the ‘your folders’ section you will find a ‘likes’ section. Click on it.
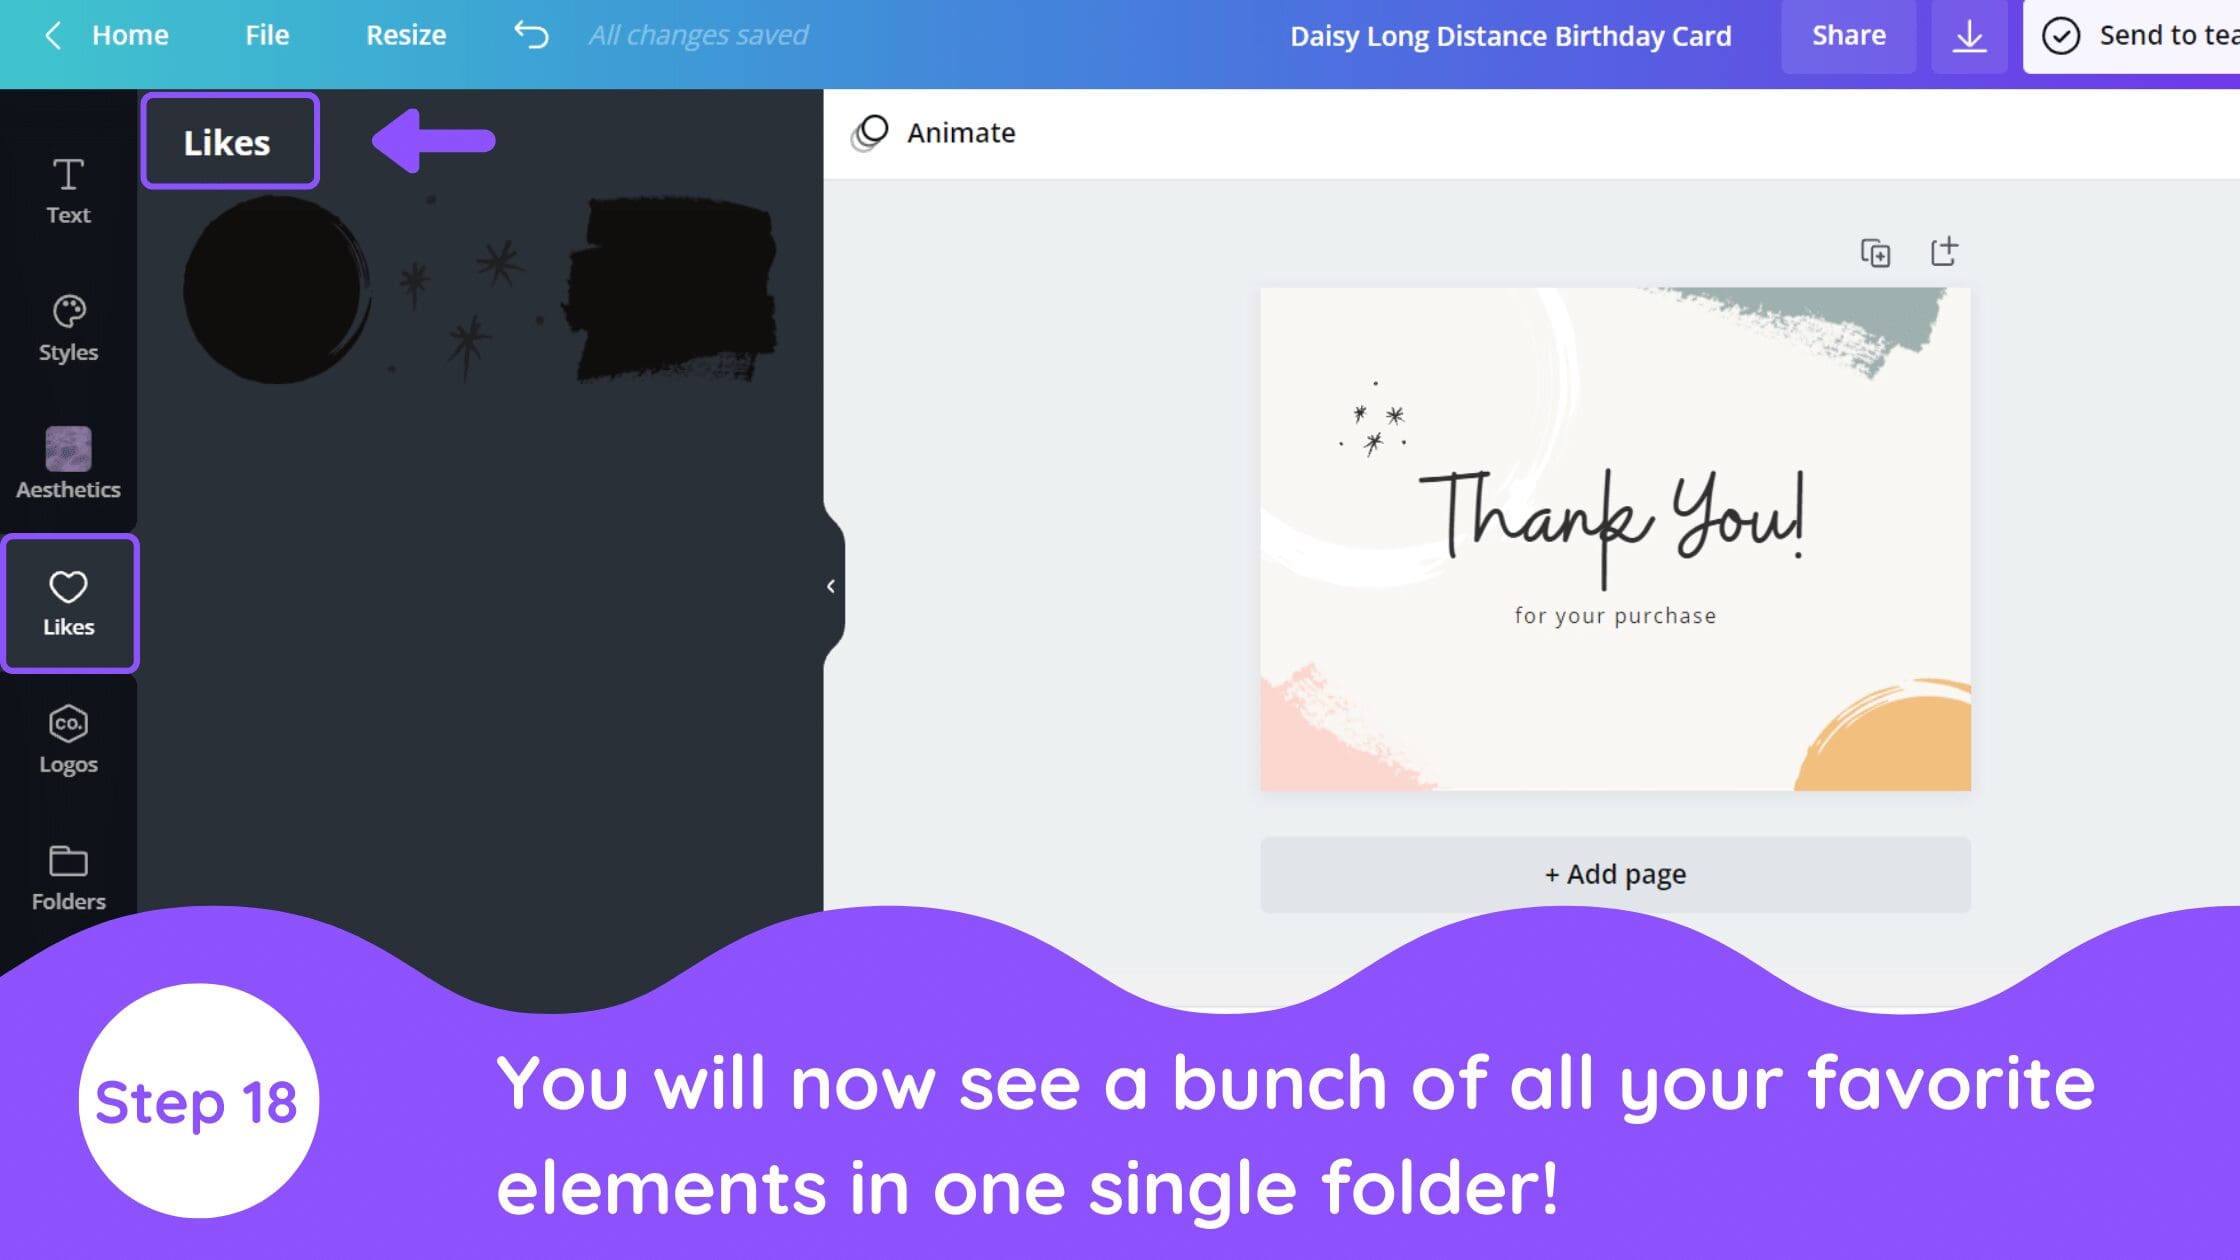
18. Use Your Favorite Elements
You will now see a bunch of all your favorite elements in one single folder!
Tip – In step 16 below the ‘add to likes’ folder you will see a ‘add to folder’ option. You can choose that option too in case you need to make a separate folder for your favorite elements or add those elements to any existing folder.
19. Declutter to Get Organized (Method 5)
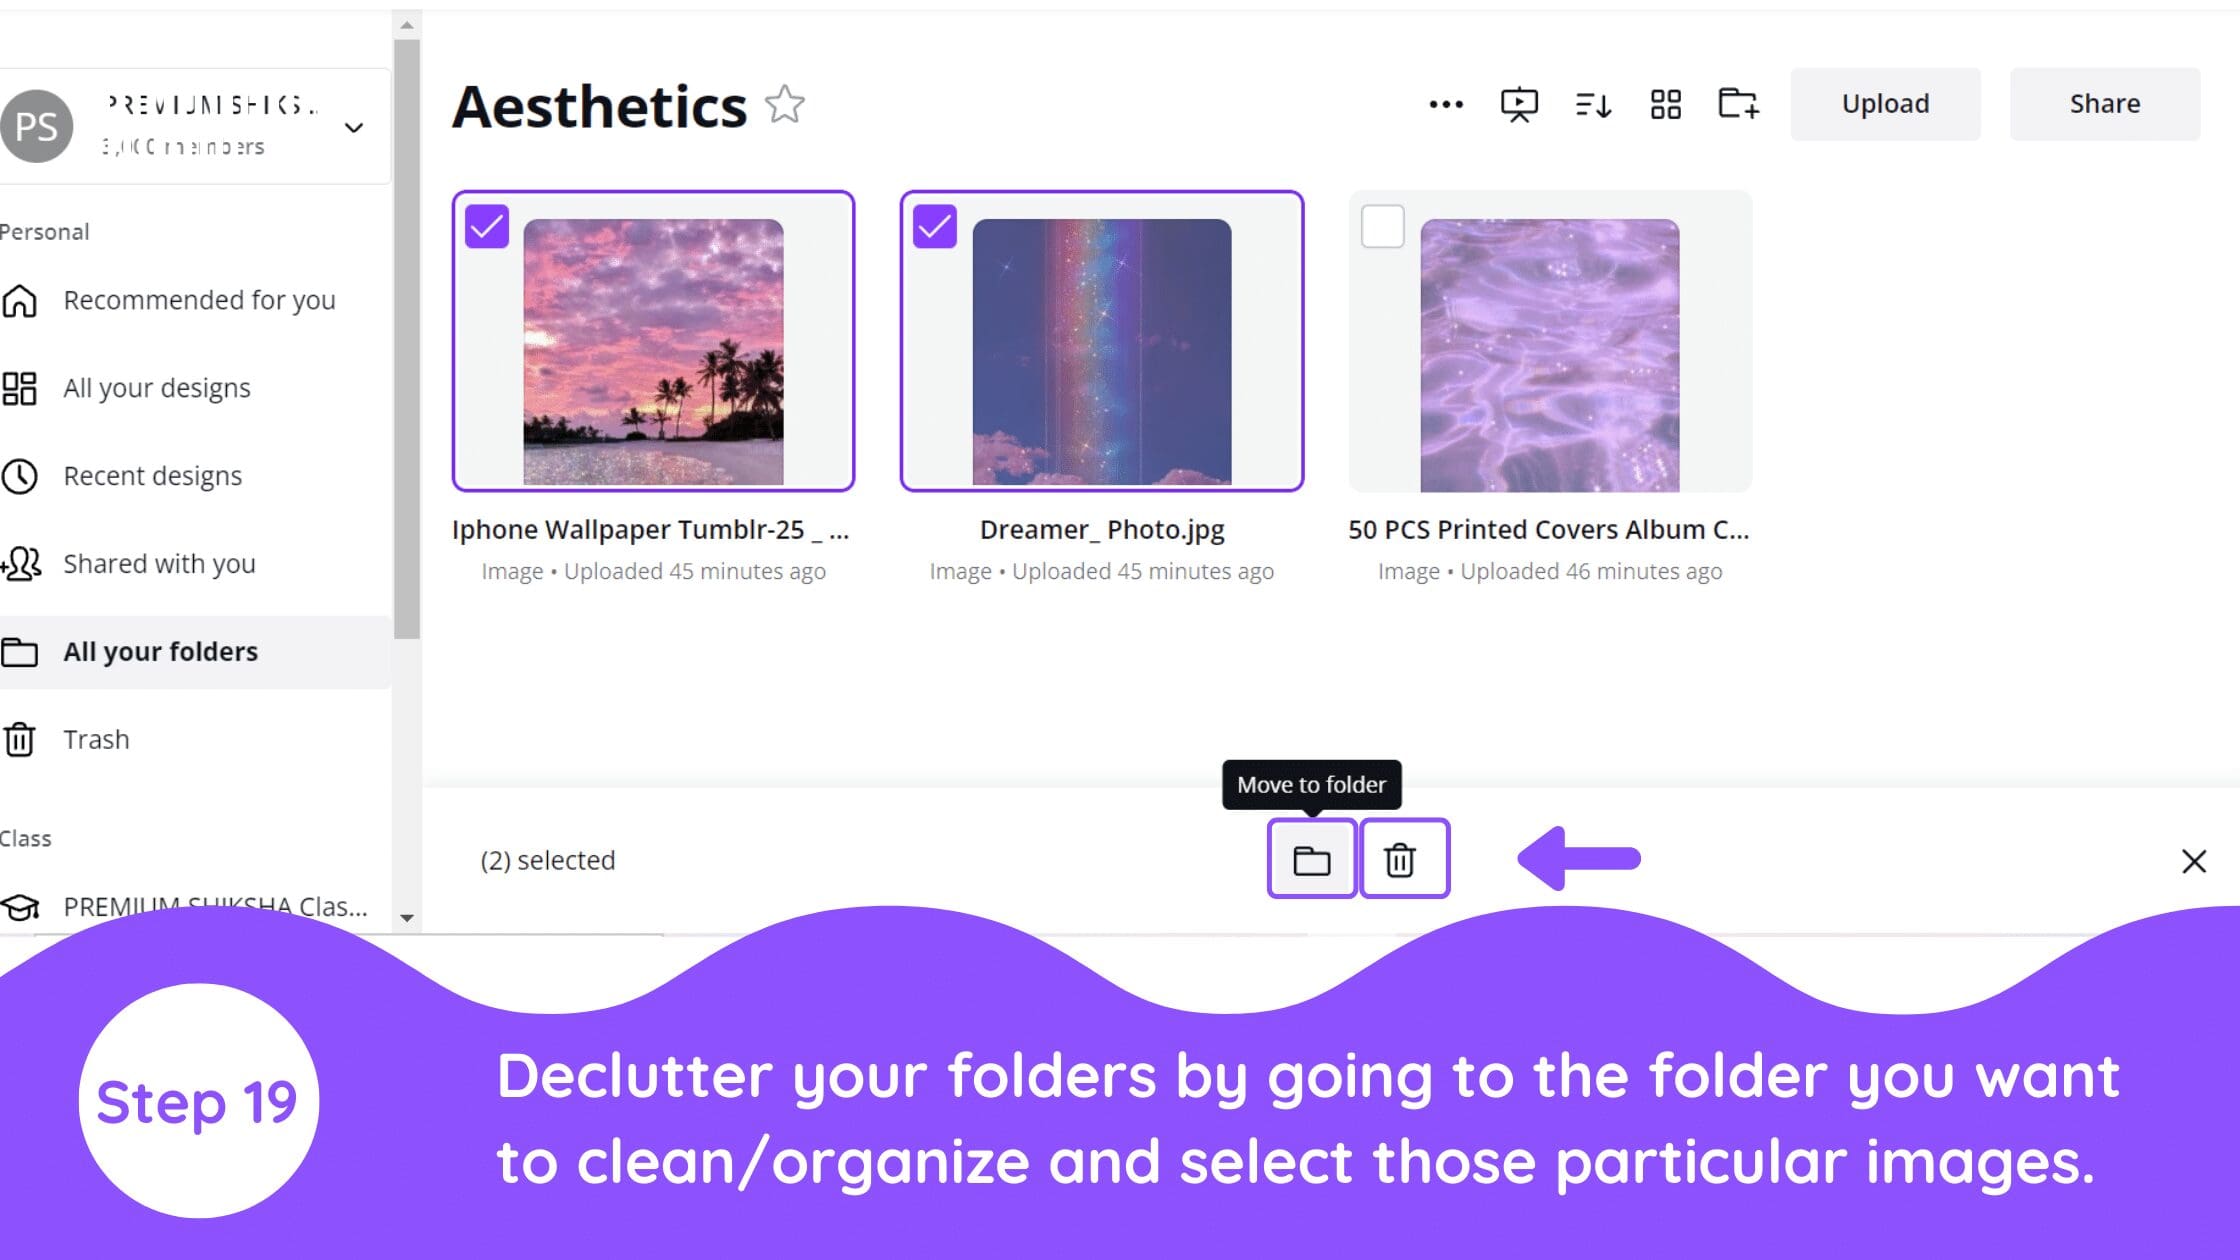
Another way to get organized is by simply decluttering your folders.
You can do this by going to the folder you want to clean/organize and select those particular images. To select the images just simply hover over the picture and you will find a small check box. Click on it and you will find two options below. Choose ‘move to folder’ to organize and ‘delete’ to clean the folder.
Conclusion
Canva is an amazing graphic design tool, and I hope you found this tutorial covering how to stay organized in Canva, useful! Click here to read our comprehensive Canva Guide. If you haven’t tried CanvaPro, click here to try it for free for 30 days through our exclusive offer! Below are several related Canva tutorials that you might find useful.
