Disclosure: Some of the links below are affiliate links, meaning that at no additional cost to you, I will receive a commission if you click through and make a purchase. For more information, read our full affiliate disclosure here.
WordPress is undoubtedly the undisputed champion for building websites, especially when you’re on a budget.
Not only is the content management system powerful, but its ease of use has continued to improve since its launch in 2006.
This article will walk you through how to build a WordPress website with Bluehost, one of the most popular hosting providers.
But before all that,
Why Bluehost?
For one, it has been recommended on WordPress.org as a trusted hosting solution for the CMS (Since 2005).
As if that’s not enough to convince you, they have the highest favorable reviews and ratings on TrustPilot regarding WordPress hosting.
From my personal experience, their customer support is amongst the best I’ve ever come across when fixing WordPress-related issues; they practically live and breathe WordPress.
An undisputedly good website solution like WordPress combined with a reliable hosting provider like Bluehost is a failproof recipe for building great websites.
So, back to the website building process, Bluehost makes it simple to build WordPress sites on their platform by providing a unique and streamlined process that rivals WordPress.com (a hosted software-as-a-service (SaaS) solution for WordPress).
Here is an overview of the steps to follow to build a WordPress Website on Bluehost::
- Choose a Bluehost Plan
- Pick a Domain Name
- Complete the Sign-Up Process
- Configure And Install WordPress
- Install And Customize a Theme
- Add Recommended WordPress Plugins
- Launch Your Site
How to Build a WordPress Website with Bluehost
1. Choose a Bluehost Plan
The first step in building a WordPress website with Bluehost involves picking a hosting plan; you can think of hosting as a house where all your website files live (pictures, text, documents, etc.).
Bluehost offers a variety of hosting plans for different stages of a website’s growth; In terms of WordPress, they have different tiers of hosting packages depending on your website’s use case.
To pick a hosting plan, visit Bluehost.com and hover your cursor on “WordPress” in the menu, then select “WordPress Hosting” from the dropdown.
You’ll be redirected to the pricing page, where you’ll have to choose one of four WordPress hosting plans;
- WordPress Basic – This plan costs $2.95 per month for the first year and is recommended for small starter sites like blogs, portfolios, and landing pages. It supports just one website.
- WordPress Plus – This plan costs $5.45 per month for the first year and offers the same performance as the Basic plan but allows for unlimited websites and 20GB of storage space (SSD Storage).
- WordPress Choice Plus – This plan also costs $5.45 for the first year with an additional 40GB of storage space, free domain privacy, and one year of free automated backup.
- WordPress Pro – This is the highest-tiered WordPress plan and is ideal for websites where you expect high daily traffic. It supports unlimited websites as well, with 100GB of storage space.
You have to select a hosting plan with good specifications for the kind of WordPress website you plan on building with Bluehost.
You can choose any plan and upgrade or downgrade to another after launching your site, so don’t overthink this part.
For this article, I’ll go ahead and select the Basic plan.
Note: The renewal cost for each plan after the first year is at least 2 – 3 times the first payment; keep that in mind when selecting a plan.
2. Pick a Domain Name
After selecting any WordPress plans, you should see the domain wizard on the next page.
If a hosting plan allows you to store your website files and pages, a domain name helps people find it.
A domain name is simply an address pointing to where your website lives on the internet (Hosting server).
Without domains, websites addresses would simply be numbers called IPs (Internet Protocols, e.g., 192.512.42.1)
Domain names represent IP addresses and act as ALIAS, so people do not need to remember hard-to-remember numbers to access your website.
All domains are made of two parts;
- Name: This can be a combination of any letter or number, you can also use a hype (-), but other symbols are not allowed.
- Extension: An extension is the second part of a domain, there are different types of domains, but the most commonly used are TLDs (Top-Level Domains) like COM, NET, and ORG.
Whichever you choose, it should take you to the next part of the wizard.
Simply enter a domain name into the field, select an extension and click next.
If you have already purchased a domain from another registrar, enter the domain name in the second “Use a domain you own” option and click next.
Whichever you choose, it should take you to the next part of the wizard.
3. Complete The Sign Up Process
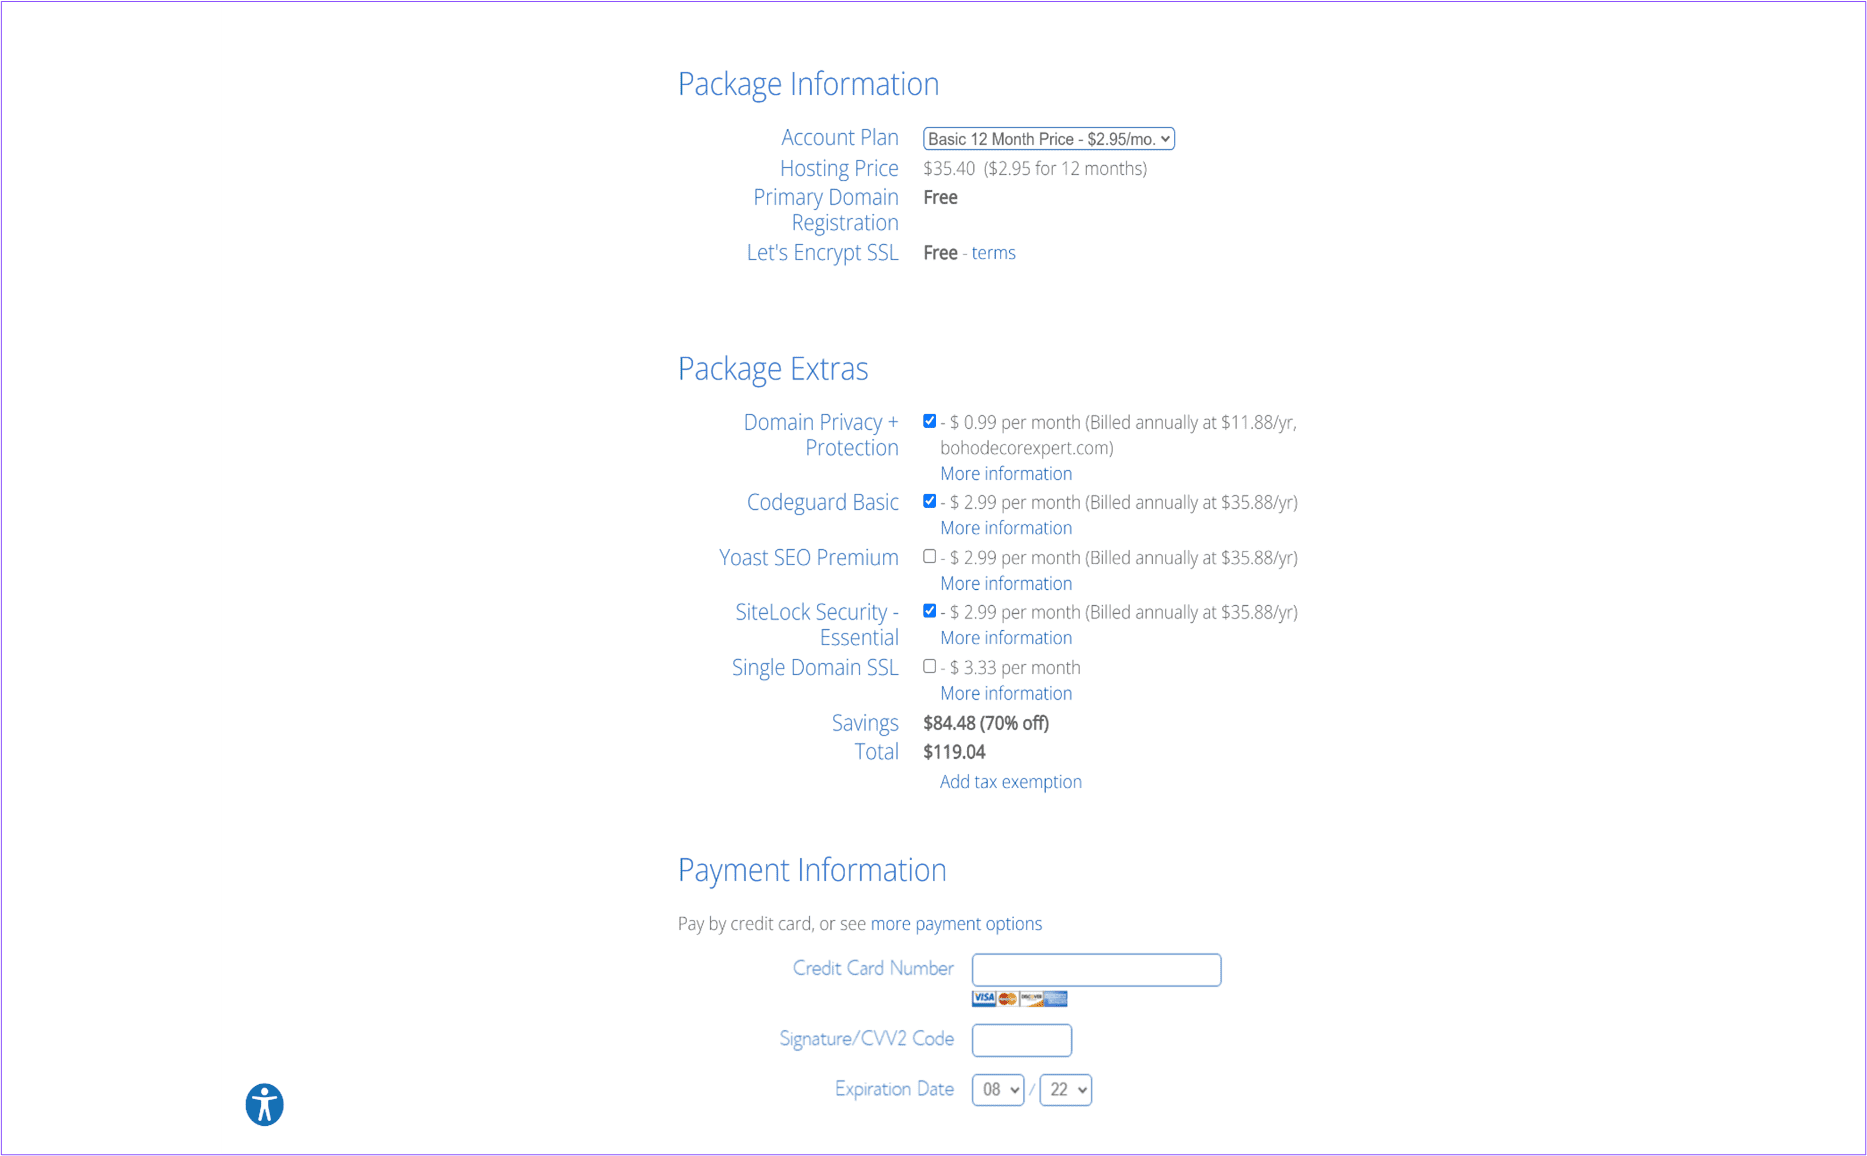
You’ll be redirected to the pricing page, where you’ll have to choose one of four WordPress hosting plans;
- WordPress Basic – This plan costs $2.95 per month for the first year and is recommended for small starter sites like blogs, portfolios, and landing pages. It supports just one website.
- WordPress Plus – This plan costs $5.45 per month for the first year and offers the same performance as the Basic plan but allows for unlimited websites and 20GB of storage space (SSD Storage).
- WordPress Choice Plus – This plan also costs $5.45 for the first year with an additional 40GB of storage space, free domain privacy, and one year of free automated backup.
- WordPress Pro – This is the highest-tiered WordPress plan and is ideal for websites where you expect high daily traffic. It supports unlimited websites as well, with 100GB of storage space.
You have to select a hosting plan with good specifications for the kind of WordPress website you plan on building with Bluehost.
You can choose any plan and upgrade or downgrade to another after launching your site, so don’t overthink this part.
For this article, I’ll go ahead and select the Basic plan.
Note: The renewal cost for each plan after the first year is at least 2 – 3 times the first payment; keep that in mind when selecting a plan.
4. Configure and Install WordPress
When your payment is confirmed, you will automatically be logged into Bluehost.
The next step of the Bluehost WordPress building process is to install and configure WordPress on your plan.
If you’re not automatically redirected to the WordPress setup page from the Bluehost dashboard, navigate to the “My Sites” page via the left sidebar.
On the My Sites page, click on add site to start the WordPress installation process.
Once you do, you’ll be required to fill in details specific to your WordPress installation, including;
- Site Name: The name of your website can be your business name or the domain name without the extension.
- Site Tagline: Your website’s description or business motto.
- Email Address: The official email address where you plan on receiving website-related information.
- WordPress Admin Username: The administrative username (For Login Purposes)
- WordPress Admin Password – The Administrative password (For Login Purposes)
Note: You must click the “Advanced” button to reveal all the essential fields.
After filling in all the detail, click on the “Next” button.
On the next screen, WordPress will recommend some regular plugins; feel free to skip them, as your theme of choice will probably come with its suite of plugins.
Once you’ve decided on the plugins you need and do not, click the “Next” button at the bottom, and the wizard should install WordPress.
5. Install & Customize Theme
Once the WordPress installation is completed, the wizard should direct you to the website’s dashboard on Bluehost.
There is a lot you can do on the Bluehost site dashboard, like;
- Manage website users (reset passwords and delete accounts)
- Create and restore site backups
- Monitor and tweak site performance
- Tighten or loosen website security
- Manage WordPress Plugins
We’re simply going to log in to the WordPress dashboard of our website and install a theme.
Click on the Login into WordPress button on the top-right of the website’s Bluehost dashboard, and you should be redirected to your site’s WP dashboard.
A WordPress theme, according to WordPress.org, is a collection of web-related files that work together to produce a graphical interface with an underlying unifying design for a website.
In simpler terms, a WordPress theme provides predesigned layouts, images, and pages to make it easier for site owners to create WordPress websites.
You can find free themes on the WordPress Repository in your wordpress site, but in most cases, you’ll find that they don’t look good and are challenging to set up since they’re free.
That’s where marketplaces like ThemeForest come in.
How To Find and Purchase WordPress Themes on Themeforest
The most common place to get premium wordpress themes for your Bluehost wordpress site is Themeforest which has a catalog of over 10,000+ themes ranging from common categories like Business and Health.
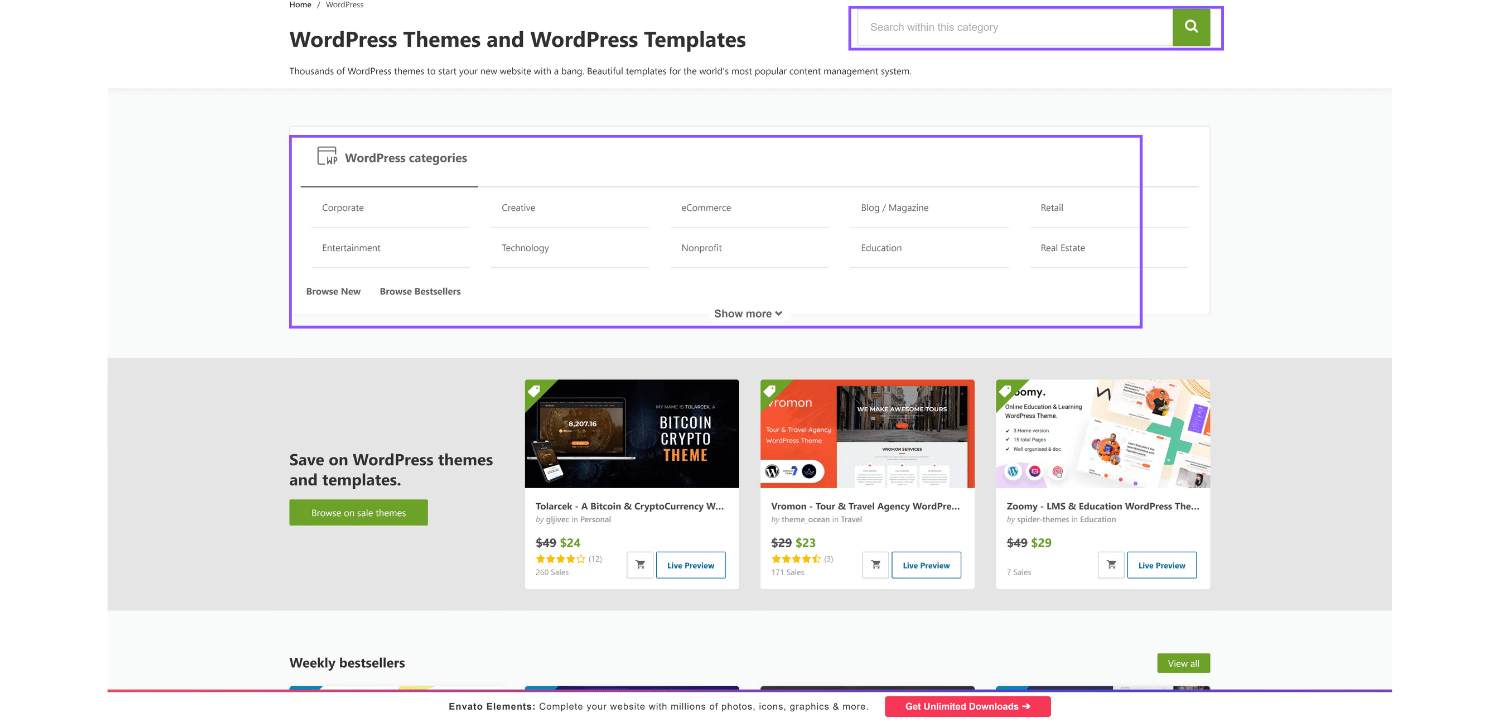
Most themes cost between $29 – $79, and irrespective of your choice, the installation process is the same (Not the setup, just the installation).
Here’s a step-by-step guide on purchasing and installing WordPress themes purchased on Themeforest on any Bluehost WordPress site.
Step 1: Navigate to Themeforest’s WordPress category and browse for a theme you like.
You can also use the search bar on the top-right to look for industry-specific themes, e.g., medical themes.
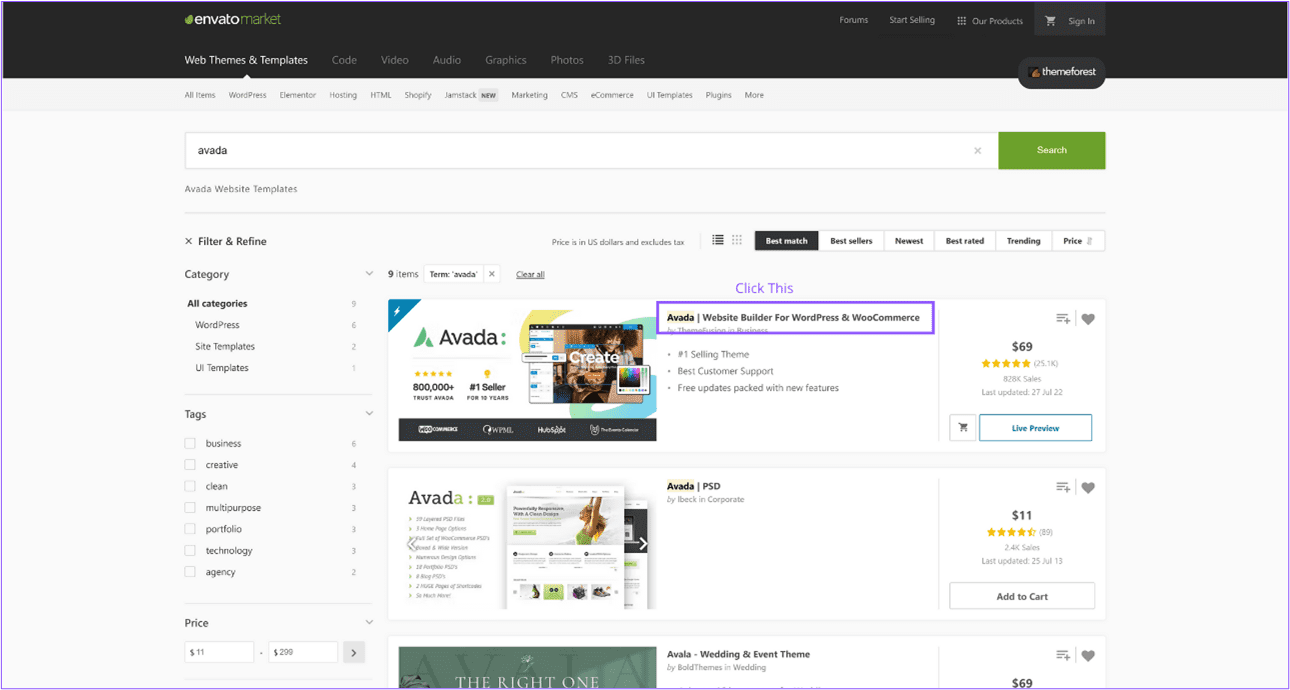
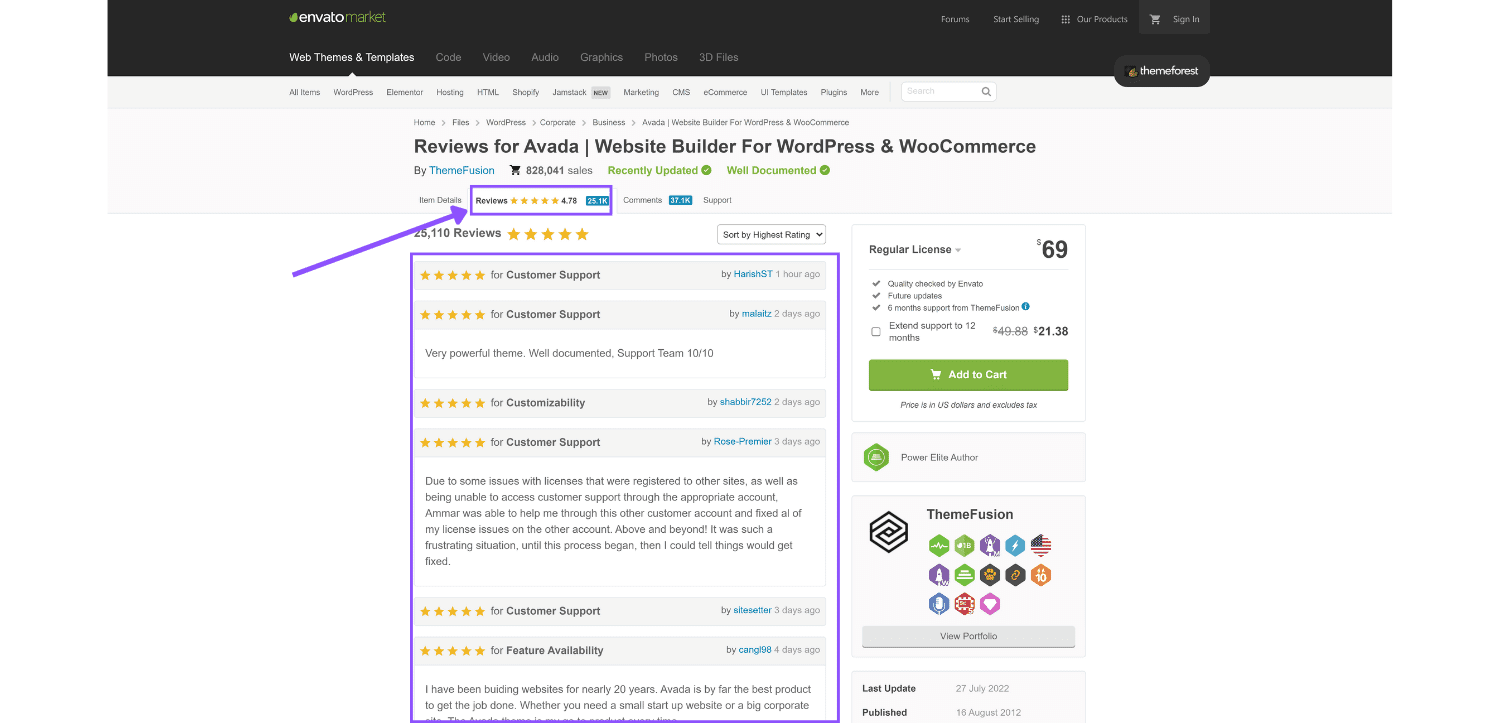
Step 2: Click on the Live Preview button on any of the listings to see a working version of the theme; when you find one you like, click on the listing for more information, like features and reviews.
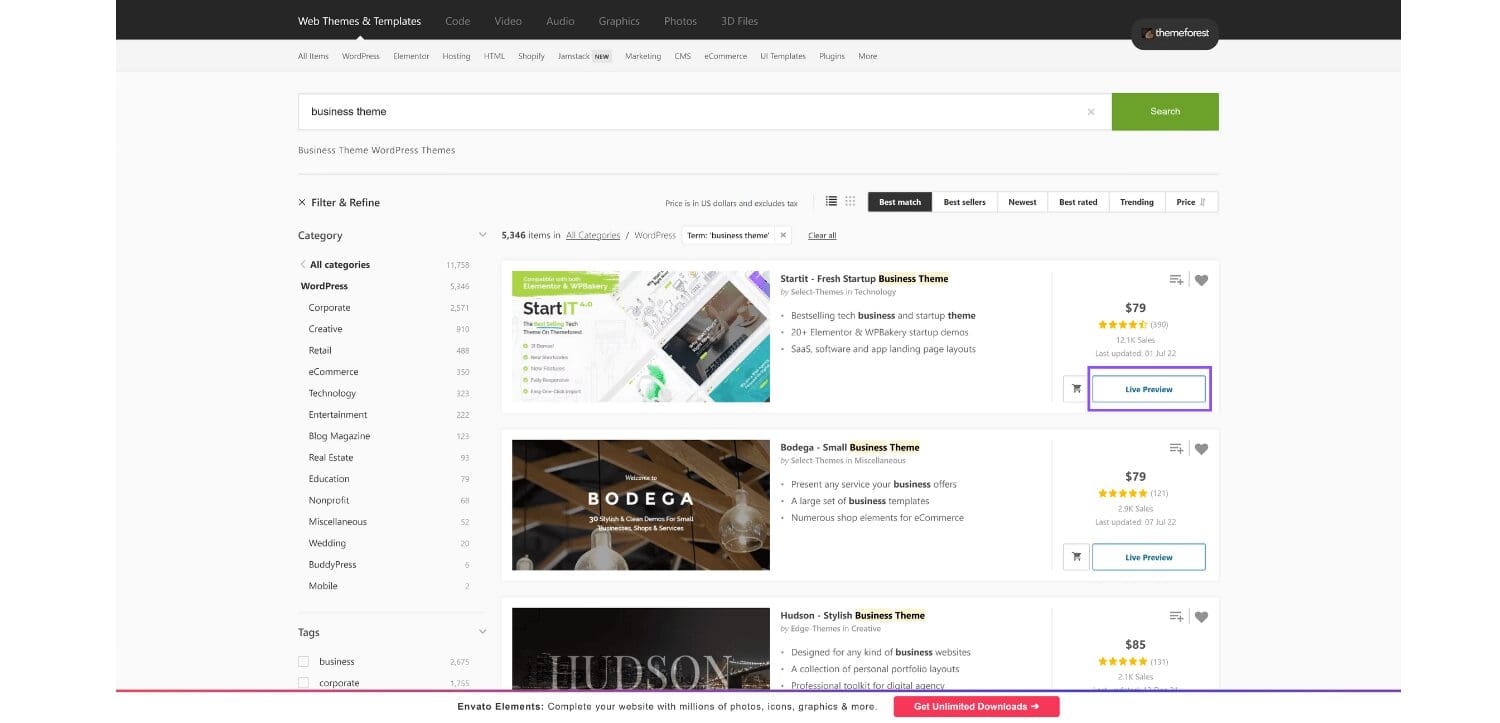
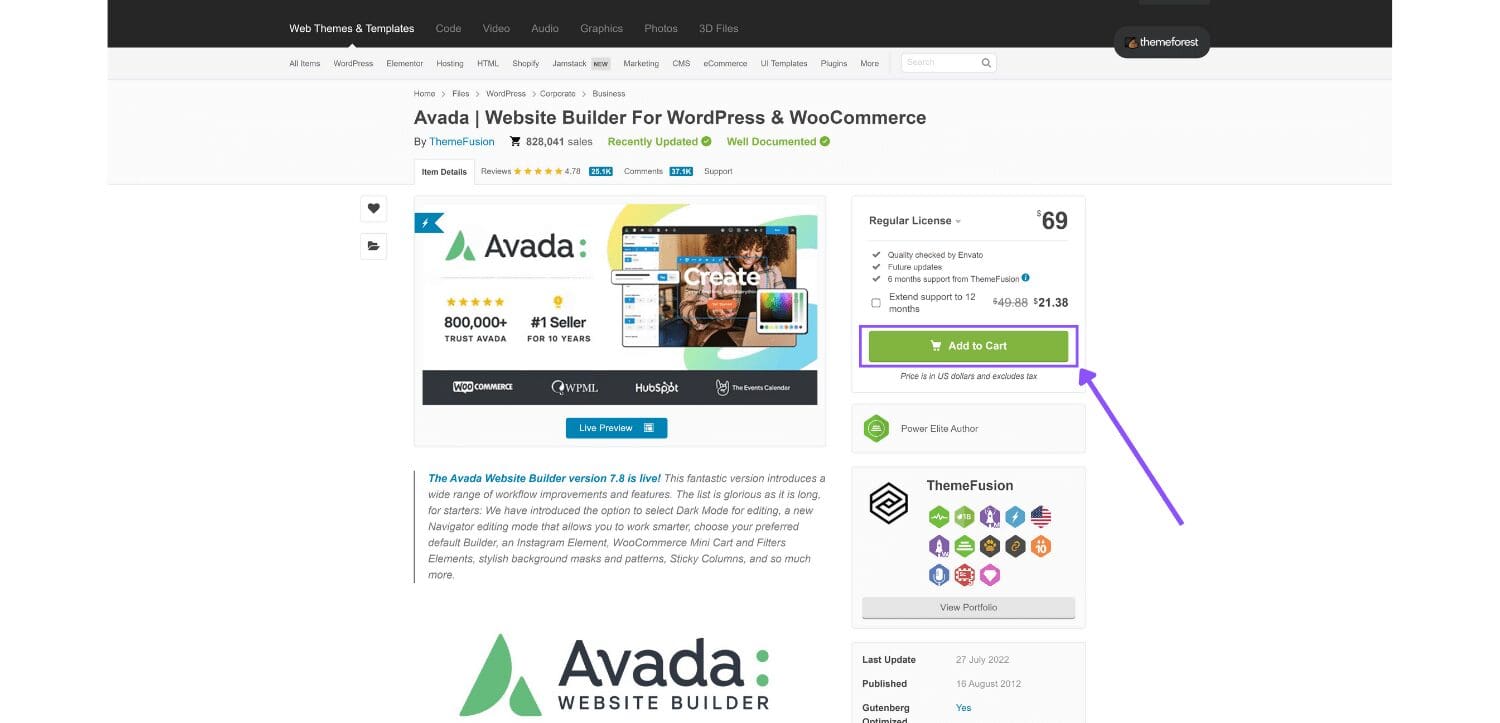
Step 3: If everything checks out, click the Add to Cart button and complete the payment.
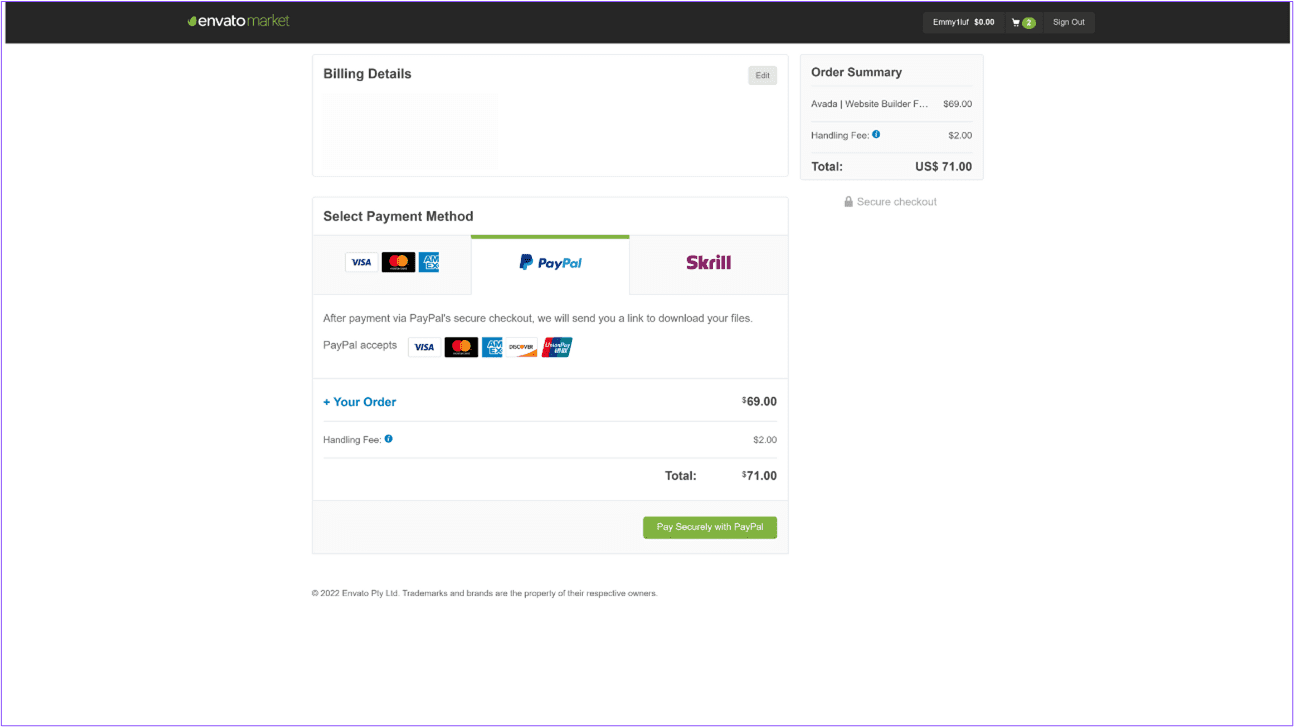
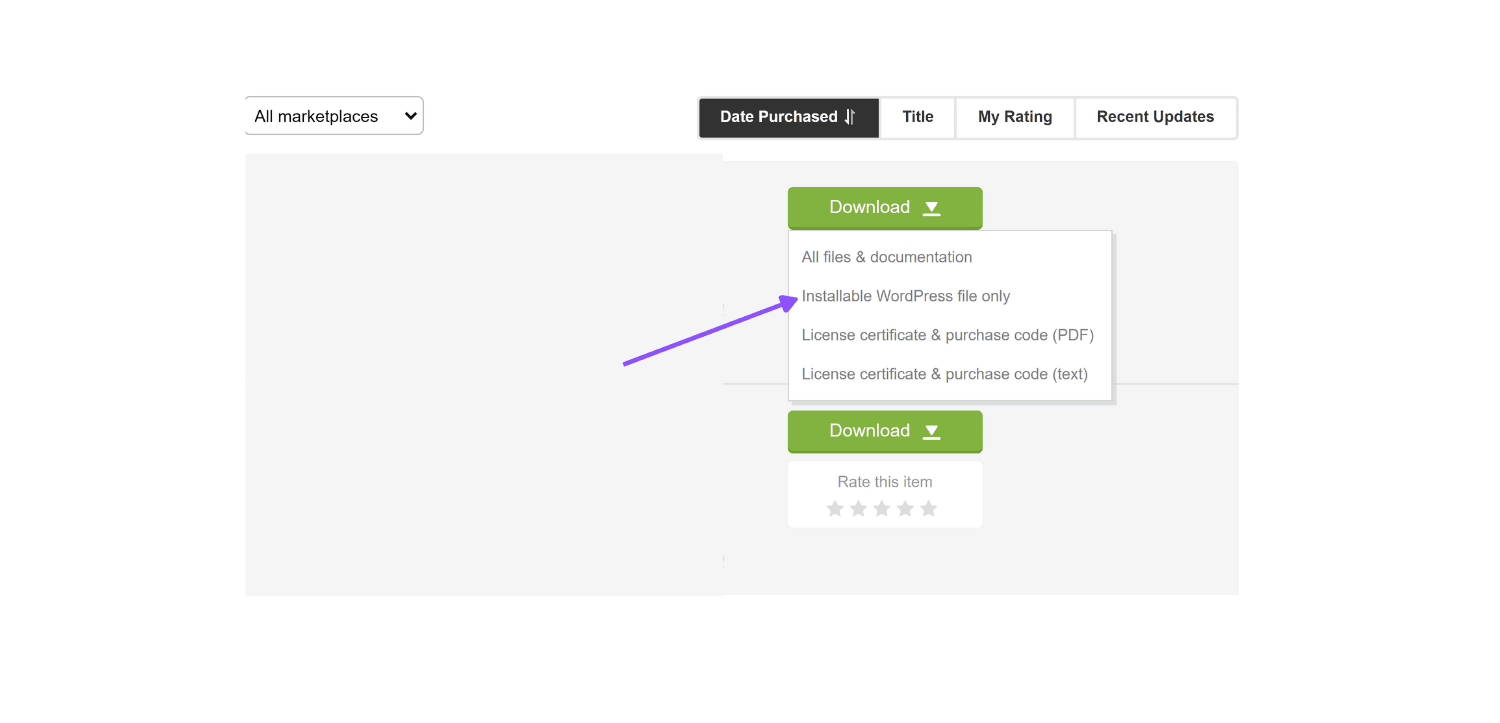
Step 4: After payment, you should be redirected to the download section; click on the download button of the purchased theme and select “Installable WordPress File Only.”
That’s the entire process; ThemeForest should provide you with a zip file of the theme that you can install on any wordpress site.
How To Install WordPress Themes on Your Bluehost WordPress Website
Now that we have secured a good theme let’s install it on our WordPress site.
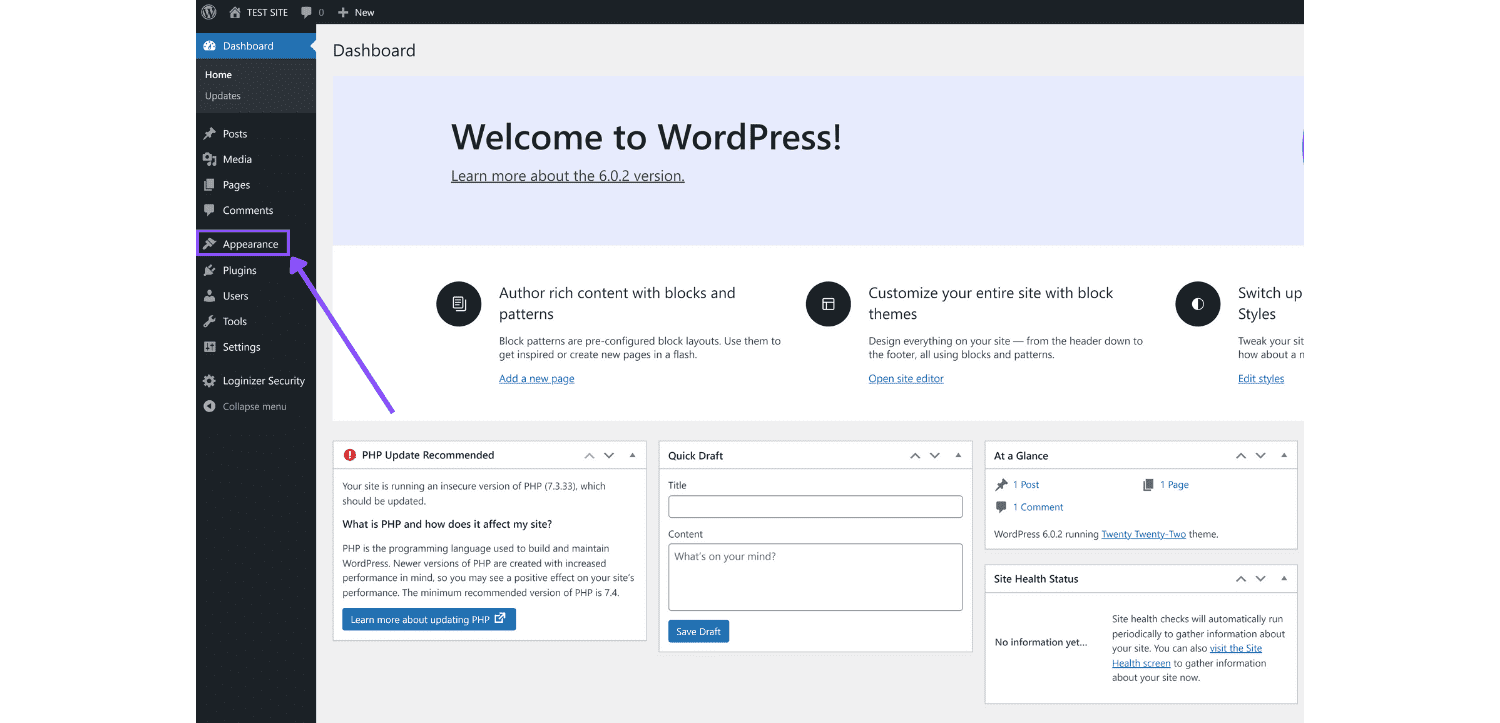
Step 1: Log in to WordPress and navigate to the “Appearance” page via the sidebar.
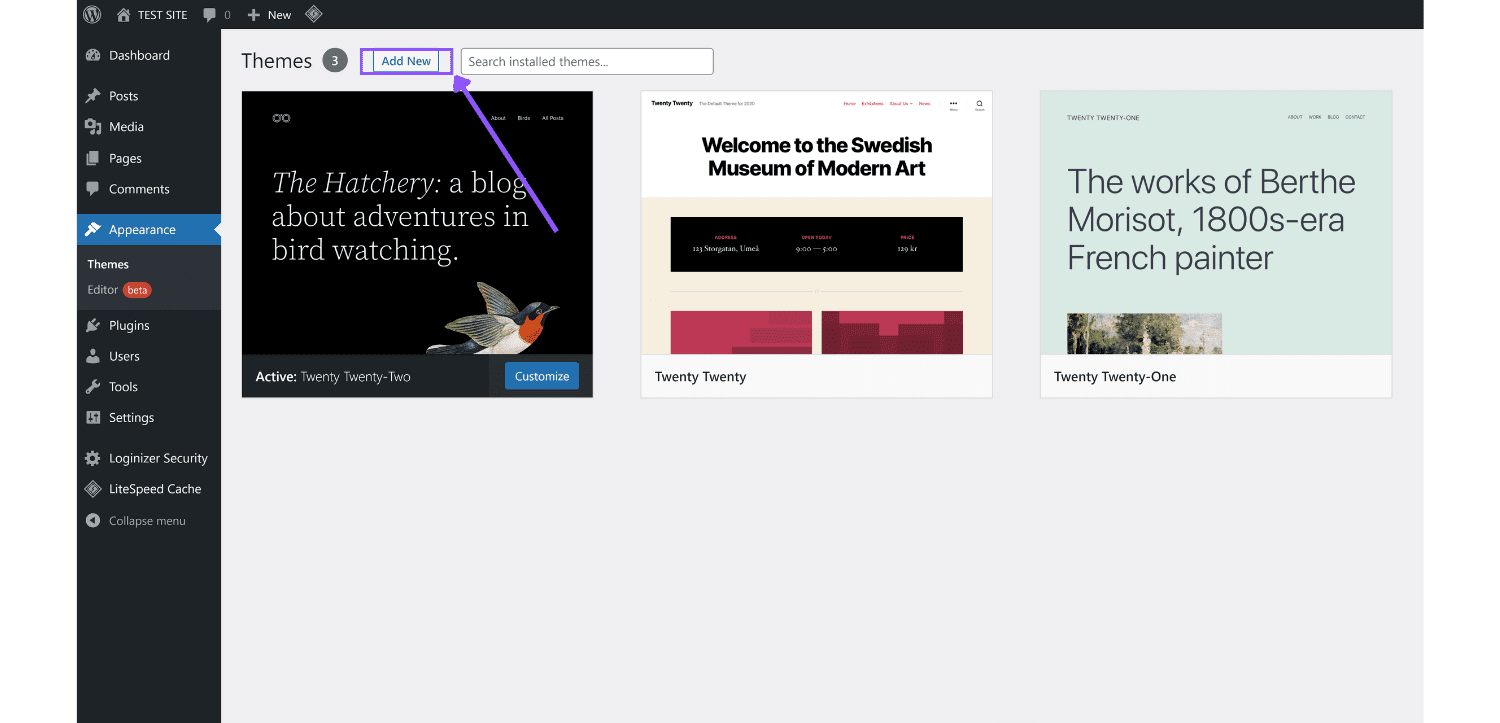
Step 2: Click on the “Add New” button on the appearance page.
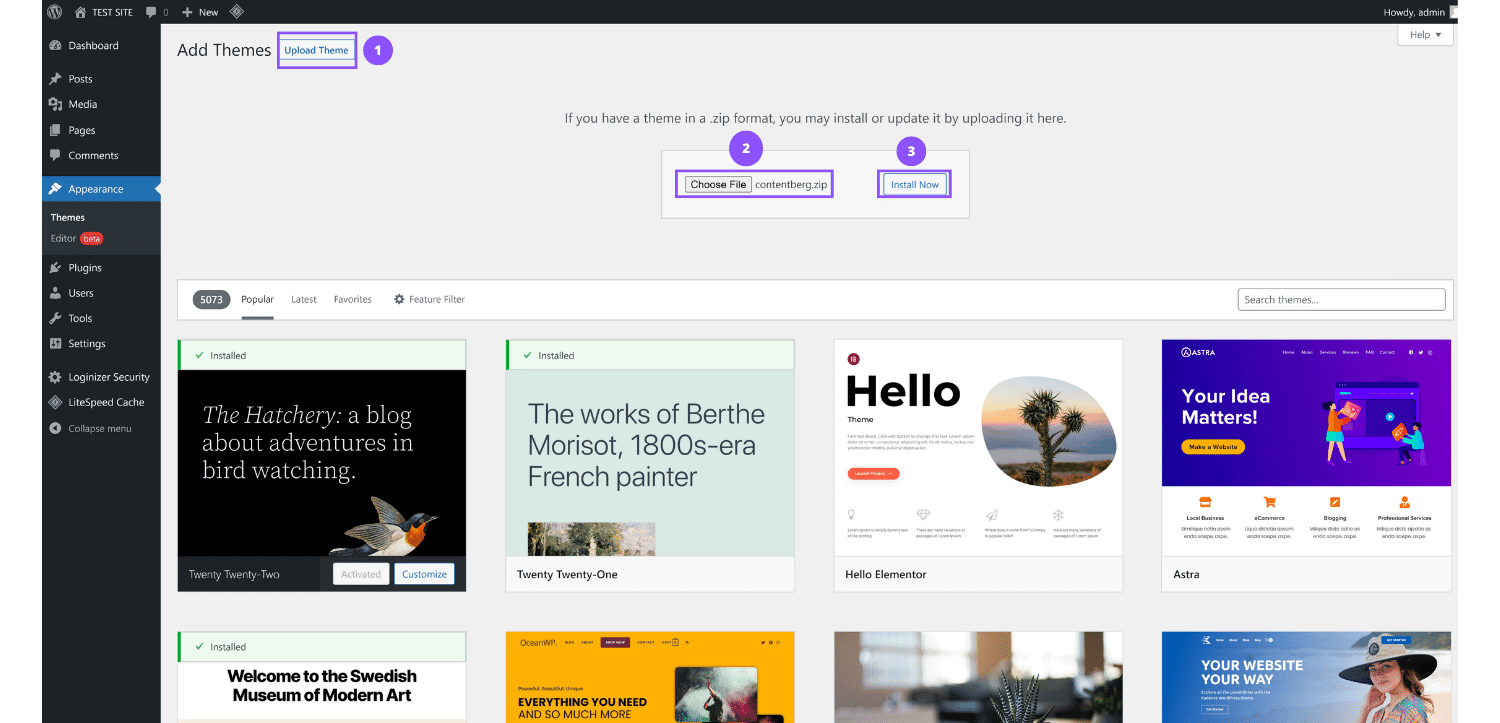
Step 3: Click on the “Upload Theme” which reveals the uploader, then select “Choose File” and grab the theme zip file you got from Themeforest or another marketplace and click “Install Now”.
Step 4: Click on “Activate” and the Theme should become active on your WordPress website.
Setting up themes on WordPress varies greatly because every theme developer has a unique approach.
After purchasing any theme from a marketplace like ThemeForest.net, you’ll be provided with a documentation PDF or link where they layout all the setup instructions in written text or easy-to-follow videos.
Irrespective of what theme you purchase, though, there are three steps to setting up WordPress themes;
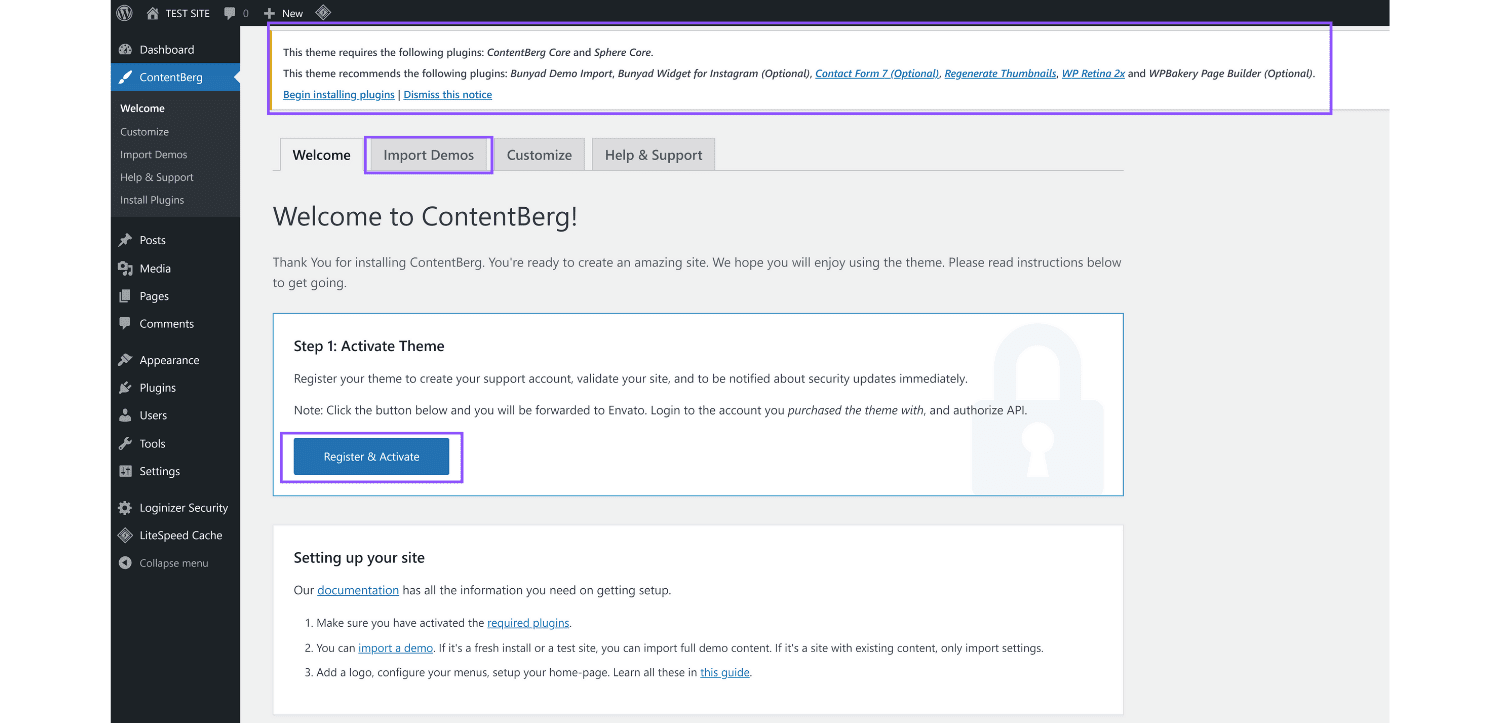
Adding in your theme’s purchase license code to validate automatic updates
- Installing all required plugins
- Importing a Ready-Made Demo
Once you do all three of these, what would simply be left is replacing all demo content (text and images) on the theme with yours, which is simple and requires no code because of drag and drop pagebuilders Divi, WP Bakery, and Elementor.
Pro Tip: If you’re not comfortable with setting up themes, there are a lot of freelancers on platforms like Fiverr willing to help out for a small fee.
6. Add Recommended WordPress Plugins
By default, Bluehost provides many performance and security features for websites hosted on their WordPress plans.
For most WordPress websites, that should suffice, but not for Ecommerce or high-traffic websites.
Using more advanced tools is guaranteed to prevent disasters like a security breach or slow website loading speed.
Here’s a list of five recommended WordPress plugins every Bluehost WordPress site should install:
- Updraft Plus – Updraft is a free and powerful backup plugin that provides a streamlined way of backing up your wordpress website locally and to a cloud provider e,g. Gdrive. It is an excellent alternative to Bluehost’s Codeguard basic addon but can be used along aside it.
- WordFence – Wordfence is the most popular security plugin in the entire WordPress repository; it is free to use but has a premium version that offers even more security. The plugin provides features like 2-factor authentication, brute force protection, and a web application firewall which all work together to prevent a majority of attacks from affecting your wordpress installation.
- WP Rocket – By default, Bluehost relies on Cloudflare to cache and speed up sites hosted on their servers. WP rocket takes this to another level by applying site-level optimizations that can speed up Bluehost websites by over 60%. It costs $49 per year per site.
- Rank Math – Rank math is a free WordPress SEO plugin that offers premium features that you would otherwise be paying for in something like Yoast (Bluehost SEO addon). It applies optimizations to your website, allowing site engines like Google to find and rank content easily. Rank Maths also has a paid version, but in most cases, the free version should be good enough.
- Site Kit by Google – Google released this plugin to help WordPress site owners quickly set up their site to be discoverable by google (Just like Rank Math does). This plugin’s main feature that makes it so valuable it’s simple integration with Google Analytics and the Google Search console.
There are other alternatives to these WordPress plugins, but from my experience, I’ve found that they work pretty well with Bluehost without any compatibility issues.
Installing WordPress Plugins
Now that we’ve set up both WordPress and a theme, here’s how to add the recommended plugins to the WordPress site in case you need help,
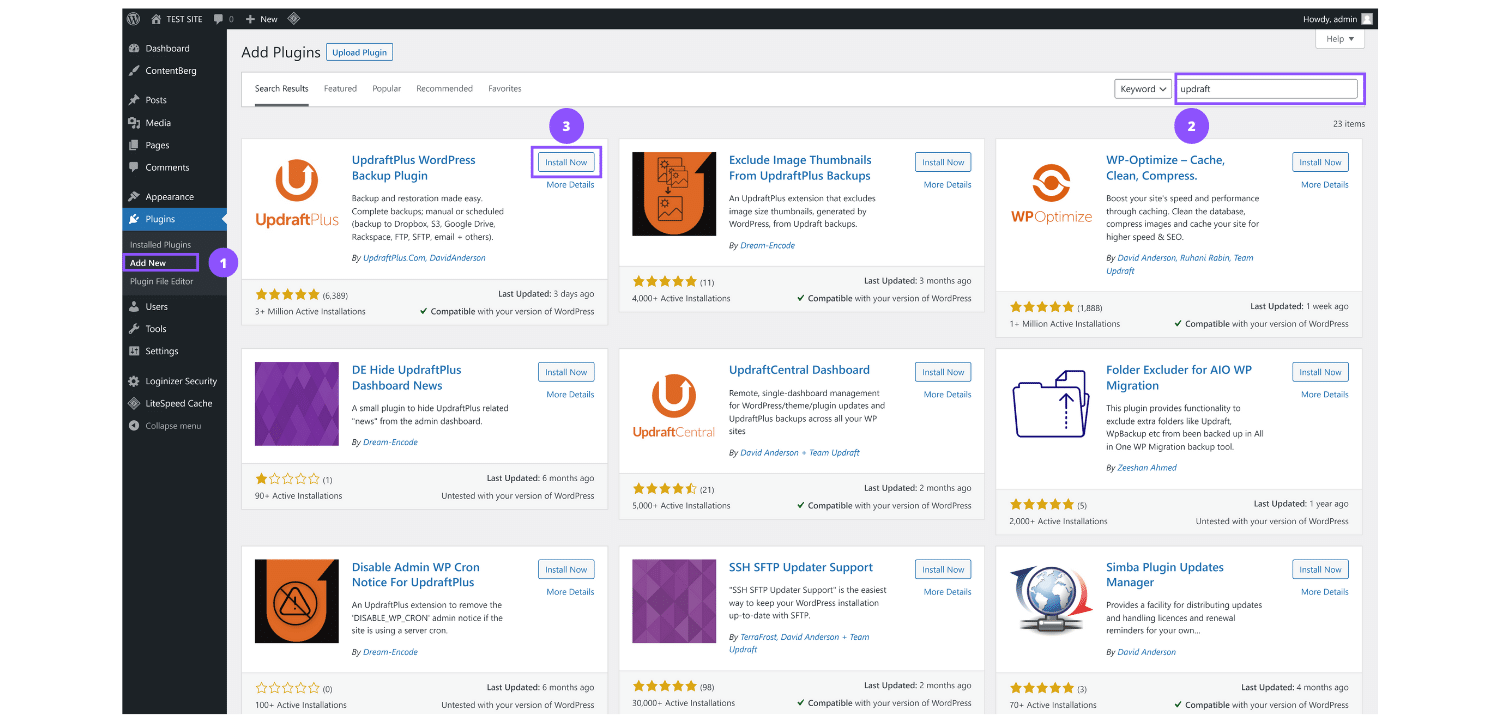
Step 1: Navigate to the Plugins page via the sidebar, select “Add New” type in the plugin’s name on the search bar, and click on the “Install” button when you find it.
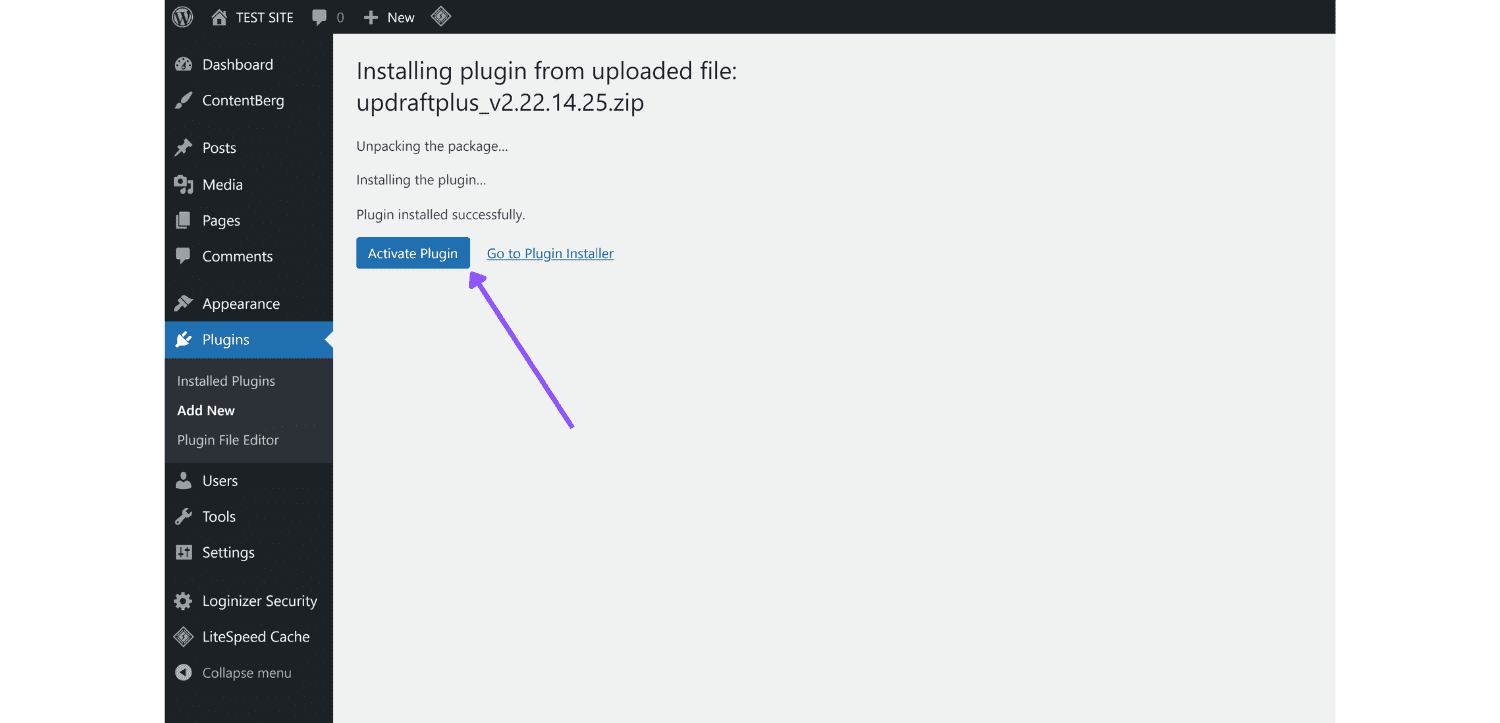
Step 2: Click the “Activate” button, and WordPress will fully activate the plugin on your site.
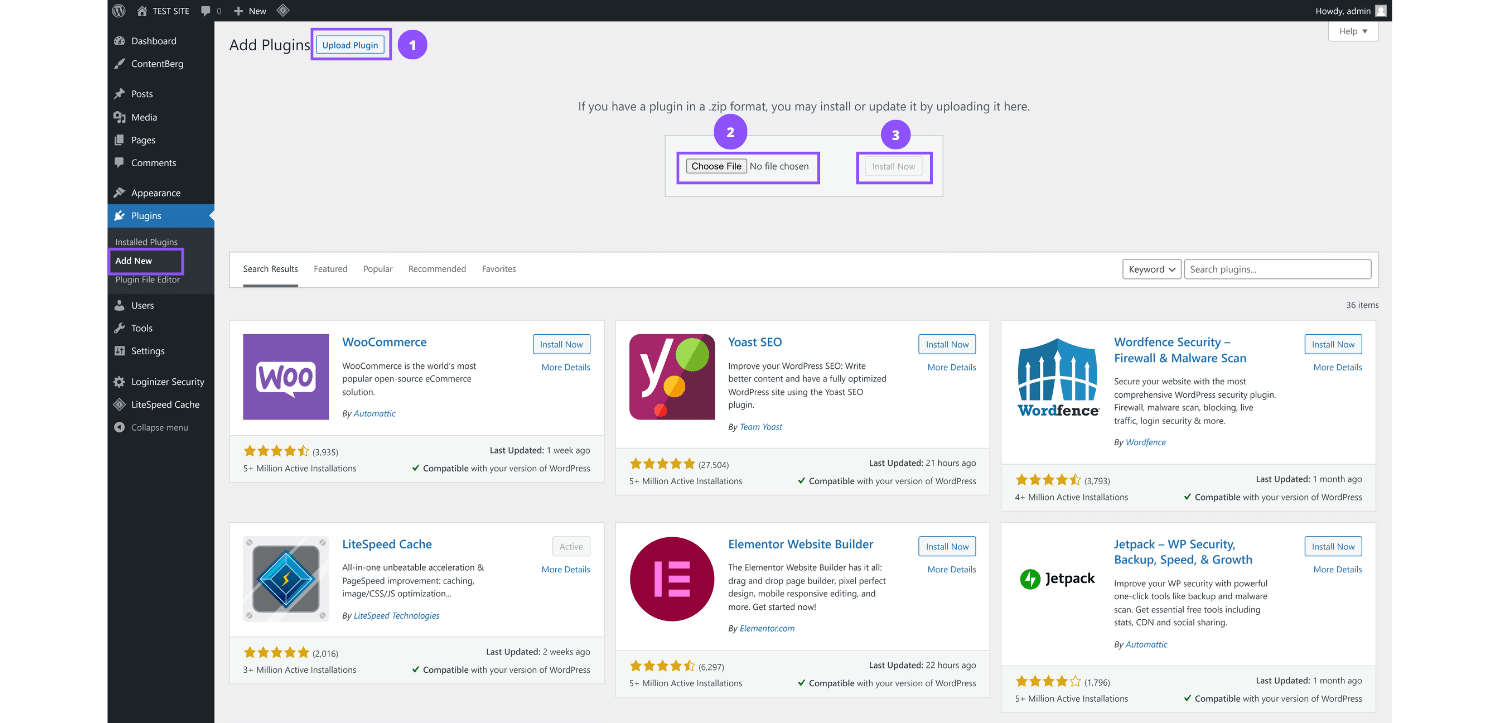
If you downloaded the plugin from a third-party development company (e.g., WP rocket), it would be available in a zip file, just like WordPress themes.
You can easily install the plugin by following the steps shown in the screenshot below.
7. Launch Your Site
At this stage, your Bluehost wordpress site should be fully configured and production ready.
Bluehost, by default, put all sites in “Coming Soon” mode until you’re ready to launch.
To publish your site navigate to “Bluehost” on the WordPress dashboard via the sidebar or by clicking on the Launch your site button at the message at the top-right of your dashboard.
After this, your site should be live and display all your pages.
Conclusion
So that’s basically it, folks: in this article, we’ve gone over how you can build a WordPress website on Bluehost.
We started by purchasing a Bluehost plan, configuring a wordPress installation, and installing a theme, then ended with a recommended list of plugins every WordPress website needs.
Thanks for reading, and I hope you’ve found this helpful.


