How to Create a Course on Podia

Written by Casey Botticello
Disclosure: Some of the links below are affiliate links, meaning that at no additional cost to you, I will receive a commission if you click through and make a purchase. Read our full affiliate disclosure here.
According to Statista, by 2026, the global e-learning market is forecast to reach almost 400 billion U.S. dollars.
This means E-learning is projected to double in market size in the next 4 years.
With statistics like these, it’s no wonder why creating courses is so profitable.
It use to be difficult and expensive to create courses, but with platforms like Podia, the entire process has been streamlined.
This article will guide you through how to create your first course on Podia including all the prerequisites needed.
At the end of this article, you should have a full grasp of Podia’s online course creation wizard.
Let’s get to it.
Podia is a unified platform that enables users to create, manage and sell online courses, digital downloads, memberships, coaching, etc.
Podia also has a Mail service (which means you can send emails) and a website builder, the platform provides all the common tools required for digital marketing. So instead of paying subscription fees for different digital marketing features, you just need one — Podia.
There are many Learning Management Systems in the market but Podia makes creating and selling a course way easier.
Instead of relying on a complicated course-building system (like competitors), Podia keeps things simple with a limited but powerful interface separated into sections and media.
Podia continuously improves its platform by listening to customer feedback and it’s the core reason they have such a good product.
Aside from online courses, you can also use Podia for Email marketing, website creation, and a multitude of other use cases.
It’s an all-in-one solution for digital marketing needs.
Before creating a course with Podia, you need to complete the prerequisite covered below.
Prepare and Validate Course Content
Just as how a house requires a construction plan, so does your course.
Before thinking of using Podia, you need to already have your entire course or the structure figured out.
There are two ways you can go about this and they both require you already have a course outline/structure ready.
You can either create your entire course from the outline before moving them to Podia or use the course outline to create the course structure on Podia then slowly upload each video according to the outline.
I recommend the pre-production route though as this will allow you to make corrections and create even more videos before tinkering with the Podia course creation interface.
Using a project management tool like Trello or ClickUp, you can create a course outline and checklist and set deadlines for the production of each Lesson.
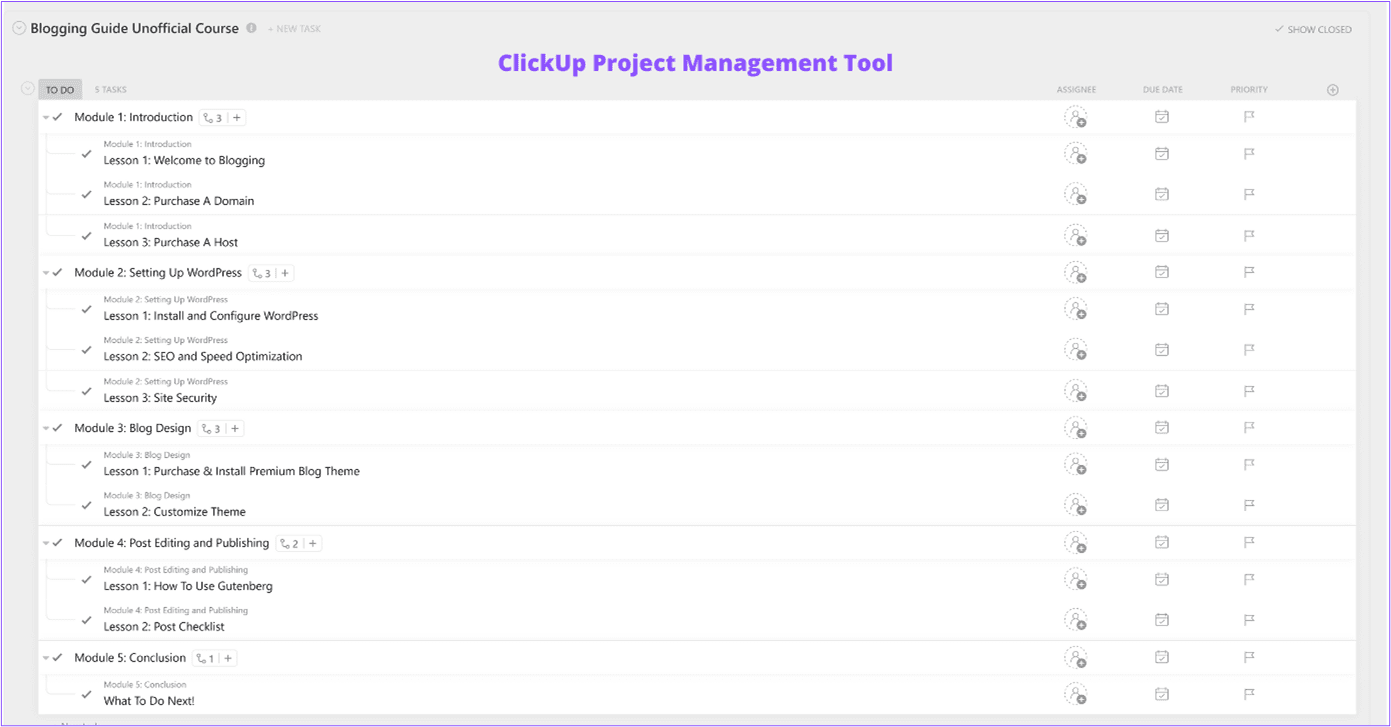
Source: ClickUp Project Management Tool
A Lesson is basically an individual embed, quiz, text, coaching, or file that can be domiciled under a section or independently.
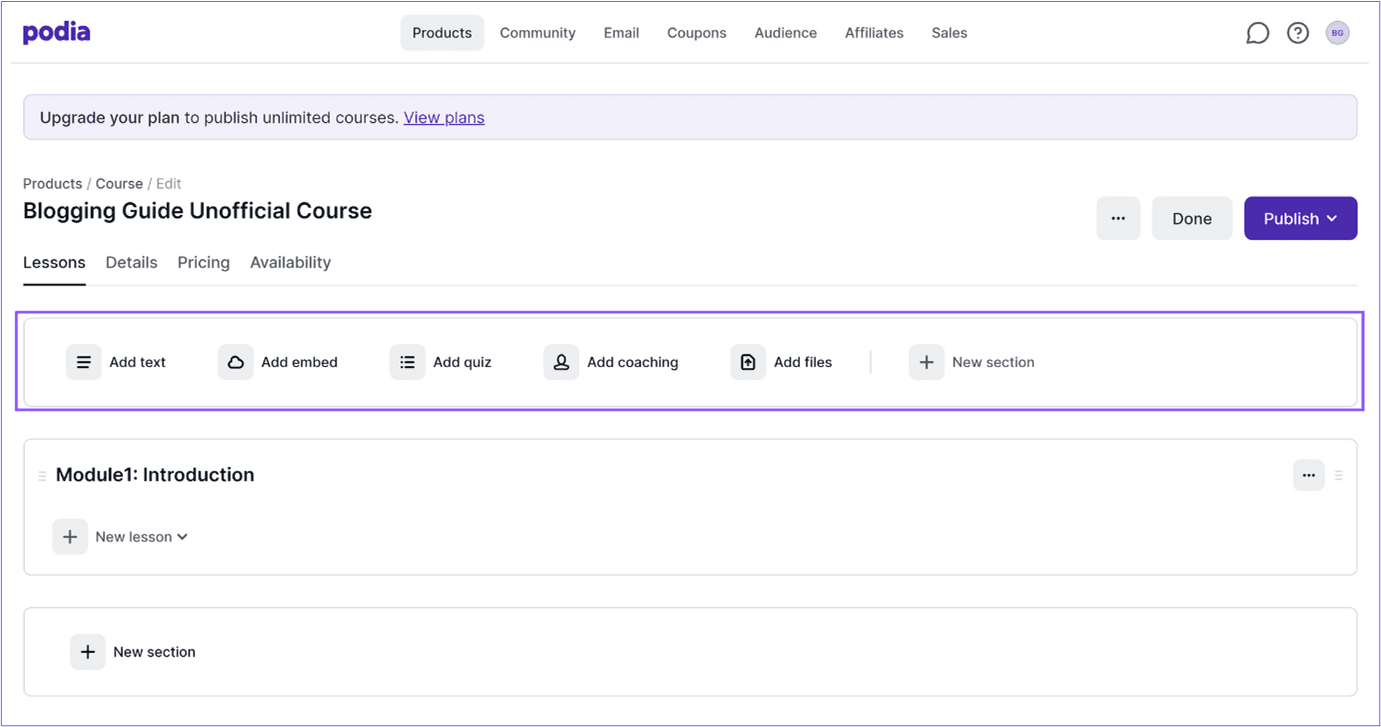
You’ll mostly use the EMBED and FILE lesson type as it’s how you’ll add in videos.
I recommend using the EMBED lesson type over a FILE as it allows you to add videos from Youtube, Vimeo, and many other services.
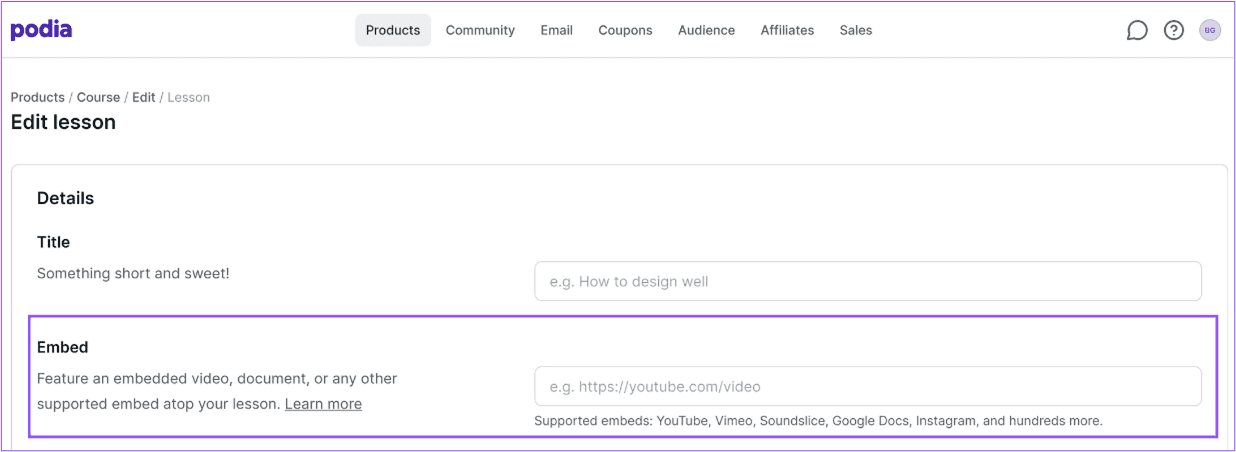
Personally, I recommend Vimeo over YouTube if you can afford their annual subscription as it offers more embedded features but either of the two is fine.

You should also create description texts for each lesson; if you mentioned anything important during the video like links to websites or sample files, your lesson description would be the perfect place to add them.
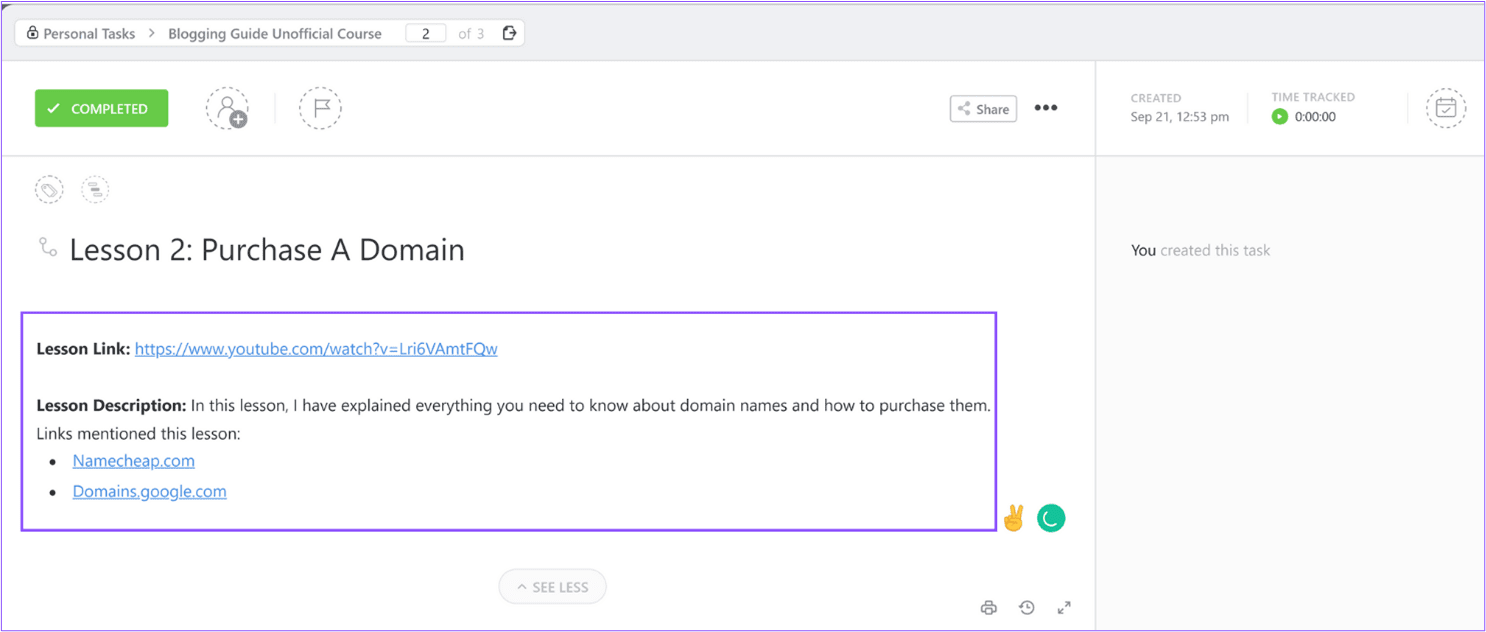
Source: ClickUp Project Management Tool
So after producing all lessons according to the course outline, you should upload them to a video service like Youtube unlisted.
Copy the links and add them to your project management tool or notepad with the course outline.
You can also come up with Quizzes and written lessons if required, at the end of this phase, you should have your entire course content ready or at least an outline.
Creating a Podia Account
Creating a Podia account is simple, first, you have to visit Podia.com and click on any of the Sign Up buttons.
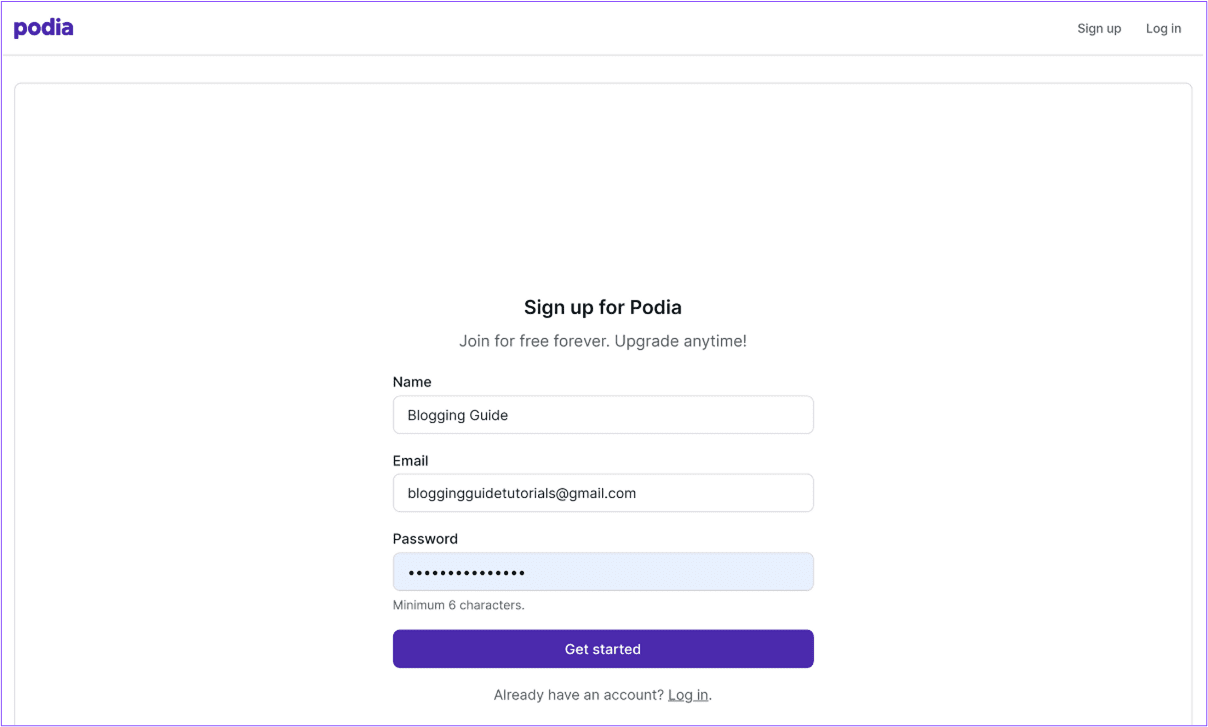
You’ll be redirected to the signup page where you have to enter your Name, Email, and Password.
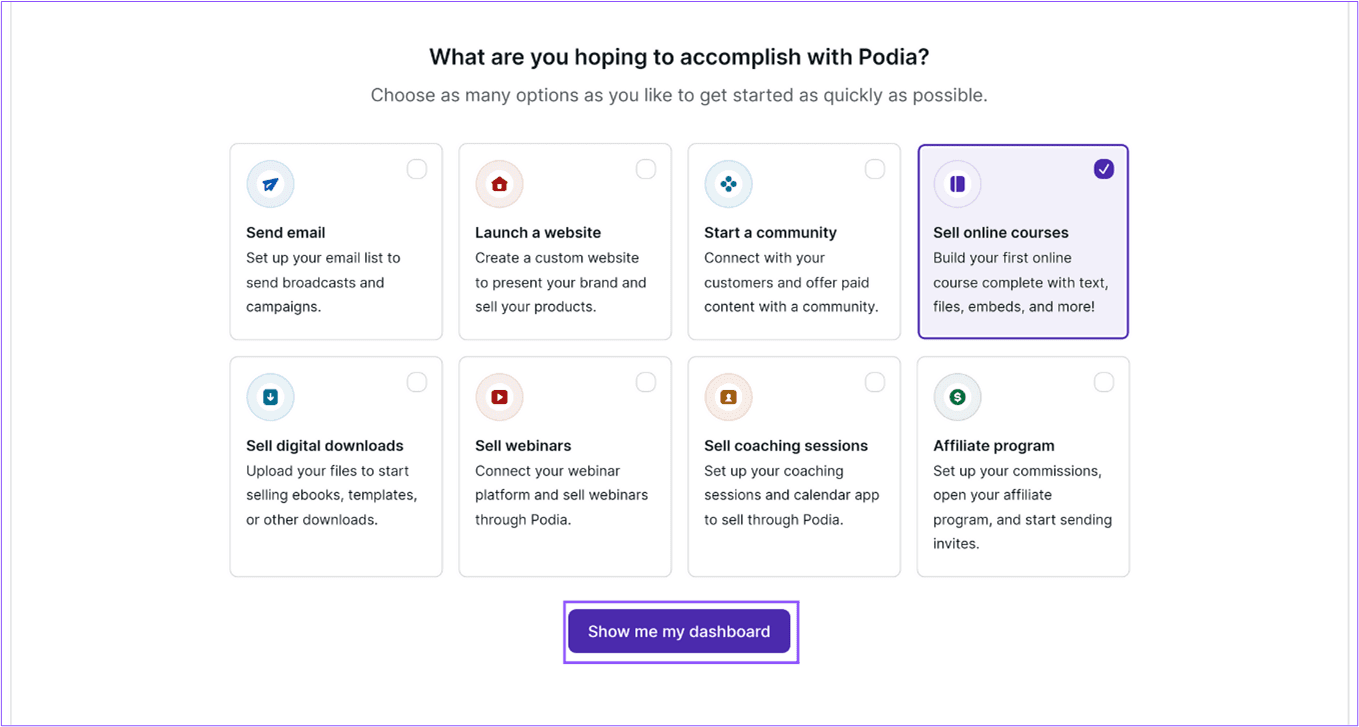
Next up is a survey that you can skip, just click the Show me my dashboard.
You should be redirected to your account dashboard and immediately receive a confirmation email, click on the link to verify your email address and that completes the signup process.
Purchase a Podia Plan
Every Podia account by default is on the free plan which has a lot of restrictions including not being able to publish courses.
You also can not add certificates and integrate with services like Zapier and PayPal.
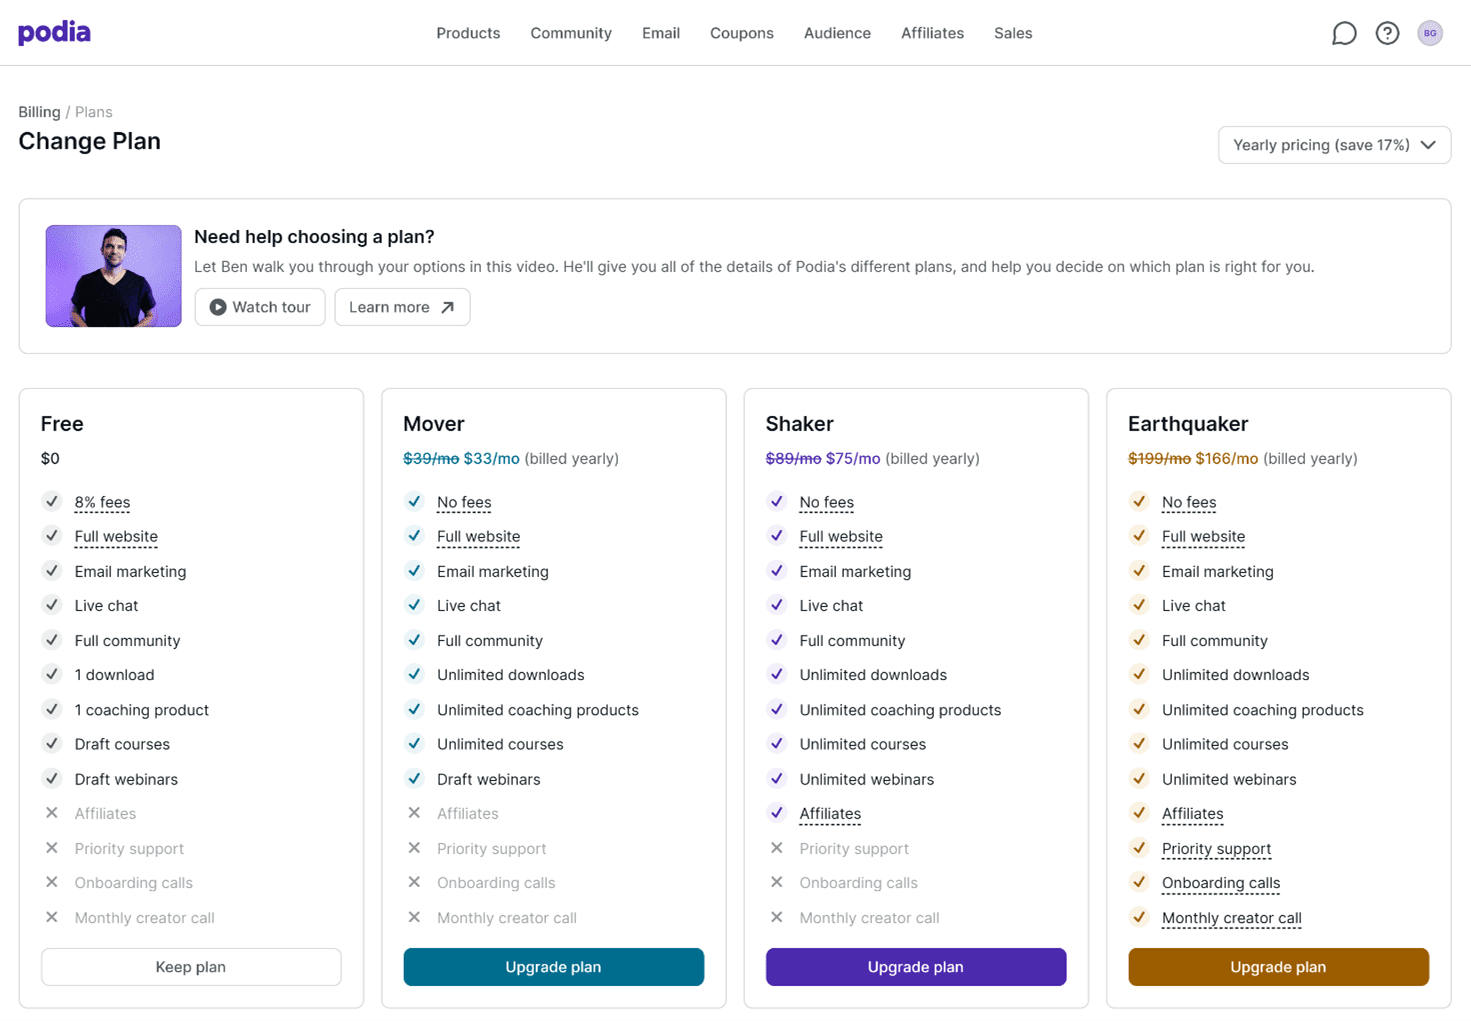
The plans Podia does offer aren’t too expensive with the lowest priced plan being $39 a month.
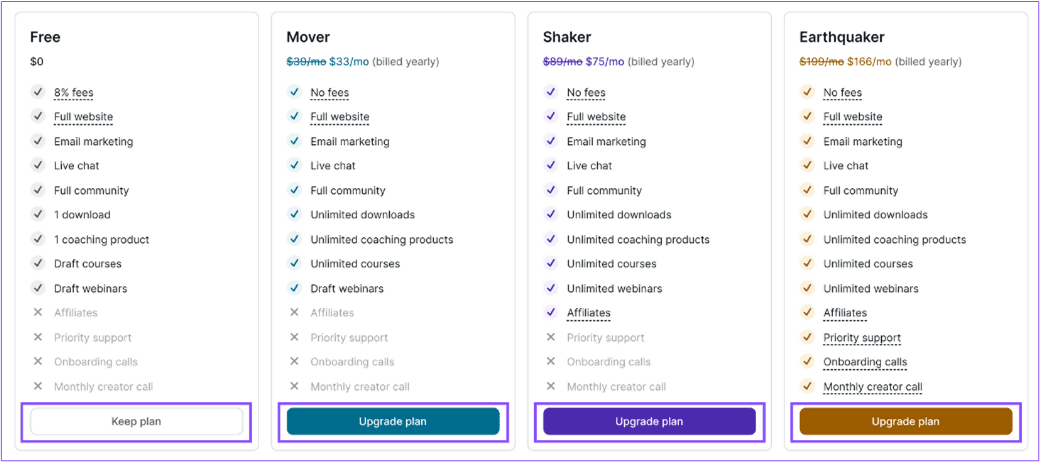
Here’s a list of all Podia paid plans:
- Mover Plan: The Podia Mover plan disables fees on products purchase, and allows the creation of unlimited courses, downloads, and coaching products. It costs $39 / Month.
- Shaker Plan: The Podia Shaker plan has the same features as the Mover plan with the addition of an affiliate feature that allows you to pay users who refer others a commission when someone purchases your course through their link. It costs $75 / Month.
- Earthquaker Plan: This is the highest-tiered Podia plan and offers more support options ( Priority support, Onboarding calls, and Monthly creator call) than other paid plans. It costs $199 / Month.
Note: All Paid plans offer support and allow the use of a custom domain name which is a big plus if you want to brand your course site. You can also remove Podia branding when on a paid plan.
Personally, I recommend subscribing to the Mover plan as that should be more than enough for creating and selling courses with Podia.
In case you don’t know how to upgrade your Podia plan, visit their Subscription Plans page and click the Upgrade Plan button on any of the plans you like.
How to Create a Course with Podia
Now that we have our course content and podia account ready, let’s create our first online course.
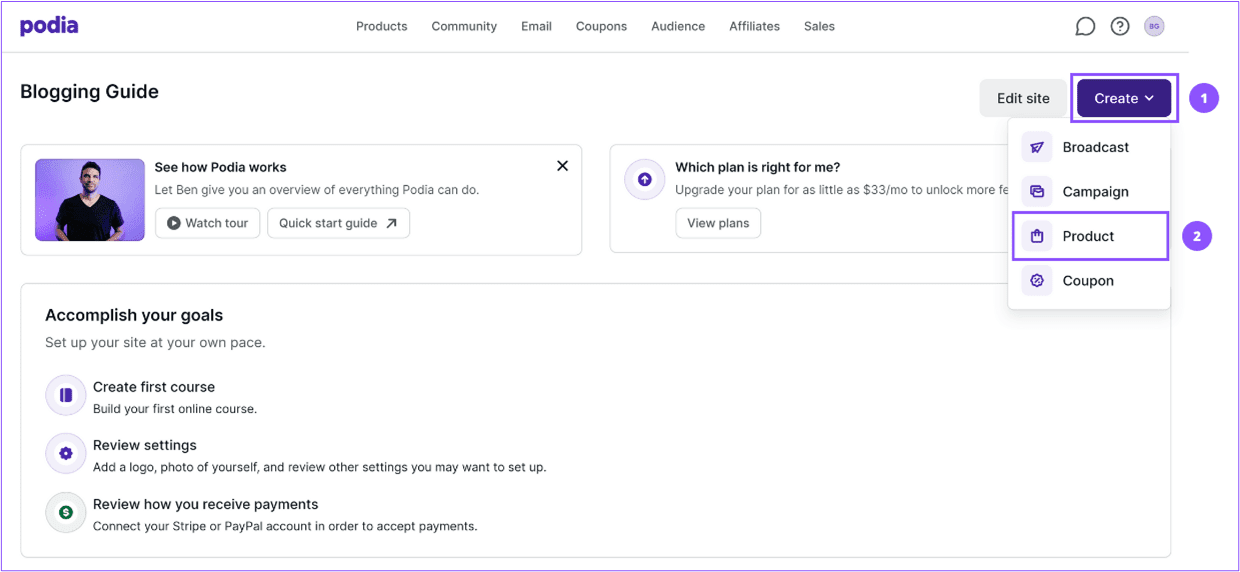
Creating courses on Podia is streamlined, from the Dashboard page, click on the Create button and select Product.
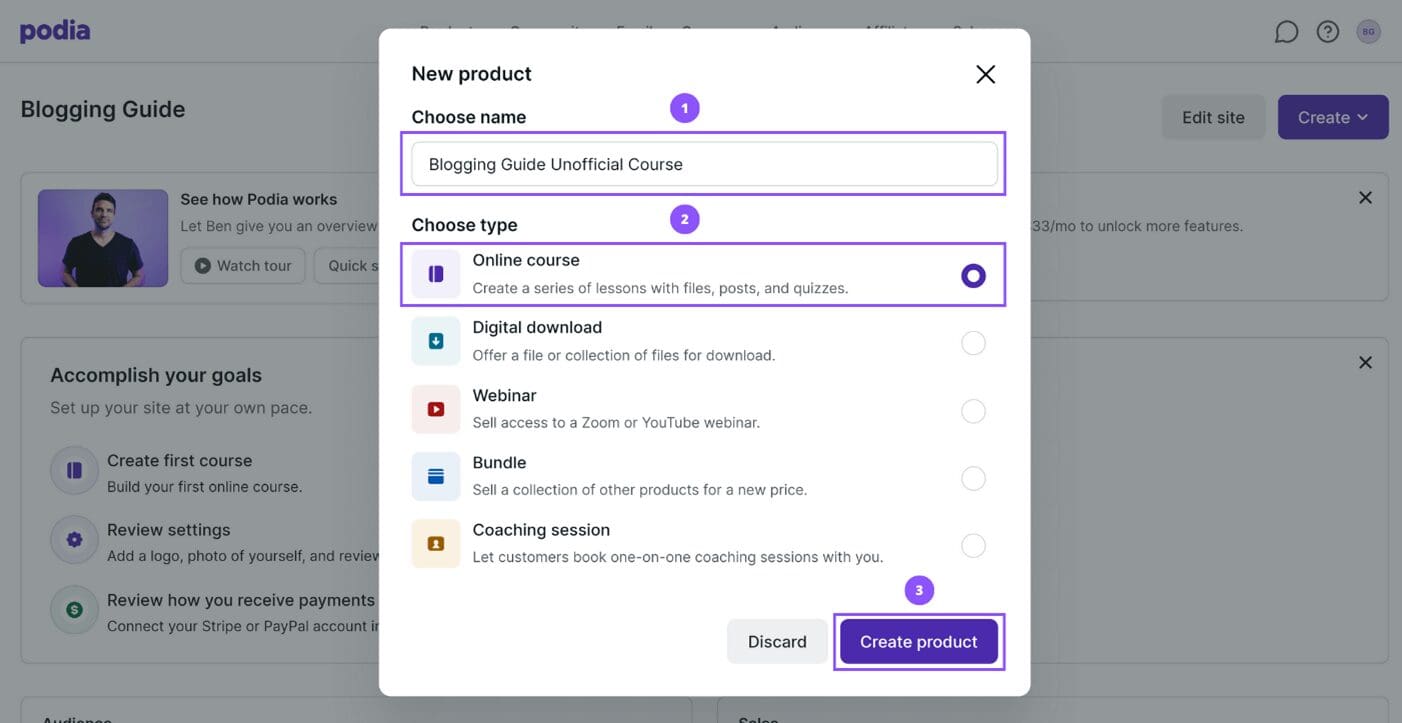
You should see a Popup with a list of different Product types, enter a name for your course then select Online Course and click the Create Product button.
You should be redirected to the Online Course dashboard which is separated into four tabs.
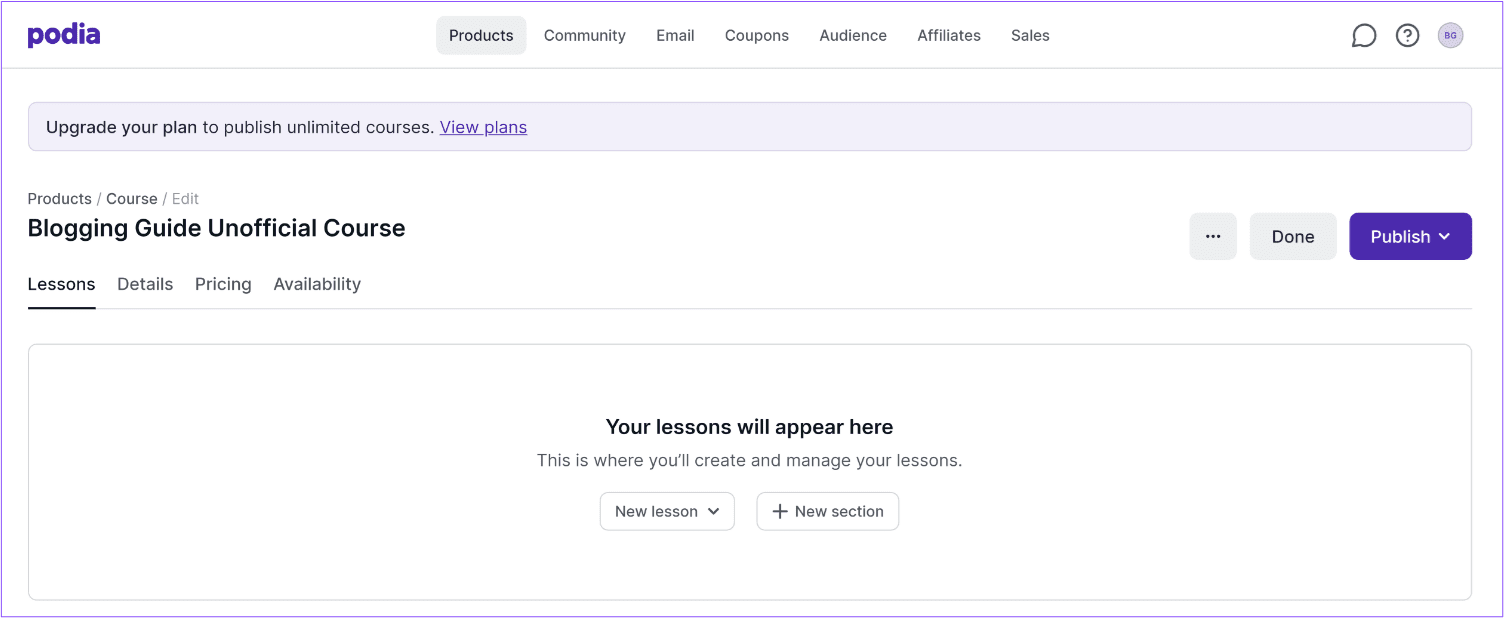
Lessons, Details, Pricing, and Availability.
You’ll spend the majority of your time on the Lessons tab as it’s where you add your course content so go over that first.
Lessons
this is where you add in your course content, you can go ahead and your course lessons directly or structure your content using Sections.
A section can be a module in your course like an introduction, it helps you group videos that are under a specific category.
The first thing you need to learn in this tab is adding Sections as those help you structure the content of your course.
Click on the New Section button from the course dashboard and you’ll be redirected to the section creation wizard.
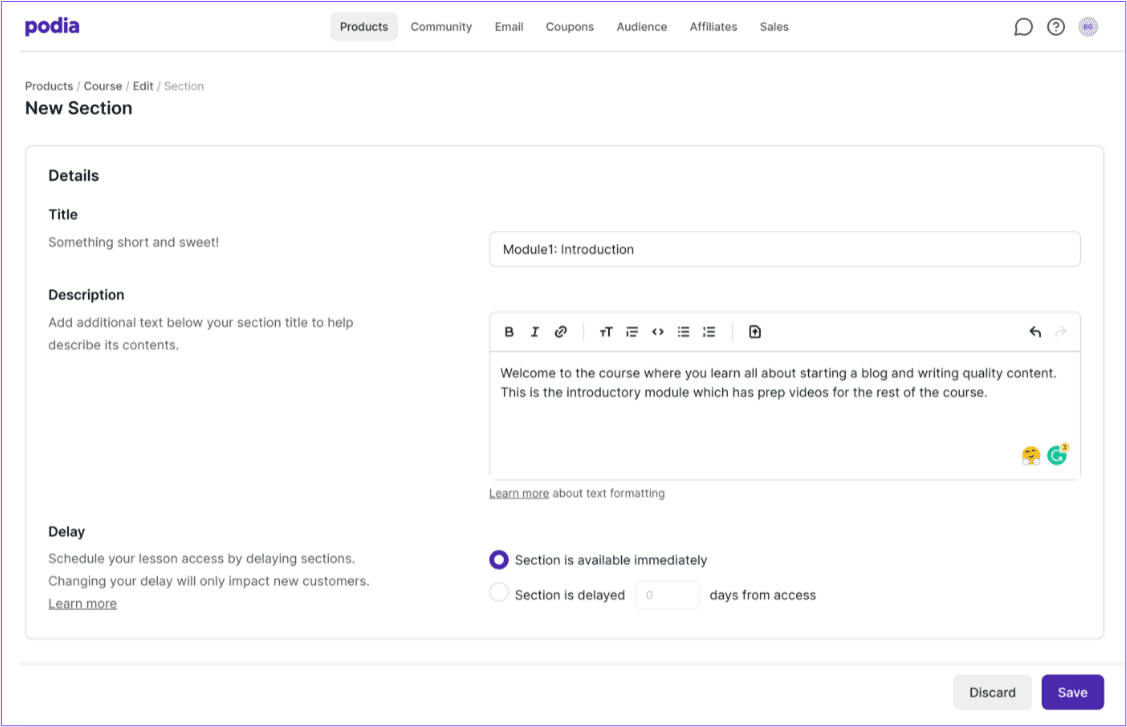
All you have to do is enter a Title for your Section and a Description, you can also set a delay if you don’t want people to access the section content instantly.
I recommend creating all the sections of your course first before adding in lessons.
Once you have sorted, you can start adding lessons under each created section by clicking the New lesson option and selecting the lesson type.
Under the lessons tab, you can add five different lesson types; Text, Embed, Quiz, Coaching, and Files.
Text
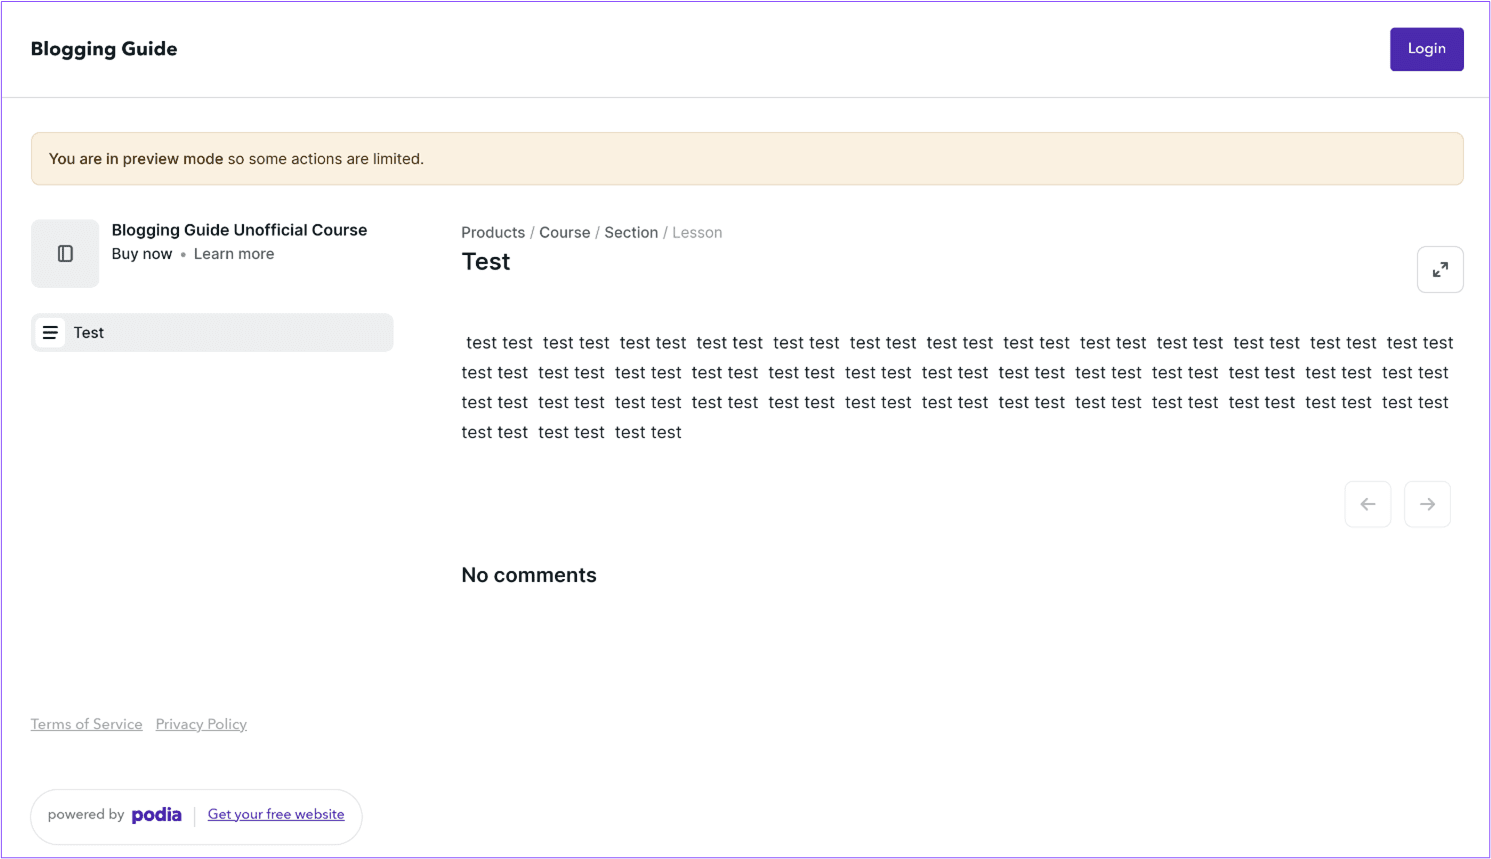
The Text Lesson type is for written course content.
If you have some text you want people to read while taking your Podia course, the Text Lesson type is made for just that.
It has two sections, on the details section you add in a Title and the lesson Content, you can also embed files and code inside the content.
The second section is lesson-specific Options, you can set the visibility of the lesson to visible or hidden and also enable Lesson Preview.
After creating the text widget, it should show up like this:
Embed
The Embed lesson type is mostly used for embedding video content but also supports other media formats.
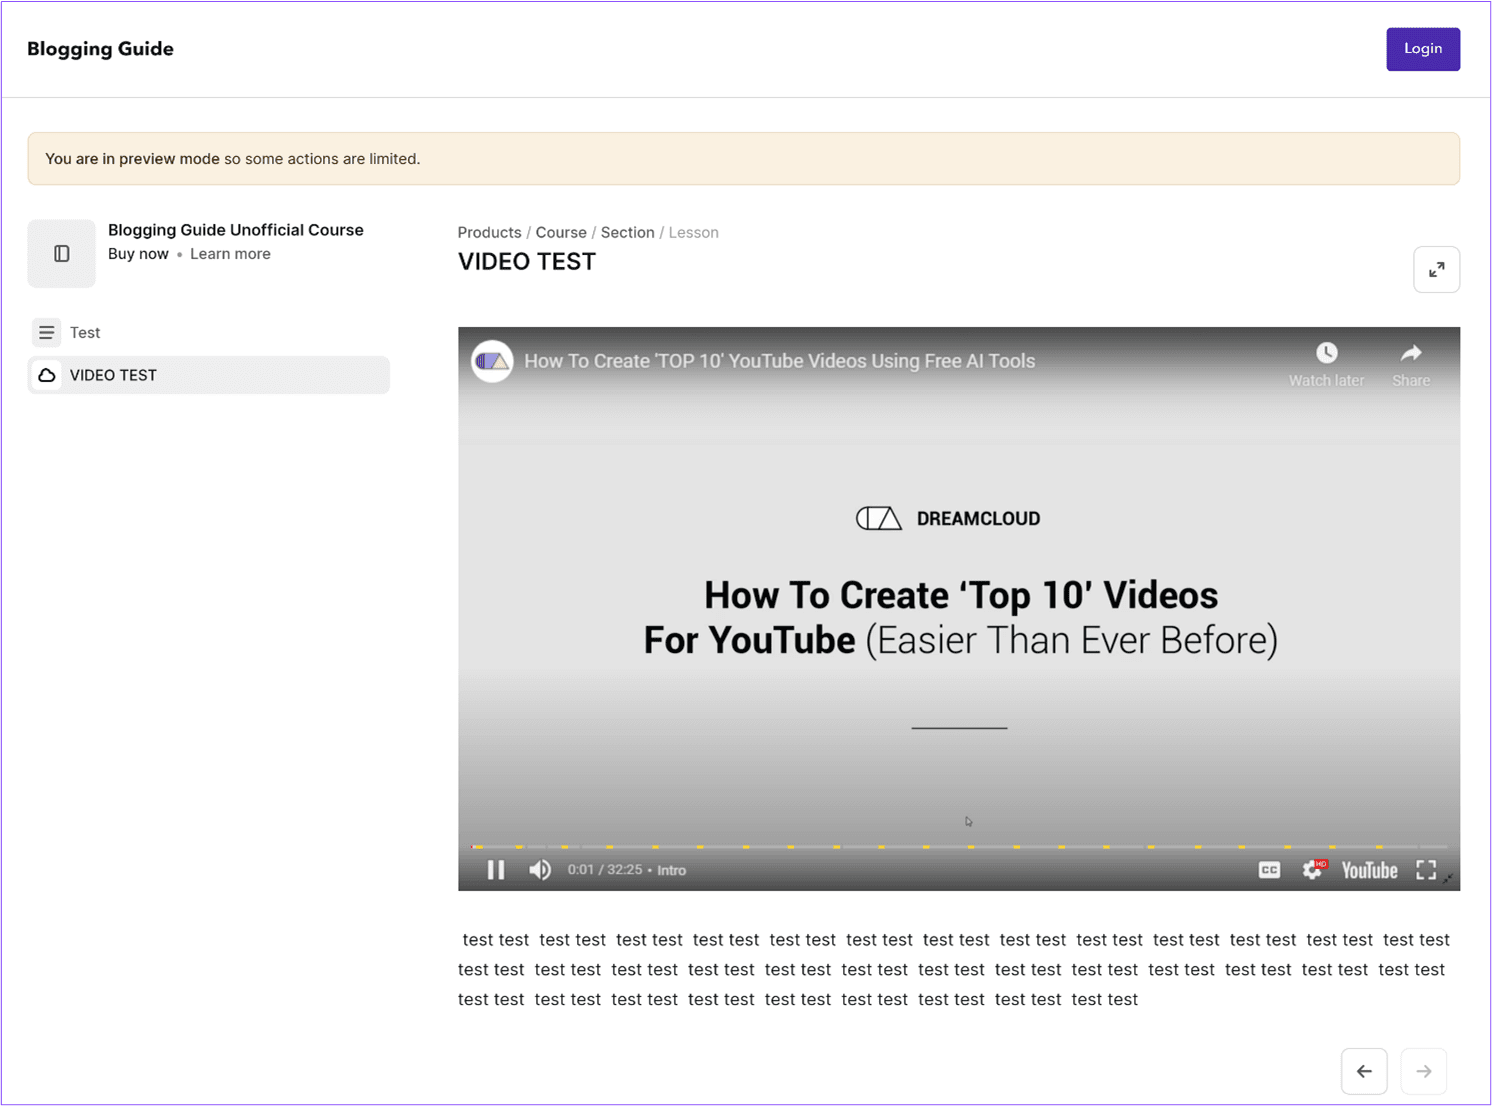
When creating traditional video courses, you’ll mostly be using the Embed lesson type which is structured exactly like the Text lesson type but with an extra field for Embed URL.
When you add this lesson to your Podia course, it should look like this when viewed:
Quiz
The Quiz lesson type allows you to create quizzes that anyone taking your Podia course can complete, it has the same fields as the Text lesson type with an additional powerful Quiz builder.
To use the Quiz builder, simply enter a question and add in several answers, you can set multiple answers as right if needed as well.

Coaching
The Coaching lesson type enables you to add a coaching session to your Podia course, this is especially useful if you’d like people taking your course to be able to contact you for questions after completing a section or the entire course.
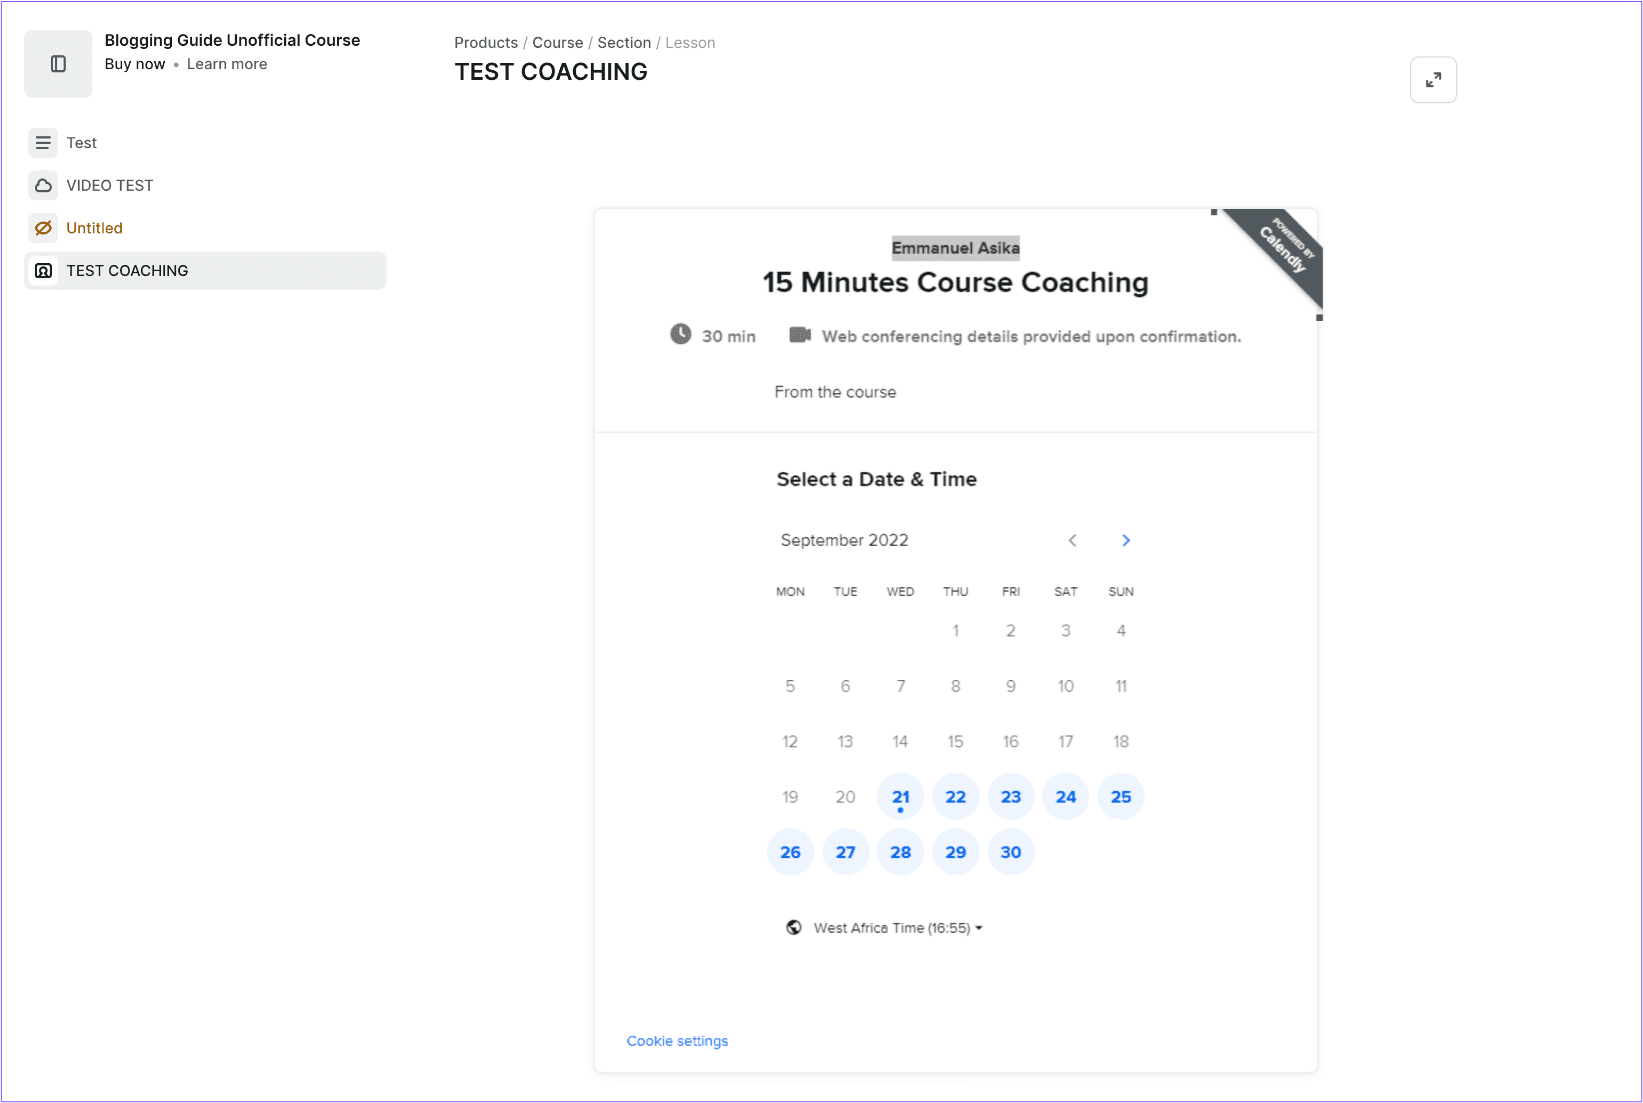
It has the same layouts as the text lesson type with the addition of a Booking field where you can enter one of four booking service links; Calendly, SavvyCal, Acuity, and YouCanBookMe.
You can also add a custom calendar link if you use another service.
This is a preview of the Coaching lesson type:
File
The file lesson type is used for adding files to your Podia course, this can be anything from PDF documents to videos and other forms of media.
Note that Podia does not have any limits on the number of files you can embed but make sure none of the files are above 5GB as those will fail to upload.
You can use Google drive or some external file storage service and embed if you ever encounter a size constraint.
Using a combination of the lesson types (mostly Embed), add in all your course content from your course outline, and then move to the next tab.
Details
The details tab contains fields for adding more information about your course, you can change the name of your Podia course, and add an image, description, with category.
You can also add a certificate that participants receive on completion but that requires a paid subscription.
Comments by default are available in every Lesson and participants can add and view older comments but this can also be changed on the details tab.
You can set comments to be Hidden which means no one gets to see them or add new entries or Locked which prevents anyone else from adding new entries but seeing previous comments.
Last on the details tab are integrations that allow you to connect your course to third-party video, email, and automation services.
Overall, you’ll find that you only need to enter a name, image, and description in this tab. The rest are features you may not need as a beginner.
Pricing
The pricing tab is where you set a price for your Podia course, Podia supports only two payment methods; Stripe and PayPal.

By default the course is set to be free, you have to connect a payment method to your Podia account before you’re allowed to set a price.
Click on Manage payment integrations and you’ll be redirected to the payments tab in your Podia account settings.
Simply click the Connect button next to the payment method of choice and follow the wizard.
Once that’s done, you should be able to set a price for your course.
You can also customize the course title and description when it’s displayed as an upsell, this can increase the conversion when compared to leaving the default text.
After customizing the product’s upsell text, you can proceed to add other products on your Podia on which you’d like the course to appear as an upsell.
Availability
This is the last tab and allows us to change the status and visibility of our course.
On Podia, a course can have three different statuses; Published, Pre-launch, and Draft.
By default, all courses are set to Draft which means no one can see them except you.
If you’d like to allow access to the course for your email subscribers only, the Pre-launch status is the right option
Lastly is published which makes the course public and purchasable by anyone.
To set a Podia course to the publish status, click on the Edit button then select the Published option, and click Save.

Note that you can change the status of your course from any tab on the course creation dashboard using the to-right widget.

The Availability tab just gives more granular settings like visibility and access control.
With the visibility option, you can set if you want the course to be hidden from the site and audience dashboard or not.

By default, visibility is turned on so you don’t need to do anything here.
The Access limit sub-section helps you control if new customers can still purchase the course, the course start date, and amount of total signups possible.

Conclusion
After structuring your course content and adding them to Podia with other tab settings configured, publish the course via the Availability tab or the widget at the right top to complete the course creation process.
Other things you can do include creating a Podia website that alters the appearance of your course pages as well.
You can also start marketing your course to your audience, your course link is available from the Products Dashboard.
Click on the 3-dot icon and select Share Course and your Podia course link should appear in a popup.

Overall, creating courses with Podia is always a stress-free process and it’s one of the best solutions in the Learning Management System market.
If you do run into issues when creating a course on Podia or just have a question, leave a comment below and I’ll get back to you as soon as possible.


