How to Set Up a Self Hosted Ghost Blog

Written by Casey Botticello
Disclosure: Some of the links below are affiliate links, meaning that at no additional cost to you, I will receive a commission if you click through and make a purchase. Read our full affiliate disclosure here.
Since its release in 2013, Ghost has garnered much attention and support online. With over 3,000,000 global installs and a stable version released in 2022, there’s no telling just how far this publishing technology is going.
One primary reason for Ghost’s popularity is that it’s open-source, meaning anyone can use the software for free without any restrictions.
Until now, the only well-known open-source blogging solution has been WordPress, which has completely evolved into a web development solution (with blogging being one of its lesser uses)).
Ghost focuses only on blogging and publishing content and has many built-in features to help promote and monetize content.
In this article, I’ll guide you on how to set up a self-hosted Ghost blog. It doesn’t matter if you’re a non-techie; as long as you follow all the steps in this guide correctly, you should have Ghost installed and working in no time.
Let’s get to it.
Ghost is a blogging content management platform that enables online publishers to create, present, and monetize their publications (articles, videos, etc.)
Ghost is quite similar to WordPress; in fact, I’d dare to say. Ghost got its inspiration from WordPress but completely revolutionized and streamlined content publication.
Unlike WordPress, you do not need to install tons of plugins to get your blog up and running, as most features you’ll ever need as a blogger is baked into Ghost.
Wikipedia.org defined Ghost as an open source platform written with Javascript; this means Ghost can not be self-hosted with regular hosting servers like WordPress.
It requires servers that support Nodejs (a javascript server technology), and that’s why Cloud hosting providers are mostly recommended.
Downsides of Self Hosted Ghost
Even though self-hosting Ghost will remove restrictions, your hosting server resources can still limit the use.
For example, if you host Ghost on a $5 server, there are no membership limitations. Still, there is a limitation on how many concurrent users can visit your website.
Even still, a $5 server does way more than what Ghost (Pro) offers in their starter plan for $11.
Another downside to self-hosting ghost is setting it up and maintaining the server.
Not everyone is a tech wizard. Ghost is by no means considered easy to set up, especially for people completely new to this internet thing.
More so, most cloud hosting providers offer little to no support for individual solutions like Ghost.
In most cases, you’ll have to hire someone to help fix issues and maintain or upgrade your self-hosted Ghost installation.
Overall, it’s still worth it.
You’ll hardly find anything better than Ghost in the market for blogging platforms, so going through the setup hassle one time will pay off in the long run.
Ghost (Pro) is recommended for established online publishers who already have a lot of members and the funding required to pay for the top tier plans (Which, ironically, have no restrictions but cost a kidney).
To run a self-hosted Ghost blog, you need the following;
- A Domain Name & Business Email
- A Hosting Provider
- Content Delivery Network (Cloudflare)
It doesn’t matter what service you use to secure each requirement needed for Ghost. They will all work together when setting up.
For the sake of this article, though, I’m going to use some well-known services while adding recommendations for other alternatives.
Domain Name & Business Email
For the absolute newbies to blogging and online publishing in general, a domain name is an ALIAS that allows people to find your content on the internet.
You see, websites are hosted on servers that have IP addresses, e.g., 192.564.2.1.
This means that if you wanted to access a website, you would have to type in the IP address in the URL bar of a browser.
Now imagine having to memorize 9-10 numbers for every website you plan to visit.
Domain names were invented to solve this problem, so instead of entering an IP address, all you’d have to do is type a name.
So, in a nutshell, Domain names act as intermediaries between a server and your browser.

For your Ghost blog, you’ll need to come up with a domain name and register it via a Register.
A Registrar is a company that has a license from ICANN.org to rent out domain names, so you have to pay through them every year to keep your domain name up.
How To Purchase a Domain Name For Ghost (Namecheap)
Follow these steps to register a domain on Namecheap for your Ghost Blog;
Step 1: Visit Namecheap.com and enter a domain name into the search bar.

Step 2: Click Add to Cart, then click the Checkout button.

Step 3: For the Business Email, you can easily add that to your domain by selecting it below.

Step 4: Confirm the Domain Registration term, then click the Confirm Order button.

Step 4: Register Or log in if you already have an account.

Step 5: Select a Payment Method, fill in your billing details, and click the Continue button.

Step 6: Confirm all the order details and click the Pay Now button to complete your order.

After the payment is confirmed and your order is completed, the domain will be added to your account.
From your Namecheap dashboard, click on the manage button next to your domain name.

Let this sit for now; we’ll return to this domain management page later when setting up hosting for the Ghost Blog.
A Hosting Provider
At the beginning of this article, I mentioned that you could not host Ghost just like WordPress, as they both use a different technology stack.
Unlike WordPress, most traditional hosting companies like Bluehost do not support self-hosted Ghost in their shared hosting plans.
You can still use them for Ghost, but that requires purchasing a VPS, which is pretty expensive for hosting software like Ghost.
Not to mention there’s no guaranteed support; in that case, it would be even better to go with Ghost Pro.
There are, however, Ghost Recommended Hosting Providers, which include companies like:
- Digital Ocean
- Amazon EC2
- Google Cloud
- Linode
- Vultr
- Dreamhost
As you’ve probably noticed, these are all cloud hosting solutions.
Ghost works pretty well with cloud hosting, so it’s what everybody uses; it actually doesn’t matter what cloud hosting provider you go with. You’re good to go as long as you can configure the server to work with Ghost.
I, on the other hand, 100% recommend Digital Ocean. Why?
Because of their Ghost One-Click Application.
You’ll hardly find a cloud hosting solution that offers the one-click installation feature. I even checked out my longtime favorite Linode. They do not have Ghost on their Marketplace for one-click installation, which was a big disappointment.
Digital Ocean is very popular, so finding your way around the platform will be easier compared with other providers.
There are many videos and guides; self-hosting requires you to constantly learn new (easy) things to keep things running, so you might as well go where the crowd is.
Some other hosting providers I found that work with Ghost include; A2 Hosting, DigitalPress. FastComet, and Google Cloud
Again, I still recommend Digital Ocean because it’s the easiest way to self-host Ghost currently.
They give $100 worth of free credits for new accounts, so you’re getting a year of cost taken care of.
Here’s an easy-to-follow step-by-step tutorial on setting up Ghost on Digital Ocean.
Just follow through with the screenshots, and you should be able to pull it off.
1. Register on Digital Ocean
Visit DigitalOcean.com and signup using your email or any other options listed.

I’m using the Email option here, which means I’ll have to verify my email address.

After clicking on the email verification code, you should see this screen.

Click on Explore our control panel, and you should be redirected to the dashboard.
2. Configure Account
Once you’re at the Digital Ocean dashboard, I recommend configuring your Project first.
You see, Digital Ocean works so that you can create different projects and have droplets (installations) assigned to them, just to stay organized.
We only need one Project, and it’s created by default when you register.
I recommend renaming the Project and adding other information, as seen below.

All that’s left in configuring your account is adding a Payment method; you can do that by clicking on the Add a Payment Method link above.


You can add a credit card or PayPal; once you do, your account should become fully activated for droplets.
3. Create Droplet for Ghost
Click on Droplets on the left sidebar, then click on the blue Create Droplet button.

You’ll be presented with a busy interface; first, navigate to the Marketplace tab under the choose an image section and search for Ghost.

After selecting Ghost, leave the Choose a plan CPU section as Basic and CPU options as $7 a month.
The $7 server should be enough to get started, and you can easily upgrade the Droplet with time as your website grows.
For the “Choose a data center region” section, select a country close to your target audience. If your target country is not listed, just choose any US state.
Under the Authentication section, select a password and enter a secure password, as the SSH might be a bit too complicated.
Lastly, under the Select additional options section, select Enable backups if you want backups of your Ghost blog to be created weekly.


Once you’re okay with everything, click on create Droplet, and Digital Ocean should generate a working server for your ghost blog to be installed in.
Since we’re using the Ghost One-Click install from the Marketplace, there’s little to no technical configuration needed.
Digital Ocean will take care of most of the advanced stuff for us.
4. Connect Domain Name to Ghost and Cloudflare CDN

A Content Delivery Network, or CDN for short, is a group of interconnected servers spread across the globe to enable quick content delivery.
When you purchase a server, it will most likely be located in the US or a specific country. Your website will always load way faster for US visitors than for someone staying overseas.
This is because a server’s proximity to your visitor greatly influences how fast they can access it.
Using a CDN like Cloudflare helps solves the latency issue by taking copies of your website files and spreading them across the globe, so instead of your users waiting for a page to be sent from your origin server, they get it from the closest server to their proximity.
Sounds a bit advanced, but in the long run, this will add tremendous speed and performance benefits to your Ghost Blog.
So how do you set up a Cloudflare?
First, visit their website at Cloudflare.com and click the Get Started Free button.

Enter an email address and a password and click Create an Account

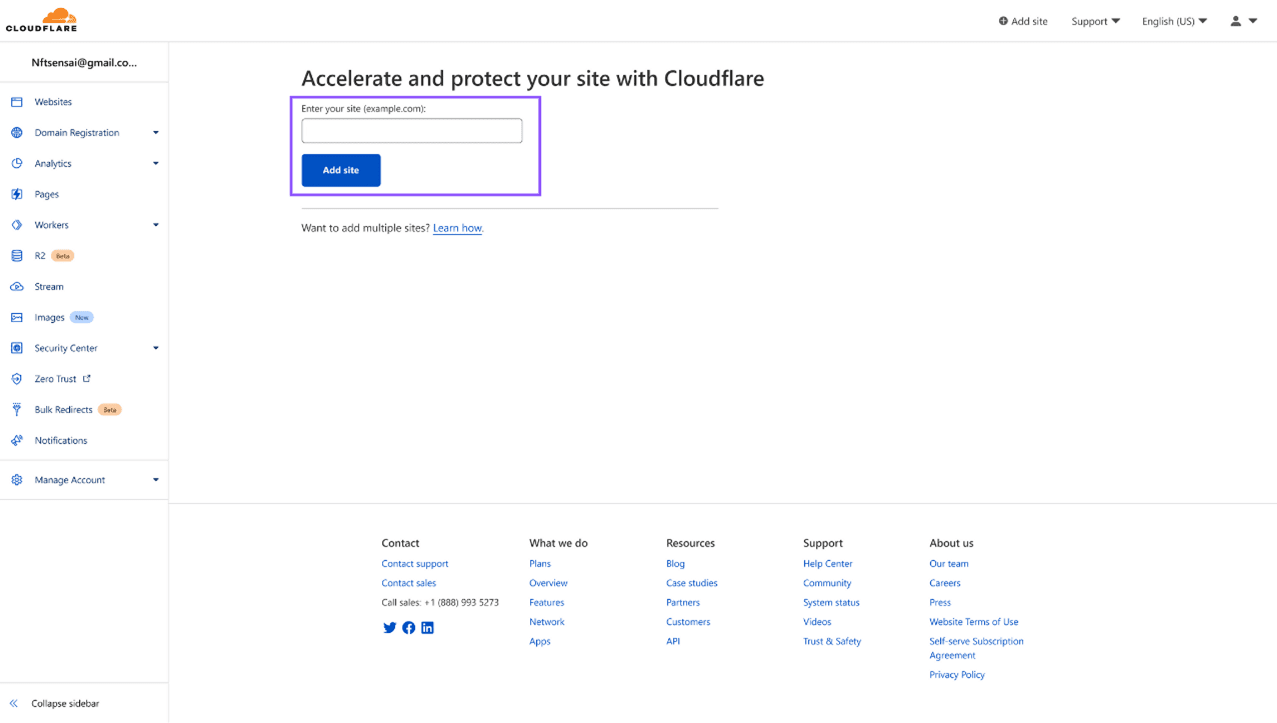
Once you’re at the dashboard, select the first option, Cloudflare – Protect your internet presence. Select Websites from the sidebar and click Add Site.

Enter the Doman name you purchased from Namecheap and click Add Site

Select the Free Plan and click Continue

Cloudflare will then take a minute to scan your domain’s current DNS records and import them, just leave everything as is and click Continue.


For the last step, Cloudflare will ask you to update your domain nameservers to theirs; you can easily do this on Namecheap by logging into your account dashboard, clicking the manage button on the domain, and changing the nameserver option to Custom DNS.

Once you do this, you should be able to add the Cloudflare Nameservers.

Note, it takes a couple of hours for Cloudflare to detect the nameserver change but after they do, proceed back to Cloudflare as there’s still one more thing we need to do.
Make sure your site’s domain is selected on the Cloudflare dashboard and navigate to the DNS page.
Now, you’ll need to change the domain A record IP to that of your Droplet IP Address.

You can easily find your Ghost blog droplet IP address from the Digital Ocean dashboard.

Also, ensure the CNAME www record points to your domain name.
Once you change the records, wait for a couple of hours to allow your new DNS records to propagate worldwide, then proceed with the setup.
5. Setup Ghost Via Console / Terminal
To finalize our Ghost blog installation, we need to access the server from a console.
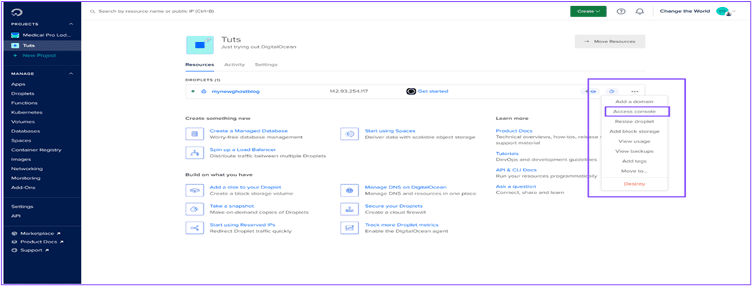
Luckily, Digital Ocean has an inbuilt web-based console that you can access via the drop.
Click on the three-dotted icon to reveal a menu and select Access Console.

On the next page, you should see the Launch Droplet Console button; clicking that will launch a console and automatically log you in as the root user, so there is no need for any passwords.

Once the console is active, Ghost will begin its installation.

You’ll be prompted to press the Enter key on your keyboard, followed by prompts asking for the Domain name and your Email Address (Use the one created on Namecheap).

If you remember, we already pointed our domain to the Droplet in the previous step, so after the console setup, our Ghost blog should be able to access via the domain name.
6. Setup Ghost Admin
After completing the console step, type in your domain name followed by /Ghost (e.g., yourdomain.com/ghost) in a web browser to configure the platform.
You should see an interface like this when you do.

Enter your Blog name, full name, Email Address (Use the Namecheap Private Mail), and a Login Password.

On the next page, you’ll see different starter options like importing existing members or writing your first blog post; skip everything by clicking Explore Ghost Admin.

And Voila, Ghost should be completely set up on your domain and ready for use.
Conclusion
Whether you’re a total newbie or some with experience setting up websites, this article should have walked you through how to set up Ghost in a self-hosted environment.
Setting up Ghost is not that hard, especially after the first time, wand when you think of all the benefits of self-hosting, it makes the entire process worth it.
If you have any questions about this article or Ghost in general, leave a comment below, and I’ll respond as soon as I can.


